background image

15

Picture controls

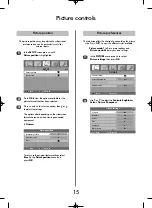
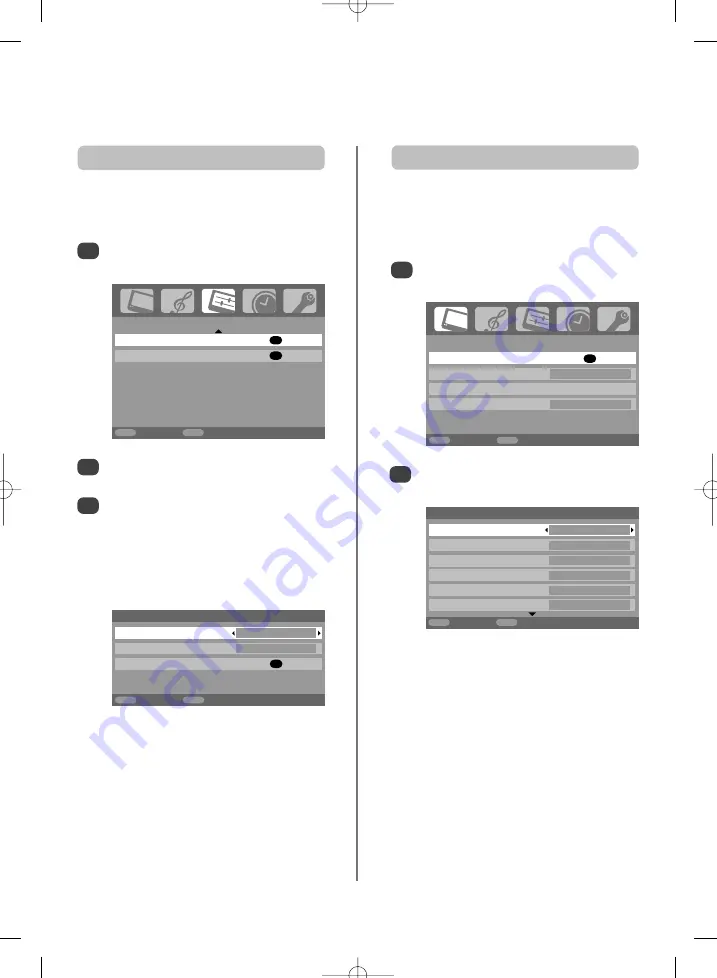
This television offers the choice of personalising the picture

style. Press 

m

to view the different styles available:

Picture mode-1

to 

3

are preset options and 

Picture mode-M

stores your own settings: 

Picture preferences

SET UP                     

Picture position 

OK

Quick Setup 

OK

MENU

Back

EXIT

Watch TV

2/2

To return to the original factory settings select

Reset

in the 

Picture position 

menu and 

press 

OK

Picture position

The picture position may be adjusted to suit personal

preference and can be particularly useful for 

external inputs.

In the 

SET UP 

menu press 

Q

until 

Picture position 

is highlighted.

1

Press 

OK

to view the options available for the

picture format that has been selected.

Press 

P

and 

Q

to select an option, then 

S

or 

R

to adjust the settings.

The options alter depending on the widescreen
format chosen and when viewing connected
equipment.

In 

Cinema

:

2

3

Picture position

Horizontal position

0

Vertical position

0

Reset

OK

MENU

Back

EXIT

Watch TV

PICTURE

Picture settings 

OK

Colour management 

Off

Basic colour adjustment

Cinema mode 

Off

MENU

Back

EXIT

Watch TV

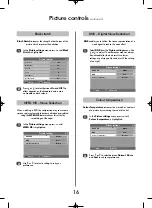
In the 

PICTURE 

menu press 

Q

to select 

Picture settings

, then press 

OK

.

1

Use 

S

or

R

to adjust the 

Contrast

,

Brightness

,

Colour

,

Tint

and 

Sharpness

.

2

Picture settings

Contrast

100

Brightness 50

Colour 50

Tint

0

Sharpness 0

Black stretch 

On

MENU

Back 

EXIT

Watch TV

1/2

g

g

Содержание 42WP56

Страница 1: ...42WP56 Owner s manual TOSHIBA ...

Страница 2: ... boost 12 Sound controls bass treble balance dual stable sound 13 WOW sound effects SRS 3D FOCUS TruBass 13 Widescreen viewing 14 Picture controls picture position picture preferences contrast brightness colour tint sharpness 15 Picture controls black stretch MPEG noise reduction MPEG NR digital noise reduction DNR colour temperature 16 Picture controls colour management base colour adjustment cin...

Страница 3: ...ur dealer ABOVE ALL NEVER let anyone especially children push or hit the screen push anything into holes slots or any other openings in the case NEVER guess or take chances with electrical equipment of any kind it is better to be safe than sorry TO FULLY DISCONNECT THE TELEVISION SWITCH OFF THE MAINS SOCKET AND REMOVE THE POWER PLUG Leave at least 10cm clearance around the television to allow adeq...

Страница 4: ...se Please take note EXCLUSION CLAUSE Toshiba shall under no circumstances be liable for loss and or damage to the product caused by i fire ii earthquake iii accidental damage iv intentional misuse of the product v use of the product in improper conditions vi loss and or damage caused to the product whilst in the possession of a third party vii any damage or loss caused as a result of the owner s f...

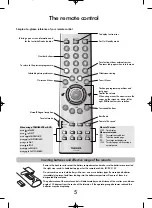
Страница 5: ...e the sound Text control buttons To exit Menus Bass Boost Stereo Bilingual reception To bring up on screen information and for the text initial index function To select input from external sources To access sub pages when in text mode To select mode On screen Menus Selectable picture preferences Widescreen viewing Number buttons To return to the previous programme For On Standby mode To display te...

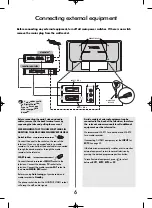
Страница 6: ...ables remove the the back terminal cover by squeezing the tabs and pulling the cover out WE RECOMMEND THAT YOU USE SCART LEADS IN ADDITION TO AERIAL CABLES WHEREVER POSSIBLE Aerial cables Connect the aerial to the socket on the rear of the television If you use a decoder and or a media recorder it is essential that the aerial cable is connected through the decoder and or through the media recorder...

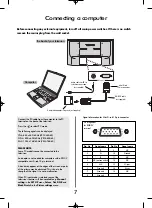
Страница 7: ...00 60 XGA 1024 x 768 60 Hz VESA 768 60 PLEASE NOTE Some PC models cannot be connected to this television An adaptor is not needed for computers with a DOS V compatible mini D sub 15 pin terminal A band may appear at the edges of the screen or parts of the picture may be obscured This is due to the strength of the signal it is not a malfunction When PC input mode is selected some of the television ...

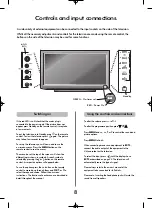
Страница 8: ...ns The functions of each menu are described in detail throughout the manual A wide variety of external equipment can be connected to the input sockets on the side of the television Whilst all the necessary adjustments and controls for the television are made using the remote control the buttons on the side of the television may be used for some functions To alter the volume press j To alter the pr...

Страница 9: ...gnal may be weak so the station order can be changed using Programme sorting which will appear in the Quick setup screen B G Continental Europe I UK D K Eastern Europe L France Use Q or P to move through the list to your preferred position As you do so the other stations will move to make room Press S to store your move Repeat as necessary then press EXIT If the television cannot be connected to a...

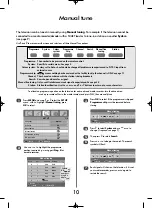
Страница 10: ...from external source Programme skip means nothing has been stored or the facility to skip the channel is ON See page 11 Channel The channel number on which a station is being broadcast Search Search up and down for a signal Manual fine tuning Only used if interference weak signal is experienced See page 25 Station Station identification Use the P or Q and Sor Rbuttons to enter up to seven characte...

Страница 11: ...d press R to move along to Station With P Q S and R put in the required characters e g VCR This television has direct channel entry if the channel numbers are known Select the Manual tuning screen in Step 3 Enter the Programme number the System then C for standard terrestrial channels or S for cable channels and the Channel number Press OK to store 8 At any time by pressing OK a list will appear o...

Страница 12: ...ss To display on screen information i e programme position input mode or stereo mono signal press CALL Selecting programme positions Sound controls If stereo or dual language broadcasts are transmitted the word Stereo or Dual will appear on the screen each time programme positions are changed disappearing after a few seconds If the broadcast is not in stereo the word Mono will appear Stereo Press ...

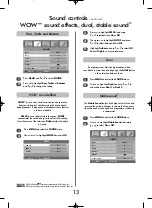
Страница 13: ...ND menu Use P or Q to highlight WOW then press OK 3 4 5 Press Q to highlight SRS 3D and using S or Rselect between On or Off Then press Q to highlight FOCUS and press S or Rto select between On or Off Highlight TruBass and use S or Rto select Off Low or High to suit your preference 1 2 Press MENU and select the SOUND menu Use Q to highlight Stable Sound then press S or Rto select On or Off Dual If...

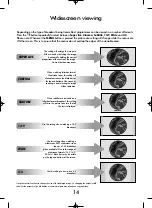
Страница 14: ...format films video tapes this setting will eliminate or reduce the black bars at the top and bottom of the screen by zooming in and selecting the image without distortion When subtitles are included on a letterbox format broadcast this setting will raise the picture to ensure that all the text is displayed SUBTITLE 14 9 Use this setting when watching a 14 9 broadcast Use this setting when watching...

Страница 15: ...til Picture position is highlighted 1 Press OK to view the options available for the picture format that has been selected Press P and Q to select an option then S or R to adjust the settings The options alter depending on the widescreen format chosen and when viewing connected equipment In Cinema 2 3 Picture position Horizontal position 0 Vertical position 0 Reset OK MENU Back EXIT Watch TV PICTU...

Страница 16: ...es you to soften thescreen representation of a weak signal to reduce the noise effect DNR Digital Noise Reduction Select DNR from the Picture settings menu Use S or R to adjust The differences may not always be noticeable for the best result use lower settings as picture quality can be lost if the setting is too high 1 When watching a DVD the compression may cause some words or picture elements to...

Страница 17: ...urs to suit personal preference This can be useful when using an external source Base colour adjustment PICTURE Picture settings OK Colour management On Basic colour adjustment OK Cinema mode Off MENU Back EXIT Watch TV To return to the original factory settings select Reset and press OK Base colour adjustment Hue Saturation Red 2 6 Green 0 0 Blue 0 0 Yellow 0 0 Magenta 0 0 Cyan 0 0 Reset OK MENU ...

Страница 18: ... screen continuously in minute increments to minimise retention of stationary images Picture shift Automatic format Widescreen When this television receives a true Widescreen picture and Auto format is On it will automatically be displayed in Widescreen format irrespective of the television s previous setting Press MENU and S or R to select the FUNCTION menu 1 Press Q to highlight Auto format then...

Страница 19: ...cture Inverse Select Long life from the FUNCTION menu then press Q to select White pattern 1 Press OK the picture showing on the screen will be replaced with a white screen The screen will return to normal when EXIT is pressed 2 White pattern The Side Panel feature lightens or darkens the band each side of the screen when in 4 3 or 14 9 format This helps prevent image retention of the band and can...

Страница 20: ...xample to switch the television off in one and a half hours enter 01 30 or press R to increase decrease in steps of 10 minutes If setting the Sleep timer press EXIT to finish If setting the On timer press Q to select On timer Position enter the programme position number required then press ito put the television into Standby The GREEN On timer indicator on the front of the television will now be l...

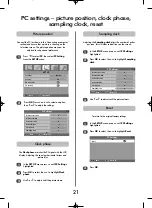
Страница 21: ...ing a computer section and ensure that a picture is showing on the television screen The picture position may now be adjusted to suit personal preference Press Bto select PC then select PC Setting from the SET UP menu 1 Press OK Press P and Q to select an option then S or R to adjust the settings 2 3 Press OK In the SET UP menu press Q until PC Setting is highlighted Press OK to select then Q to h...

Страница 22: ...t selection 1 2 Press Bto select B1 B2 B3 EXT1 3 or PC PC displays a computer connected to Input RGB PC on the back of the television To return to television mode press Bagain or one of the numbered buttons This specifies the type of signal going into SCART 2 EXT2 on the back of the television Please refer to the manufacturers instructions for the connected equipment In the SET UP menu press Q unt...

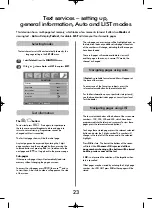
Страница 23: ...e accessed by entering the 3 digit page number using the numbered buttons pressing the coloured buttons or pressing P f P to advance to the next page and P e Q to go back to the previous page Sub pages If there are sub pages they will automatically load into memory without changing the page on screen To access the sub pages press X B then use P and Q to view them A bar with numbers will appear on ...

Страница 24: ...t to hold a page of text Press q and qwill appear in the top left of the screen The page will be held on screen until the button is pressed again To hold a wanted page q To discover the solutions on quiz and joke pages press the rbutton To reveal concealed text r To select a page whilst viewing a normal page 8 9 Press sonce to enlarge the top half of the page press again to enlarge the bottom half...

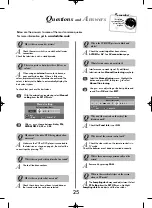
Страница 25: ...colour system To check that you have the best colour There is a picture but why is there little or no colour Q With the external source playing select Manual setting from the SET UP menu With P or Q choose between Auto PAL SECAM NTSC 4 43 or 3 58 1 2 For television operation queries please ring the helpline Remember Questions and Answers 25 Select the Manual tuning menu Highlight the station and p...

Страница 26: ...SC source is played Q Set the Colour to Auto and exit Go to the Picture settings menu and adjust the tint 1 2 Manual setting Colour system Auto EXT2 A V C R OK Store MENU Back EXIT Watch TV A The Clock phase may need adjustment Select PC Setting from the SET UP menu highlight Clock phase and adjust until the picture clears Why are there horizontal stripes and or blurred images on the screen when i...

Страница 27: ...27 Notes For your own records ...

Страница 28: ... Admiralty Way Camberley Surrey GU15 3DT UK Specification is subject to change without notice Originated by Kensa Creative Solutions Saltash Cornwall Toshiba Information Systems U K Limited All rights reserved Reproduction in whole or part without written permission is strictly prohibited Printed on recycled paper 100 Chlorine free Programme Positions 100 Stereo Nicam 2 carrier system Visible Scre...

Отзывы: