background image

26

INPUT DISPLAY

Note:

If you forget your password, press DISPLAY
four times within five seconds while the TV is
in password entering mode. This allows you
to reset your password.

Using the LOCKS menu

The LOCKS menu includes the CH LOCK, VIDEO LOCK, GAME
TIMER, PANEL LOCK and NEW PASSWORD functions.

Selecting a password

You can use these functions after entering the correct password.

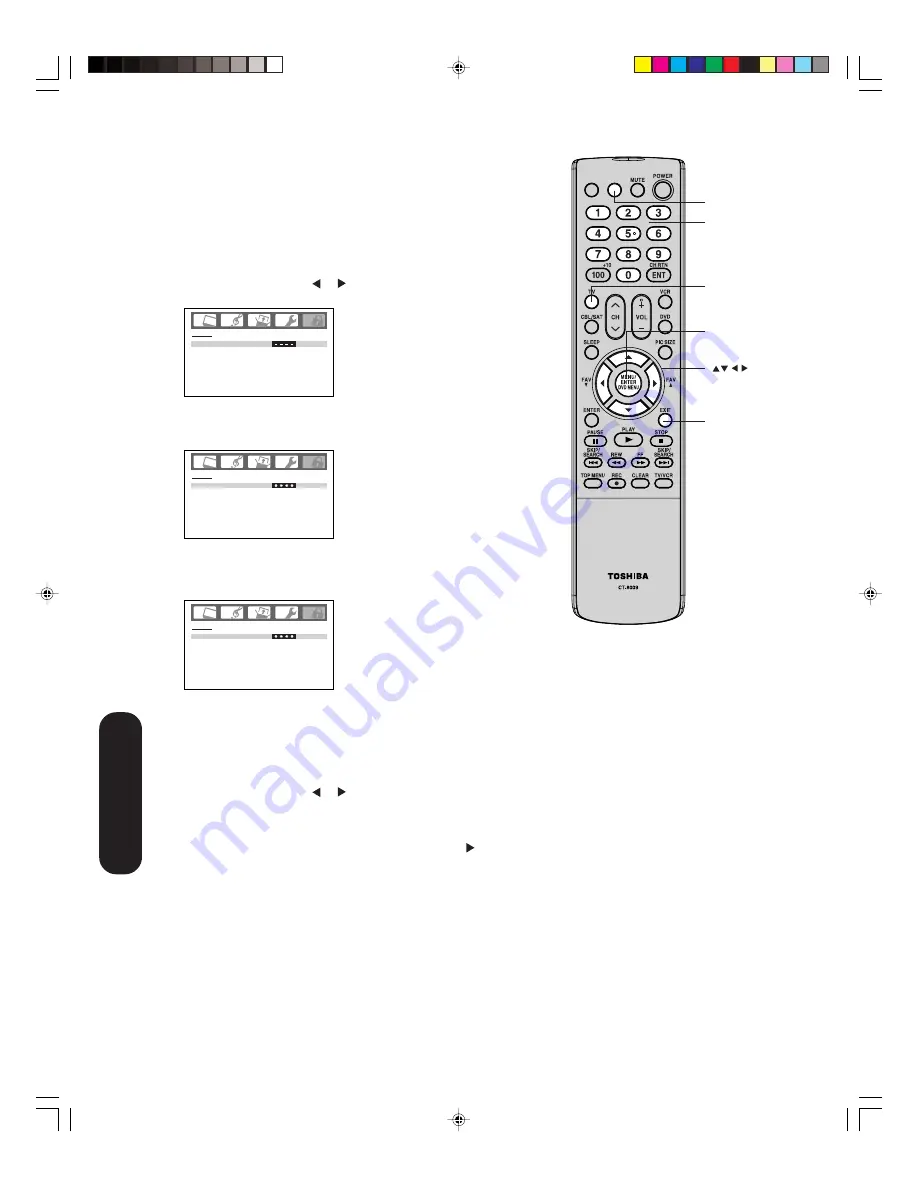
To select your password and access the LOCKS menu:

1. Press TV to select the TV mode.
2. Press MENU, then press   or   to highlight the LOCKS menu.
3. Press 

 or 

 to display the password entering mode.

4. Use the Channel Number buttons (0-9) to enter your password.

If you are accessing the LOCKS menu for the first time, select a
four-digit number to be your password. Press ENTER.

5. Enter the password again to confirm it, and then press ENTER.

The LOCKS menu appears.
If the wrong password is entered, “ERROR” blinks about 4
seconds.

6. You may now set up the LOCKS menu. See “Locking channels”

(page 27),  “Locking the video inputs” (page 27), “Setting the
GameTimer

TM

” (page 28) or “Using the panel lock feature”

(page 28).

To change your password:

1. Press TV to select the TV mode.
2. Press MENU, then press   or   to display the LOCKS menu.
3. Press 

 or 

 to display the password entering mode.

4. Use the Channel Number buttons (0-9) to enter your password.

Press ENTER. The LOCKS menu appears.

5. Press 

 or 

 to highlight NEW PASSWORD and press   to

display the NEW PASSWORD menu.

6. Use the Channel Number buttons (0-9) to enter a new code. Press

ENTER.

7. Enter the password again to confirm it, and then press ENTER.
8. Press EXIT to return to normal viewing.

Menu/Enter

Channel
Numbers

Display

Exit

Note:

If the remote control does not operate your TV,
press the “TV” button on the remote control
and try again.

TV

L O C K S

N E W   PA S S W O R D


[ 0 - 9 ] : S E L E C T                                 E N T E R : S E T


                                                                            E X I T: E N D

L O C K S

N E W   PA S S W O R D


[ 0 - 9 ] : S E L E C T                                 E N T E R : S E T


                                                                            E X I T: E N D

L O C K S

C O N F I R M   PA S S W O R D


[ 0 - 9 ] : S E L E C T                                 E N T E R : S E T


                                                                            E X I T: E N D

Using the 

TV’

s Features

 30A0121A_En_p26-30

5/26/06, 6:25 PM

26

Содержание 42HP86

Страница 1: ...42HP86 50HP86 Plasma Television Introduction Connecting your TV Setting up your TV Using the TV s Features Appendix 30A0121A_En_cov 5 26 06 6 24 PM 1 ...

Страница 2: ...htning flash with arrowhead symbol within an equilateral triangle is intended to alert the user to the presence of uninsulated dangerous voltage within the product s enclosure that may be of sufficient magnitude to constitute a risk of electric shock to persons The exclamation point within an equilateral triangle is intended to alert the user to the presence of important operating and maintenance ...

Страница 3: ... not use this apparatus near water 6 Clean only with dry cloth 7 Do not block any ventilation openings Install in accordance with the manufacturer s instructions 8 Do not install near any heat sources such as radiators heat registers stoves or other apparatus including amplifiers that produce heat 9 Do not defeat the safety purpose of the polarized or grounding type plug A polarized plug has two b...

Страница 4: ...nufacturer Upon completion of service ask the service technician to perform routine safety checks to determine that the TV is in safe operating condition 37 When the TV reaches the end of its useful life ask a qualified service technician to properly dispose of the TV Installation cont from previous page 26 Always make sure the antenna system is properly grounded to provide adequate protection aga...

Страница 5: ...may be susceptible to permanent ghost images also known as phosphor burn in under certain circumstances Certain operating conditions may accelerate the potential for phosphor burn in including but not limited to the following Displaying fixed non moving images including but not limited to PIP POP windows closed captions video game patterns TV station logos stock tickers and websites Displaying spe...

Страница 6: ...gs 25 Switching between two channels 25 Programming your favorite channels 25 Using the LOCKS menu 26 Selecting a password 26 Locking channels 27 Locking the video inputs 27 Setting the GameTimerTM 28 Using the panel lock feature 28 Labeling channels 29 Selecting the video input source 30 Labeling the video input sources 30 Setting the clock 30 Setting the ON timer 31 Setting the sleep timer 31 Vi...

Страница 7: ...right side panel When a menu is open to select the desired setting you can use either the arrow buttons on the remote control or the CHANNEL and VOLUME buttons on the right side panel Introduction Remote sensor Power indicator Right side panel VIDEO 3 IN CHANNEL VOLUME INPUT POWER Remote control INPUT DISPLAY Features of your new TV The following are some of the exciting features of your new Toshi...

Страница 8: ...ear panel of the TV you will see that the terminals are color coded in the same manner as the cables S video cables provide better picture performance than standard video cables S video cables can only be used with S video compatible components Component video cables provide better picture performance than S video cables Component video cables can only be used with component video compatible compo...

Страница 9: ...r box you may wish to use a two set signal splitter sometimes called a two set coupler and an A B Switch box from the cable installer or an electronics supply store Follow the connections shown below With the switch in the B position you can directly tune any nonscrambled channels on your TV With the switch in the A position tune your TV to the output of the Converter Descrambler box usually chann...

Страница 10: ...e receiver make the audio connections but remove the standard video cable Do not connect both an S video and a standard video cable to VIDEO 1 or VIDEO 2 at the same time or the picture performance will be unacceptable DVD player Satellite Receiver Stereo VCR TV back panel The unauthorized recording use distribu tion or revision of television programs videotapes DVDs and other materials is prohibi...

Страница 11: ... can greatly enhance picture quality and performance DVD player with Component video Stereo VCR Note You can connect the component video cables to either set of ColorStream jacks on the TV HD 1 or HD 2 The ColorStream HD 1 and HD 2 jacks can be used with Progressive 480p 720p and Interlaced 480i 1080i scan systems A 1080i signal will provide the best picture performance The unauthorized recording ...

Страница 12: ...es Note You can connect the component video cables to either set of ColorStream jacks on the TV HD 1 or HD 2 The ColorStream HD 1 and HD 2 jacks and HDMI 1 and HDMI 2 jacks can be used with Progressive 480p 720p and Interlaced 480i 1080i scan systems If your DTV receiver does not have compo nent video use the S video and standard audio connections instead Do not connect both an S video and a stand...

Страница 13: ...ndard audio cables VHS Camcorder Note For better picture quality if your camcorder has S video you can use an S video cable plus the standard audio cables instead of a standard video cable Do not connect both a standard video cable and an S video cable at the same time or the picture performance will be unacceptable You will need one set of standard AV cables TV right side panel S VHS Camcorder Co...

Страница 14: ...igital video from an HDMI source device or uncompressed digital video from a DVI Digital Video Interface source device This inputs are designed to accept HDCP High Bandwidth Digital Content Protection program material in digital form from EIA CEA 861 861B compliant consumer electronic devices such as a set top box or DVD player with HDMI or DVI output The HDMI inputs are designed for best performa...

Страница 15: ...st the sound level To control the audio Turn on the TV and the stereo amplifier Turn off the TV s built in speakers see Turning off the built in speakers on page 41 Note To hear sound when using an external audio amplifier the volume of both the TV and the amplifier must be set to a reasonable listening level TV back panel Analog audio amplifier You will need one pair of standard audio cables 30A0...

Страница 16: ...TV and press the button for the desired function The signal passes from the remote control through the TV to the device via the IR blaster cable You will need one IR blaster IR emitter cable 3 5mm mono mini plug other audio video cables as required to connect the device s to the TV see pages 7 15 TV back panel Front of IR controlled device Infrared sensor IR blaster cable wand approx 1 inch from d...

Страница 17: ...e TV see page 44 Note Make sure to insert the plug of each cord securely WARNING Do not connect this unit to power using any other power cord This could cause fire electric shock or damage Do not use with a voltage other than the power voltage displayed This could cause fire electric shock or damage CAUTION When this unit is not used for a long time e g if you are away on a trip in the interest of...

Страница 18: ...ate your other devices on the next page The buttons shown at right will control the cable TV converter satellite receiver Press CBL SAT first Power CH RTN Channel Return Channel Numbers Input TV Pic Size TV Channel Volume TV TV VCR Power CH RTN Channel Return Channel Numbers Input TV Pic Size TV Channel Volume TV VCR controls Mute TV CBL SAT VCR Note The TV remote control may not operate your VCR ...

Страница 19: ...player and press POWER to test the code If the device responds you entered the correct code If the device does not respond repeat steps 1 4 using another code 5 Press TV to control the TV For future reference write down the codes you used Cable TV converter satellite receiver code _____________________ VCR code ______________________________________________ DVD player code ________________________...

Страница 20: ... Funai Garrard GE Go Video Goldstar Gradiente Harman Kardon Hitachi JBL JC Penney Jensen JVC Kenwood Kodak LG Lloyds Logik LXI Magnasonic Magnavox 004 041 018 073 018 001 002 009 040 042 048 056 056 059 061 081 005 010 014 054 056 065 067 018 065 005 024 025 035 037 042 063 070 080 076 005 006 007 008 009 010 023 024 025 026 035 056 061 063 065 024 025 037 005 006 007 014 037 043 062 063 068 082 0...

Страница 21: ...25 031 035 049 051 056 057 060 065 066 079 073 018 005 006 007 014 037 053 004 032 034 041 047 069 086 Brand Code Code Brand Code TV VCR Combo Brand Action GE Goldstar Panasonic 078 059 062 065 065 078 065 079 074 Precision Quasar Realistic Sony Toshiba Zenith Totevision 057 065 009 010 065 Brand Code Brand Code Portable DVD Brand Code Aiwa Audiovox 093 094 095 024 096 099 Panasonic RCA 098 Brand ...

Страница 22: ...nnels page 25 EXIT closes on screen menus page 23 DVD MENU accesses the DVD menu PAUSE pauses a videotape DVD PLAY plays a videotape DVD STOP stops a videotape DVD DVD SKIP SEARCH skips DVD chapter REW rewinds reverses a videotape DVD FF fast forwards a videotape DVD TOP MENU accesses the DVD TOP menu REC starts recording a videotape CLEAR clears input data in DVD mode TV VCR toggles between TV an...

Страница 23: ...een menus You can access the menu system with the buttons on the remote control When you make a menu selection your changes are immediate You do not have to press MENU or EXIT to see your changes If you do not make a selection Your changes will still be saved When you have finished programming the menus press EXIT Changing the on screen display language You can choose from three different language...

Страница 24: ... channel programming is complete the message COMPLETED appears 8 Press CH or to view the programmed channels Adding and erasing channels manually After you have programmed the channels automatically you can add or erase specific channels manually To add or erase channels manually 1 Press TV to select the TV mode 2 Select the channel you want to add or erase If you are adding a channel you must sel...

Страница 25: ...s or to highlight FAVORITE CH 5 Press to display the FAVORITE CH menu SET CLEAR will be highlighted 6 Press or to highlight SET and press ENTER 7 Press EXIT to return to normal viewing 8 Repeat steps 1 7 for up to 12 channel To select your favorite channels Press the FAV buttons on the remote control to select your favorite channels The FAV buttons will not work until you have programmed one of mo...

Страница 26: ... blinks about 4 seconds 6 You may now set up the LOCKS menu See Locking channels page 27 Locking the video inputs page 27 Setting the GameTimerTM page 28 or Using the panel lock feature page 28 To change your password 1 Press TV to select the TV mode 2 Press MENU then press or to display the LOCKS menu 3 Press or to display the password entering mode 4 Use the Channel Number buttons 0 9 to enter y...

Страница 27: ...ing You can choose to lock up to six TV channels and six cable channels 1 Press TV to select the TV mode 2 Use the Channel Number buttons 0 9 and 100 to display the television channel you wish to lock 3 Press MENU then press or to display the LOCKS menu 4 Press or to display the password entering mode 5 Use the Channel Number buttons 0 9 to enter your password then press ENTER The LOCKS menu appea...

Страница 28: ...u can automatically activate the VIDEO LOCK feature VIDEO setting to set a time limit for playing a video game 30 60 90 or 120 minutes To set up the GameTimer 1 Press TV to select the TV mode 2 Press MENU then press or to display the LOCKS menu 3 Press or to display the password entering mode 4 Use the Channel Number buttons 0 9 to enter your password then press ENTER The LOCKS menu appears 5 Pres...

Страница 29: ...s Channel labels appear above the on screen channel number display each time you turn on the TV select a channel or press the DISPLAY button You can choose any four characters to create a channel label To create channel labels 1 Press TV to select the TV mode 2 Select a channel you want to label 3 Press MENU then press or until the OPTION menu appears 4 Press or to highlight CH LABEL 5 Press to di...

Страница 30: ...ideo cassette recorder DVD DVD video DTV Digital TV set top box SAT Satellite box CBL Cable box HD HDMI device To label the video input sources 1 Press TV to select the TV mode 2 Press MENU then press or to display the OPTION menu 3 Press or to highlight VIDEO LABEL 4 Press to display the VIDEO LABEL menu 5 Press or to highlight the video source you want to label 6 Press or to select the desired l...

Страница 31: ...to select ONCE or DAILY then press ENTER 9 Press EXIT to return to normal viewing To cancel the on timer Select CLEAR in step 8 above Setting the sleep timer You can use the sleep timer to automatically turn off the TV at a set time To set the sleep timer Repeatedly press SLEEP on the remote control to set the length of time until the TV turns off The clock will increase 10 minutes for each press ...

Страница 32: ... remains close to its original proportion but the left and right edges are stretched wider to fill the screen The top and bottom edges of the picture may be hidden however this mode cannot be scrolled The picture size illustrations are examples only The format of the image in any of the picture sizes will vary depending on the format of the signal you are currently watching TheaterWide 1 picture s...

Страница 33: ... PIP POP windows closed captions video game patterns TV station logos stock tickers websites and special formats that do not use the entire screen can become permanently ingrained in the Plasma display and cause subtle but permanent ghost images This type of damage is NOT COVERED BYYOUR WARRANTY A B C D E F G A B C D E F G A B C D E F G Using these functions to change the picture size i e changing...

Страница 34: ...Wide 3 only The scroll amounts are as follows 480i 480p signal source Wide 1 Not adjustable Wide 2 10 to 20 Wide 3 10 to 10 5 Press or to adjust the vertical position of the picture Normal center position To raise the picture press To lower the picture press SCROLL ADJUSTMENT 0 ADJUST SCROLL ADJUSTMENT 0 ADJUST SCROLL ADJUSTMENT 20 ADJUST SCROLL ADJUSTMENT 10 ADJUST INPUT DISPLAY Pic Size Menu Ent...

Страница 35: ...DE to FILM To set the CINEMA MODE to FILM 1 Press TV to select the TV mode 2 Press MENU then press or until the SETUP menu appears 3 Press or to highlight CINEMA MODE 4 Press or to highlight FILM 5 Press EXIT to return to normal viewing To set the CINEMA MODE to VIDEO off Highlight VIDEO in step 4 above Using the ASPECT feature When the ASPECT feature is set to ON and the TV receives a 480i signal...

Страница 36: ...ext is not available in your viewing area a black rectangle may appear on screen If this happens set the Closed Caption feature to OFF 6 Press EXIT to return to normal viewing To turn off the Closed Caption feature Select OFF in step 5 above Note A closed caption signal may not be decoded in the following situations when a video tape has been dubbed when the signal reception is weak when the signa...

Страница 37: ... screen Note To reduce the risk of phosphor burn in the default setting for the Picture shift function is ON 1 Press TV to select the TV mode 2 Press MENU then press or to display the SETUP menu 3 Press or to highlight PICTURE SHIFT then press or to highlight ON Side panel color The gray level feature will set the sidebar to two different levels of darkness Sidebars are the blanks spaces on either...

Страница 38: ...d in the following table To select the picture mode 1 Press TV to select the TV mode 2 Press MENU then press or to display the PICTURE menu 3 Press or to highlight MODE 4 Press or to highlight the mode you prefer 5 Press EXIT to return to normal viewing Mode Picture Quality SPORTS Bright and dynamic picture factory set STANDARD Standard picture quality factory set MOVIE Movie like picture setting ...

Страница 39: ...ss MENU then press or to display the PICTURE menu 3 Press or to highlight RESET and then press Mode Picture Quality COOL Blueish MEDIUM Neutral WARM Reddish Using the CableClear feature CableClear reduces visible interference in your TV picture This is useful when receiving a broadcast with a weak signal especially a Cable channel or playing a video cassette or disc damaged by repeated use To turn...

Страница 40: ...normal viewing Adjusting the sound quality You can change the sound quality of your TV by adjusting the bass treble and balance To adjust the sound quality 1 Press TV to select the TV mode 2 Press MENU then press or to display the AUDIO menu 3 Press or to highlight the item you want to adjust 4 Press or to adjust the level makes the sound quality weaker or increases the balance in the left channel...

Страница 41: ...l viewing To turn off the StableSound feature Highlight OFF in step 4 above AUDIO MTS STEREO BASS 25 TREBLE 25 BALANCE 0 STABLE SOUND ON OFF SPEAKERS ON SELECT ADJUST Turning off the built in speakers Use this feature to turn off the TV speakers when you connect an audio system see Connecting an analog audio system on page 15 To turn off the built in speakers 1 Press TV to select the TV mode 2 Pre...

Страница 42: ...nect an HDMI device and play media with digital audio output to hear digital audio set the HDMI audio input setting to HDMI with this connection If you connect an HDMI device but play media with analog audio output for example certain CDVs do not output digital audio to hear audio you must also connect the analog audio cables to the HDMI audio IN jacks see page 14 Set the HDMI audio input setting ...

Страница 43: ...AP second audio program audio status On timer Sleep timer Game Timer if set Picture size Picture format STEREO SAP ON TIMER 12 00AM SLEEP TIMER 2h00m GAME TIMER ANT ABCD NATURAL CABLE 480i CLOCK 12 00AM 7 30m INPUT DISPLAY Note If the remote control does not operate your TV press the TV button on the remote control and try again Note Channel status will display on the screen for approx 4 seconds D...

Страница 44: ... then press PICTURE menu settings BRIGHTNESS Adjust the brightness of the PC Monitor screen CONTRAST Adjust the contrast of the PC Monitor screen HOR POSITION To adjust the horizontal position of the image on the PC Monitor screen Each video standard will require a different value for this setting VER POSITION Adjust the vertical position of the image on the PC Monitor screen Each video standard w...

Страница 45: ...y be in SAP mode Select STR or MONO in the MTS menu Poor sound picture OK The station may have broadcast difficulties Try another channel The MTS feature may be in SAP mode Select STR or MONO in the MTS menu Poor picture sound OK Check the antenna connections The station may have broadcast difficulties Try another channel Adjust the PICTURE menu Picture and sound are out of sync As with all produc...

Страница 46: ...irectional outdoor antenna Poor color or no color The station may have broadcast difficulties Try another channel Adjust the TINT and or COLOR in the PICTURE menu No stereo or SAP sound from a Make sure the MTS feature in the AUDIO menu is set properly known MTS broadcast The remote control does not operate Make sure the TV CBL SAT VCR DVD mode is set properly on the remote control Remove all obst...

Страница 47: ...ls S VIDEO INPUT Y INPUT 1V p p 75 ohm negative sync Mini DIN 4 pin x 3 C INPUT 0 286V p p burst signal 75 ohm VIDEO AUDIO INPUT VIDEO 1V p p 75 ohm negative sync pin jack x 3 AUDIO 300 mV rms 60 modulation equivalent 35k ohm pin jack L R x 6 ColorStream component video HD INPUT Y 1V p p 75 ohm PR 0 7V p p 75 ohm PB 0 7V p p 75 ohm VIDEO AUDIO OUTPUT VIDEO 1V p p 75 ohm negative sync pin jack x 1 ...

Страница 48: ...hip as limited above and do no extend to a Service repairs or replacement made necessary by accident misuse abuse moisture liquids dust dirt neglect accident damage 24 7 applications improper installation improper operation improper cleaning improper maintenance normal wear and tear screen burn caused by prolonged display of static images and or phosphor aging or any other external cause or event ...

Страница 49: ... dispute controversy or disagreement of any other person may be joined or combined with any Dispute by you without the prior written consent of TCL Critical Applications The Product you have purchased is not designed for any critical applications Critical applications means life support systems medical applications connections to implanted medical devices commercial transportation nuclear faciliti...

Страница 50: ...erica Consumer Products L L C PRINTED IN THAILAND TEL 905 470 5400 Service Centers TORONTO 191 McNABB STREET MARKHAM ONTARIO L3R 8H2 CANADA TEL 905 470 5400 MONTREAL 18050 TRANS CANADA KIRKLAND QUEBEC H9J 4A1 CANADA TEL 514 390 7766 VANCOUVER 13551 COMMERCE PARKWAY SUITE 110 RICHMOND B C V6V 2L1 CANADA TEL 604 303 2500 30A0121A_En_p45 bc 5 26 06 6 26 PM 50 ...

Отзывы: