8
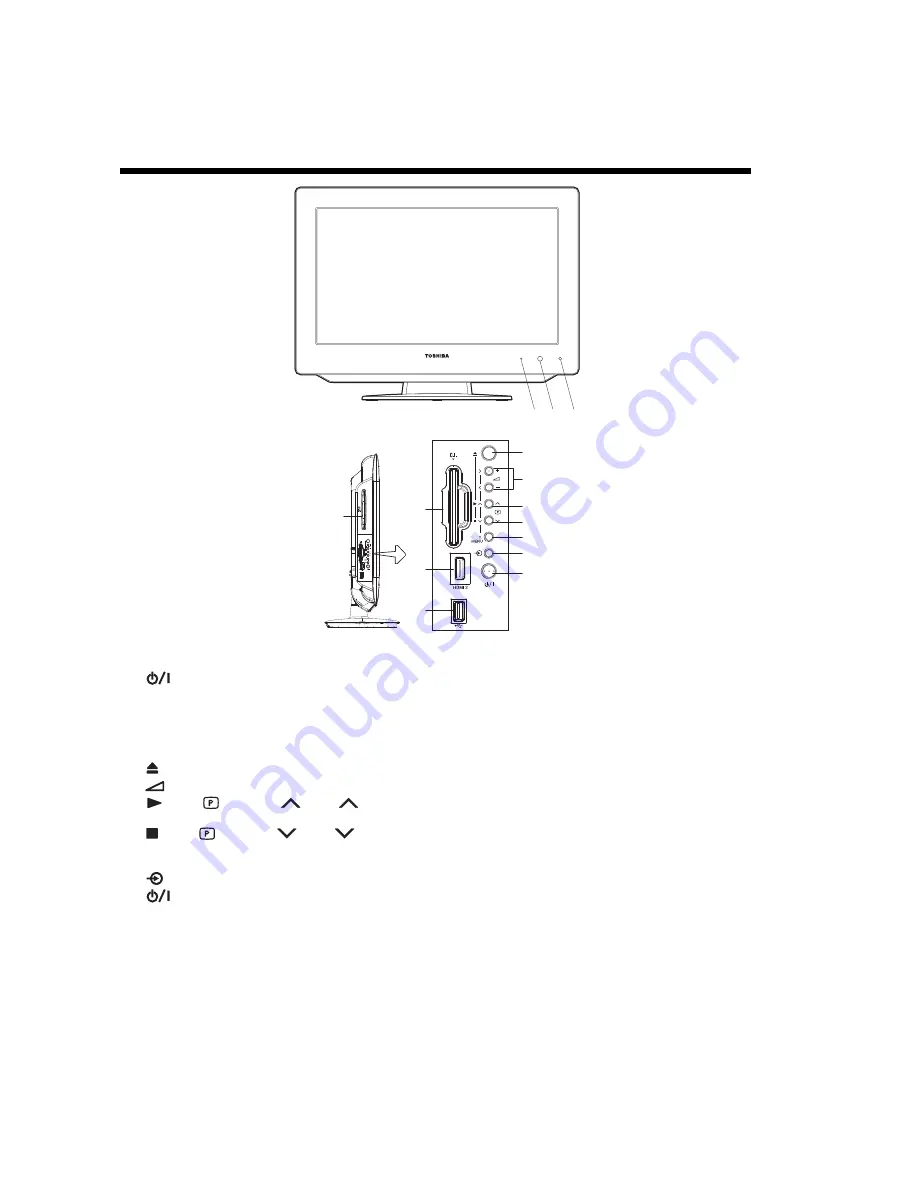
Location of controls
Description of indicators and controls
1.
POWER indicator:
The Power indicator lights red in standby mode, orange in standby mode when the timer is
activated, and green when TV is powered on.
2.
Remote sensor
3.
Auto Brightness Sensor:
This sensor will detect the ambient light conditions to optimise the backlighting level (see page
13).
4.
Disc slot:
Load the disc into the disc slot to view or listen.
5.
EJECT:
Press to eject a disc.
6.
/ -:
Press to adjust the volume level. In Menu: Setting.
7.
PLAY
/
CHANNEL :
Press
to change to a higher numbered channel set into memory.
In DVD mode: Playback. In Menu: Functions as up menu navigation button. In Standby mode: Turn the TV on.
8.
STOP
/
CHANNEL :
Press
to change to a lower numbered channel set into memory.
In DVD mode: Stop. In Menu: Functions as down menu navigation button. In Standby mode: Turn the TV on.
9.
MENU:
Press to access the menu system.
10.
INPUT/ENTER:
Select video input source. In Menu: Use as an
ENTER
button to confirm selection.
11.
POWER button:
Connect the supplied AC power cord to 220-240V/50 Hz AC outlet, and then press the button to
turn the TV on and off.
12. C.I. slot:
The Common Interface allows you to insert CAM (Conditional Access Module) and a suitable Smart Card to give
you access to additional Pay-TV services (see page 47). Before inserting the module, make sure to turn off the mains
power and then insert the module all the way into the slot until it is flushed with the side panel buttons.
13. HDMI 2 input:
High-Definition Multimedia Interface (
HDMI 2
) input receives digital audio and uncompressed digital video
from an HDMI device or uncompressed digital video from a DVI device. HDMI connection is necessary to receive 1080p
signals (see pages 77-79).
14. USB terminal:
For use when inserting a USB device.
1 2 3
12
13
14
11
10
9
8
7
6
5
4


