background image

30

Connecting your TV

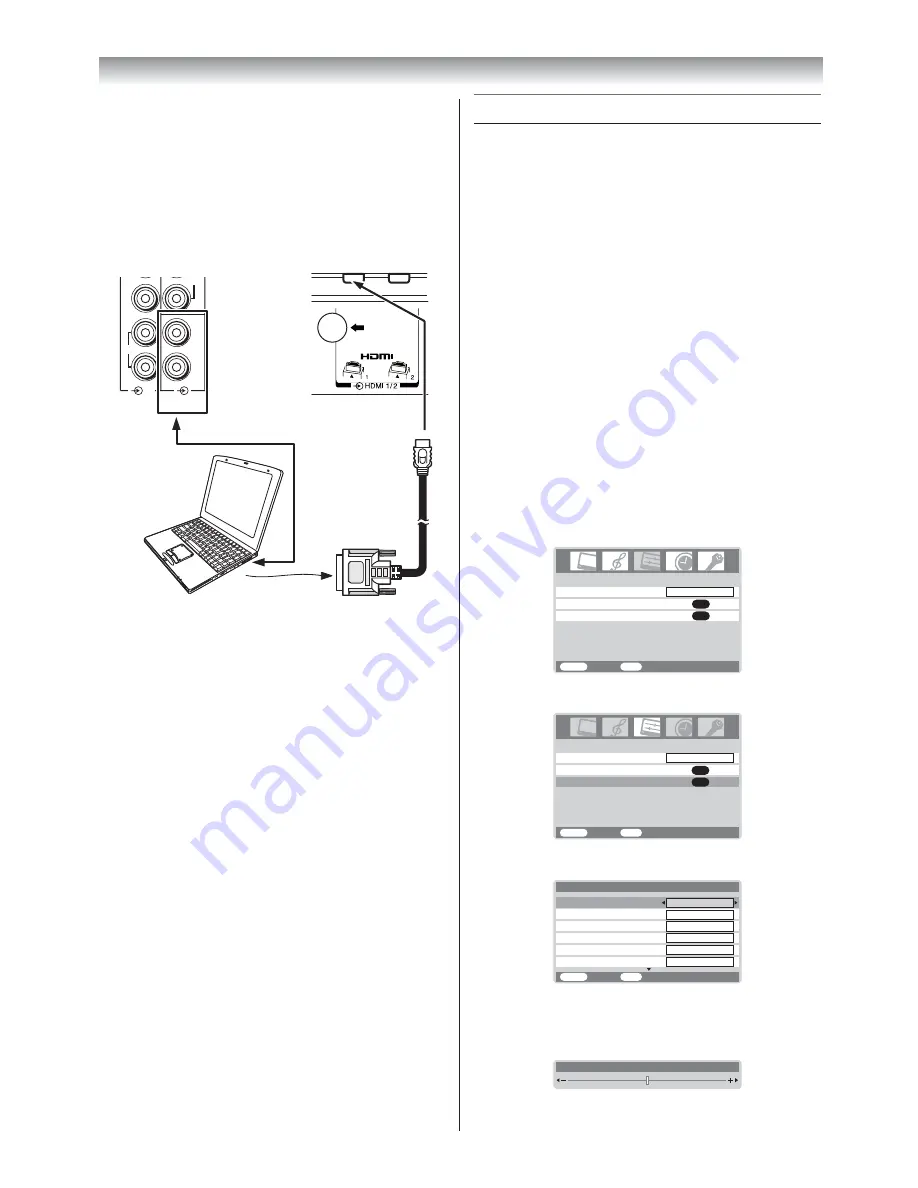
To connect a PC to the HDMI terminal on the 
TV:

When connecting a PC to the HDMI terminal on 
the TV, use an HDMI-to DVI adapter cable and 
analog audio cables.
If connecting a PC with an HDMI terminal, use 
an HDMI cable (type A connector). Separate 
analog cables are not necessary.

TV back view

TV back view

Co

m

puter

Audio cable
for PC-to-TV
connection

COMPONENT

VIDEO INPUT

PC/HDMI1

(AUDIO)

P

R

/C

R

R

R

R

L

L/MONO

AUDIO

AUDIO

(3)

The HDMI input can accept and display VGA, 
480i, 480p, 576i, 576p, 720p (50Hz/60Hz), 1080i, 
and 1080p signal formats.

Notes:

•  The edges of the images may be hidden.
•  If receiving a 720p, 1080i, or 1080p signal 

program, PC mode scales the video to display 
the entire picture within the borders of the 
screen (e.g. no overscanning) (

-

 page 17).

Using the PC setting

•  In the PC input mode, you cannot select the 

Color

Tint

Sharpness

Black stretch

MPEG 

NR

 and 

DNR

 in the 

Picture setting

 menu, 

3D 

Color management

Base color adjustment

Active Backlight Control

 and 

Cinema mode


(

-

 page 18, 19).

•  In the PC input mode, the 

Manual setting


(

-

 page 23) is not displayed.

• First press 

o

 until the video input mode list 

appears on the screen, then press 

u

 or 

U

 and 

Q

 in order to select the PC input mode (

-


page 23).

•  This function may not be available for some 

signal or if no signal is received.

•  The optimum points of the clock phase 

and sampling clock adjustments may be 
incomprehensible according to the input 
signals.

Adjusting the picture size/position

1

 Press 

M

, then press 

I

 or 

i

 to display the 

SET 

UP

 menu.

AV connection

OK

Language

SET UP

English

OK

PC Setting

MENU

Back

Watch TV

EXIT

2

 Press 

u

 or 

U

 to select 

PC Setting

.

Language

SET UP

MENU

Back

Watch TV

EXIT

English

AV connection

OK

PC Setting

OK

3

 Press 

Q

 to display the 

PC Setting

 menu.

Ver tical height

Ver tical position

MENU

Back

Watch TV

EXIT

0

0

0

Clock phase

Horizontal position

0

PC Setting

1/2

Horizontal width

0

0

Sampling clock

4

 Press 

u

 or 

U

 to select an option you want to 

adjust. Press 

I

 or 

i

 to adjust the settings as 

required.

Horizontal position

0

Содержание 32A3500A

Страница 1: ...of the TV Record these numbers in the spaces provided below Refer to them whenever you call upon your TOSHIBA dealer regarding this product Model number Serial number 32A3500A 32A3500E 32A3500T 37A3500A 37A3500E 37A3500T 42A3500A 42A3500E 42A3500T 2007 TOSHIBA CORPORATION All Rights Reserved VX1A00071900 ...

Страница 2: ...rams 13 Programming channels into the TV s channel memory 14 Using the TV s features Picture adjustment 16 Sound adjustment 20 Using the bass boost 21 Other features settings 22 Selecting the video input source to view 23 Teletext 24 Connecting your TV Side connections 26 Back connections 26 Connecting an HDMI or a DVI device 27 Selecting the PC HDMI1 audio mode 28 Setting the HDMI1 audio mode 28 ...

Страница 3: ...ed with a three pin earthing type power plug This plug will only fit an earthing type power outlet This is a safety feature If you are unable to insert the plug into the outlet contact an electrician to replace the wall outlet Never defeat the purpose of the earthing plug About the fuse In a three pin earthing type the fuse fitted in this plug is approved by ASTA or BSI to BS1362 It should only be r...

Страница 4: ...r etc with a sturdy tie and clip of supplied accessories page 35 Use as short a tie as possible to ensure the TV is stable If the TV is not installed securely it may lean or fall over and cause an injury To prevent injury use the exclusive optional stand or wall hanging bracket to install this TV on the floor or wall securely in accordance with a qualified technician Top view Sturdy tie as short as ...

Страница 5: ...chnician 3 Never insert objects metal or paper or pour water inside the TV through ventilation holes and other openings These items may cause a fire or an electric shock If these objects are inserted inside the TV turn off the TV and remove the power plug from the outlet immediately and contact a service technician Be especially careful that children do not insert objects in the TV Clip 4 Never sta...

Страница 6: ...smoke or an unusual odor comes from the TV turn off the TV and remove the power plug from the outlet immediately Make sure that the smoke or smell has stopped then contact a service technician If the TV is still used in this condition it may cause a fire or an electric shock 3 If the TV is dropped or the cabinet is broken turn off the TV and remove the power plug from the outlet immediately If the ...

Страница 7: ...t light up The LCD display panel is manufactured using an extremely high level of precision technology however sometimes some pixels of the screen may be missing picture elements or have luminous spots This is not a sign of a malfunction 4 About Interference The LCD display may cause interference in image sound etc of other electronic equipment that receives electromagnetic waves e g AM radios and...

Страница 8: ...ring your new TV Installing the remote control batteries Remove the battery cover Insert two R03 AAA batteries matching the polarities of the battery to the marks inside the battery compartment Getting started Cautions Dispose of batteries in a designated disposal area Never throw batteries into a fire Attention should be drawn to the environmental aspects of battery disposal Never mix battery type...

Страница 9: ...these buttons function as left right menu navigation buttons or adjust settings page 12 4 p Bb Program position When no menu is on screen these buttons select the program position page 13 U u MENU up down When a menu is on screen these buttons function as up down menu navigation buttons except for the input source selection page 12 5 Power on Standby Press to turn the TV on standby page 12 6 Remot...

Страница 10: ...ts page 26 15 A Antenna input terminal Analog antenna signal input page 8 16 o RGB PC input terminal For use when connecting a personal computer PC page 29 17 o HDMI1 input terminal High Definition Multimedia Interface input receives digital audio and uncompressed digital video from an HDMI device or uncompressed digital video from a DVI device page 27 18 o HDMI2 input terminal High Definition Multi...

Страница 11: ...buttons 0 9 pages 13 22 24 Input source selection TV o1 o3 HDMI1 HDMI2 PC page 23 To access sub pages when in teletext page 24 Picture size selection page 16 EXIT page 12 Menu U u page 12 Program position Bb page 13 Teletext U u page 24 Bass boost on off page 21 Sound mute This button turns off on the sound To enlarge teletext display size page 25 To reveal concealed text when in teletext page 25 ...

Страница 12: ...to select main menu headings Press u or U to select an item Press I or i to select or adjust setting Press Q to display the next menu Displaying the menu chart PICTURE menu SET UP menu TIMER menu FUNCTION menu AV connection Manual tuning OK OK Auto tuning OK Language SET UP MENU Back Watch TV EXIT English 3D Color management Picture settings PICTURE MENU Back Watch TV EXIT FUNCTION MENU Back Watch...

Страница 13: ... program position 1 Enter the desired program position number using the Number buttons on the remote control For program positions below 10 use 0 and the required number e g for program position 1 2 You can also change the program position by using PB or Pb The program position will be displayed on the screen with the Mono Stereo Dual audio status Note The program position selection change between...

Страница 14: ...ed When a station satellite is found it will be displayed NEVER PRESS ANY OTHER BUTTONS WHILE THE SET IS TUNING Programming channels into the TV s channel memory First use the Auto tuning function to preset all the active channels in your area automatically Then arrange the preset channels with the Manual tuning function so that you can tune into only desired channels Use the Manual tuning operati...

Страница 15: ...ess Q to store your settings Getting started Sorting program position The TV is capable of receiving a number of different channels depending upon where you live Sorting program position is an easy way of storing each channel on the program position of your choice Ex To swap channel ABCD Prog 1 for channel MNOP Prog 4 1 From the SET UP menu press u or U to select Manual tuning menu then press Q 2 ...

Страница 16: ...ons at the center of the image Also the black bars on the both sides of the screen will eliminate or reduce Cinema 2 When watching all sides panel format films video tapes this setting will eliminate or reduce the black bars on all the sides of the screen by zooming in and selecting the image without distortion 4 3 Use this setting to view a true 4 3 broadcast Super Live 1 When receiving 4 3 format...

Страница 17: ...utput as well To return to a moving picture press r again Moving Still Notes If you use this function except for the purpose of your private viewing and listening it may infringe the copyright protected by the copyright laws In the PC input mode page 23 this function is not available Adjusting the picture position Adjustment to the position of the picture may be made to suit your viewing preferenc...

Страница 18: ...ection I Pressing i Back light darker brighter Contrast lower higher Brightness darker brighter Color paler deeper Tint reddish greenish Sharpness softer sharper Notes The Tint may only be adjusted on NTSC signal In the PC input mode page 23 Color Tint and Sharpness modes are not available Activating the black stretch This function increases the strength of dark areas of the picture which improves...

Страница 19: ...creen brightness automatically during dark scenes 1 From the PICTURE menu press u or U to select Active Backlight Control 2 Press I or i to select On or Off Using the cinema mode A movie film s picture runs at 24 frames a second whereas movie software such as DVD etc that you enjoy watching on television at home runs at 30 NTSC or 25 PAL frames a second To convert this signal to reproduce a smooth ...

Страница 20: ... or i to select On or Off Note When a DVD movie with subtitle is playing back this mode may not work correctly Sound adjustment Setting the MTS Multi channel TV Sound Auto mode The MTS Auto mode automatically recognize stereo bilingual programs depending on the broadcast signal 1 Press M then press I or i to display the SOUND menu Dual MTS SOUND 1 2 MENU Back Watch TV EXIT Auto Dual 1 Treble Bass ...

Страница 21: ...lect the desired bass expansion level Off Low or High Notes If the broadcast is monaural the SRS 3D effect does not work WOW SRS and l symbol are trademarks of SRS Labs Inc WOW technology is incorporated under license from SRS Labs Inc The SRS WOW effect is active only when the sound outputs from the speaker Using the stable sound The Stable sound function limits the highest volume level to preven...

Страница 22: ... or i to adjust the settings as required Side panel 1 Other features settings Selecting the timer menu The Timer is especially useful if you want the TV to turn itself on or off after a selected period of time 1 Press M then press I or i to display the TIMER menu On timer Position On timer Sleep timer TIMER MENU Back Watch TV EXIT 00 00 00 00 01 2 Press u or U to select the required timer mode Sle...

Страница 23: ...io signal only Setting the manual setting menu 1 Press M then press I or i to display the SET UP menu Manual setting OK OK Picture position AV connection OK Language SET UP MENU Back Watch TV EXIT English 2 Press u or U to select Manual setting then press Q 3 Press I or i to select an item then press u or U to select the item as shown below A B MENU Back Watch TV EXIT OK Manual setting Store A Col...

Страница 24: ...al information E button Pressing E once will bring up the teletext screen Press again to superimpose the teletext over a normal broadcast picture Press again to return to normal TV mode You need to return to normal viewing if you wish to change channels When you first press E to access the text service the first page you see will be the initial page In Auto mode this displays the main subjects avail...

Страница 25: ...l concealed text Some pages cover topics such as quizzes and jokes To discover the solutions press A B To hold a wanted page This function is included as it is part of the broadcast teletext system but you will not need it as this TV allows you to control the display of sub pages C To enlarge the teletext display size Press C once to enlarge the top half of the page press again to enlarge the bott...

Страница 26: ...on the TV screen with a light gun may not work because of the LCD Color TV properties Back connections Connection example COMPONENT VIDEO INPUT COMPONENT VIDEO INPUT PC HDMI1 AUDIO MONITOR PB CB PB CB PR CR PR CR Y Y R R R R L VIDEO VIDEO L MONO L MONO L MONO AUDIO AUDIO AUDIO 3 1 TV back view DVD video player with component video outputs Set Top Box VCR Recording DVI device HDMI device TV back vi...

Страница 27: ...ut will also accept and display 480i 480p 576i 576p 720p 50 Hz 60 Hz and VGA signals HDMI High Definition Multimedia Interface DVI Digital Video Interface HDCP High bandwidth Digital Content Protection EIA CEA 861 861B compliance covers the transmission of uncompressed digital video with high bandwidth digital content protection which is being standardized for reception of high definition video sign...

Страница 28: ...en press I or i to display the SET UP menu AV connection Manual tuning OK OK Auto tuning OK Language SET UP English OK Picture position MENU Back Watch TV EXIT 2 Press u or U to select AV connection then press Q to display the AV connection menu MENU Back Watch TV EXIT PC HDMI1 audio HDMI1 audio AV connection HDMI1 Auto 3 Press u or U to select HDMI1 audio then press I or i to select Auto Digital ...

Страница 29: ...lity may deteriorate and characters may not be read Notes Some PC models cannot be connected to this TV If connecting a certain PC model that signal is particular the PC signal may not be detected correctly There is no need to use an adapter for computers with DOS V compatible mini D sub 15 pin terminal A bar may appear in the upper lower right or left side of the screen or parts of the picture ma...

Страница 30: ...u 3D Color management Base color adjustment Active Backlight Control and Cinema mode page 18 19 In the PC input mode the Manual setting page 23 is not displayed First press o until the video input mode list appears on the screen then press u or U and Q in order to select the PC input mode page 23 This function may not be available for some signal or if no signal is received The optimum points of t...

Страница 31: ... the sampling clock does not match with the dot clock frequency of the PC blurred picture detail will occur or screen width will change or drift patterns in vertical lines may be apparent This function enables you to adjust it and optimize the picture 1 From the PC Setting menu press u or U to select Sampling clock 2 Press I or i to optimize the picture Sampling clock 0 Resetting the PC setting Th...

Страница 32: ...e pixels of the screen may be missing picture elements or have luminous spots This is not a sign of a malfunction The brightness of the screen comes down or flickers of the screen are caused or some parts of the screen do not light up When you just buy and start to use this TV a flickering may be caused in the screen In this case switch off the TV then switch on it again to cure the condition The co...

Страница 33: ...ian Federation etc SECAM D K Myanmar etc NTSC M Oceania Country or region Color Sound Australia New Zealand etc PAL B G Africa Country or region Color Sound Republic of South Africa etc PAL I South America Country or region Color Sound Argentina Paraguay Uruguay etc PAL N Brazil PAL M Chile Colombia etc NTSC M Note PAL SECAM and NTSC 3 58 MHz are different color signal broadcast transmission syste...

Страница 34: ...14 69 CATV A6 A1 A W AA ZZ AAA BBB NTSC M JAPAN VHF 1 12 UHF 13 62 CATV M1 M10 S1 S41 Special RF signal NTSC 4 43 color system 5 5 6 0 6 5 MHz sound system PAL 60 Hz color system 5 5 6 0 6 5 MHz sound system COMPONENT VIDEO INPUT terminals the signal format 480i 480p 576i 576p 720p 50 60 Hz 1080i 50 60 Hz These signal formats are converted to match the number of pixels of the LCD panel Color syste...

Страница 35: ...l 1 Batteries 2 Clip 1 This is used to fix the TV to a wall pillar etc page 4 Design and specifications are subject to change without notice Never service or remodel the TV by yourself It may expose you to a fire hazard or dangerous voltages Reference section ...

Страница 36: ......

Отзывы: