background image

5

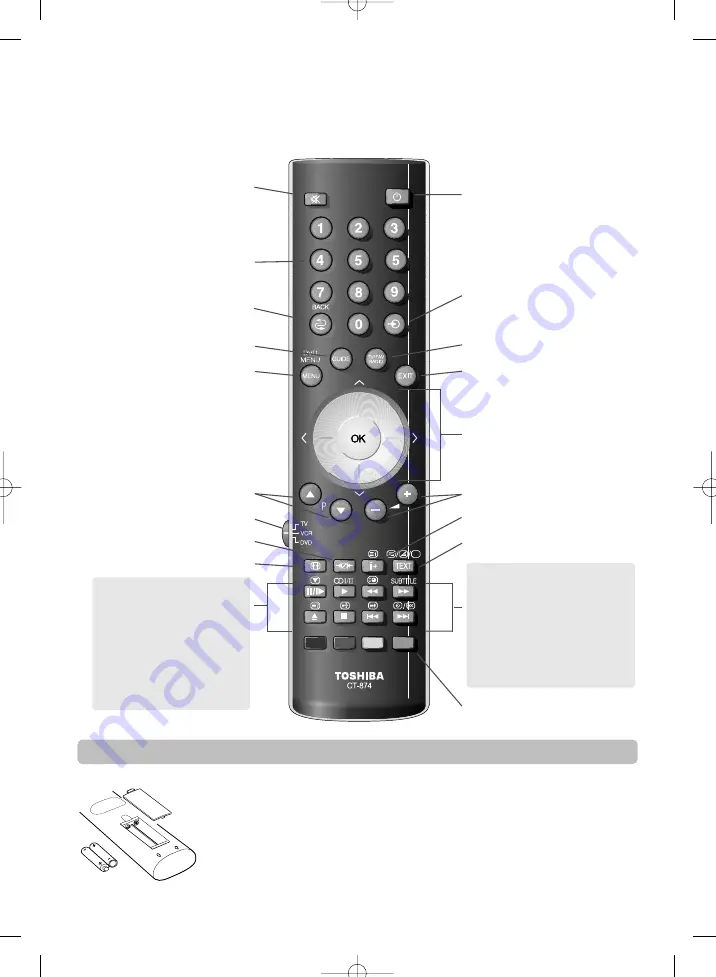
The remote control

UP

Inserting batteries and effective range of the remote

Simple at-a-glance reference of your remote control.

To alter the volume 

To display 

digital 

on-screen information

To call up text services in 

analogue 

mode

and interactive services in 

digital 

mode

Text and interactive service control

buttons

To exit Menus

Selectable picture mode

To mute the sound

To select input from external sources

To select mode

Picture format

On-screen Menus

To change programme positions and 

text pages

To display the 

digital 

on-screen

Programme Guide

To switch between TV, Radio and Favourite

programmes

Number buttons

To return to the previous programme

For On/Standby mode

When using a TOSHIBA VCR or DVD:

press

m

/ll

r

to PAUSE/STEP

press

r

to PLAY

press

q

to REWIND

press

s

to FAST FORWARD

press

w

to EJECT

press

p

to STOP

press

l

q

to SKIP-REWIND

press

s

l to SKIP-FORWARD

When using menus the arrows move the
cursor on the screen up, down, left or
right. 

OK 

to confirm your selection

When in TV mode:

u

Still picture in digital mode

O

I/II

Stereo/bilingual transmissions

SUBTITLE

Digital Subtitles

8

/

9

Time display in analogue mode

When using the Programme Guide:

q

– 2 hours

s

+ 2 hours

l

q

– 24 hours

s

l

+ 24 hours

Remove the back cover to reveal the battery compartment and make sure the batteries are inserted 
the right way round. Suitable battery types for this remote are AAA, IEC R03 1.5V.
Do not combine a used, old battery with a new one or mix battery types. Remove dead batteries 
immediately to prevent acid from leaking into the battery compartment. Dispose of them in a 
designated disposal area.
The performance of the remote control will deteriorate beyond a distance of five metres or outside an 
angle of 30 degrees from the centre of the television. If the operating range becomes reduced the 
batteries may need replacing.

Содержание 28YT56

Страница 1: ...28 32YT56 Series Owner s manual TOSHIBA ...

Страница 2: ...nd mute balance AVL pseudo 14 Sound controls equalizer headphones 15 Picture format 16 Picture controls picture mode brightness contrast colour sharpness tint tilt colour temperature 17 Picture controls video noise reduction VNR picture format VCR mode blue background still picture 18 DIGITAL Programme timers setting the television to record 19 ANALOGUE Sleep timer setting the television to turn o...

Страница 3: ...tions Switch off and withdraw the mains plug before making or changing connections DO consult your dealer if you are ever in doubt about the installation operation or safety of your equipment DO be careful with glass panels or doors on equipment DON T remove any fixed cover as this may expose dangerous voltages DON T obstruct the ventilation openings of the equipment with items such as newspapers ...

Страница 4: ... television screen for any length of time they could become conspicuous it is always advisable to reduce both the brightness and contrast settings Toshiba shall under no circumstances be liable for loss and or damage to the product caused by i fire ii earthquake iii accidental damage iv intentional misuse of the product v use of the product in improper conditions vi loss and or damage caused to th...

Страница 5: ...presspto STOP press lqto SKIP REWIND presssl to SKIP FORWARD When using menus the arrows move the cursor on the screen up down left or right OK to confirm your selection When in TV mode u Still picture in digital mode OI II Stereo bilingual transmissions SUBTITLE Digital Subtitles 8 9 Time display in analogue mode When using the Programme Guide q 2 hours s 2 hours lq 24 hours sl 24 hours Remove th...

Страница 6: ... for all additional equipment must be referred to We recommend SCART 1 for a decoder and SCART 2 for a media recordcer If connecting S VIDEO equipment set the INPUT for EXT2S or EXT3S See page 25 If the television automatically switches over to monitor external equipment return to normal television by pressing the desired programme position button To recall external equipment press to select betwe...

Страница 7: ...then turn RED To view the television press iagain or any of the number buttons The picture may take a few seconds to appear A wide variety of external equipment can be connected via the sockets located on the side of the television Whilst all the necessary adjustments and controls for the television are made using the remote control the buttons on the side of the television may be used for some fu...

Страница 8: ...icture is unclear or the signal is weak Press MENU the SETUP MENU will appear on screen Use Q to move down through the list and highlight Programmes Press OK 2 Press OK to start tuning The Auto tuning screen will appear and the television will start to search for available stations The progress bar will move along the line You must allow the television to complete the search When the search is com...

Страница 9: ...op of the screen will be updated Repeat as necessary Press EXIT to finish This feature is available for service engineers or can be used for direct channel entry if the multiplex channel is known Manual tuning The television will start to search for all available stations You must allow the television to complete the search When the search is complete the Auto tuning screen will display the total ...

Страница 10: ... as necessary then press EXIT If the television cannot be connected to a media recorder decoder with a SCART lead or if a station on another system is required a programme position can be manually tuned in 2 2 3 Press Q to highlight CONTINUE then press Rto start tuning The television will start to search for available stations The progress bar will move along the line 10 Analogue tuning and progra...

Страница 11: ...LLATION Using Q highlight FINE TUNING then use S or R to adjust to get the best picture and sound To save the selection press Q until STORE is highlighted then press R 1 2 3 7 8 Select the PROGRAMME position number then enter the FREQUENCY number Highlight SEARCH and press R To save the selection press Q until STORE is highlighted then press R NOTE If the decoder is connected to the television by ...

Страница 12: ...3 ITV 12 21 4 CH 4 13 22 5 14 23 6 15 24 7 16 25 8 17 26 9 18 27 NAME INSERT DELETE AUTOSTORE The A P S screen will appear Press Q to highlight AUTOSTORE then press Rto start tuning The television will start to search for available stations The progress bar will move along the line A P S A P S IS RUNNING PLEASE WAIT PR CHANNEL NAME 04 C 32 CH 4 z x 50 EXIT CANCEL You must allow the television to c...

Страница 13: ...ogue Selecting programme positions The Time Display analogue only Stereo and Bilingual transmissions The time display facility allows the current text service time to be seen on the television screen Press 8 9whilst watching a normal television broadcast to see a time display from the broadcaster Press again to clear it from the screen A menu will appear on screen with SOUND PICTURE and FEATURE op...

Страница 14: ...lect the SOUND option from the main menu Use Q to highlight AVL then pressRto select a tick will appear in the box Press Q to select STORE and then Rto save the selection MENU SOUND x PICTURE x FEATURE x INSTALLATION x PROGRAMME x SOUND VOLUME z x BALANCE z zx x SOUND MODE STEREO AVL PSEUDO EQUALIZER x H PHONE x STORE Pseudo PSEUDO creates a synthetic sound effect for movies and television shows r...

Страница 15: ...he sound from headphones when connected to the socket on the side of the television 1 Select the SOUND option from the main menu 2 Use Q to highlight EQUALIZER then pressRto select 2 Use Q to highlight H PHONE then pressRto select 3 4 5 Press Q to highlight PRESET thenRto select PERSONAL Using P and Q select a frequency and then S and R to adjust to suit personal taste Press Q to select STORE and ...

Страница 16: ...e without distortion When subtitles are included on a letterbox format broadcast this setting will raise the picture to ensure that all the text is displayed SUBTITLE WIDE Use this setting when watching a 16 9 broadcast Use this setting when watching a widescreen DVD widescreen video tape or a 16 9 broadcast when available Due to the range of widescreen formats 16 9 14 9 20 9 etc black bars may be...

Страница 17: ...om the main menu 1 17 Picture controls picture mode tilt colour temperature The picture controls are available in both digital and analogue modes To access the PICTURE menu in digital press MENU and using Q select TV setup press OK to bring up the PICTURE option press R to select To access the PICTURE menu in analogue press MENU and using Q highlight PICTURE press R to select In the PICTURE menu p...

Страница 18: ...ed in a number of formats depending on the type of broadcast being transmitted Picture format In the PICTURE menu press Q until VNR is highlighted Press R to select between AUTO MAX MIN and OFF The differences may not always be noticeable 1 2 VNR softens the screen representation of a weak signal to reduce the noise effect VNR Video Noise Reduction Select channel 0 on the television VCR MODE will ...

Страница 19: ...time PLEASE NOTE When a timed programme is about to start recording an information screen will appear the television will then automatically change to the required channel Cancelling this will also cancel the recording 5 1 Press MENU and S or R to select the TIMER MENU The television can be set to turn itself OFF after a certain time Sleep timer analogue 1 2 3 Press MENU and P or Q to select the F...

Страница 20: ...hannel is selected details of the programme currently being broadcast will appear then press S or R Press the button for more information about the currently highlighted programme 2 3 4 To see details of any of the other channels currently available press P and Q to scroll up and down the channel list As the channel is selected details of the programme currently being broadcast will appear Pressin...

Страница 21: ...de 1 In the PARENTAL CONTROL menu press Q to select Mode 2 Use S or R to choose between ON OFF LOCK MENU and LOCK INSTALL When menus that have been locked are now selected they will only become available when the PIN is entered 2 Use Q to select Parental Control then press OK Press Q to highlight Change Pin then press OK 3 4 Using the number buttons enter a four digit number when these have been e...

Страница 22: ...grammes encrypted programmes Favourite Programmes creates a list of the digital channels that are watched most Four lists can be created these can be a mixture of television text and radio channels Selecting favourite programmes 1 From the FEATURE MENU press Q to select Favourite and Locked Programmes 2 3 4 Use P and Q to go through the list of channels pressing OK to select the ones required a ti...

Страница 23: ...rovider Common interface 1 2 Insert the CAM and card into the Common Interface Slot following the instructions provided with the CAM A box will appear on screen to confirm that the CAM is loaded From the FEATURE MENU press P or Q to select Common Interface Slots 3 Details of the CAM should now be available Use OK to select it If two CAMs are inserted use S or R to select between the two Press MENU...

Страница 24: ...are upgrade for this TV Searching EXIT Stop NO UPGRADE AVAILABLE There is no upgrade available at this time Continue 1 2 In the SOFTWARE UPGRADE menu press P or Q to select Auto upgrade Use S or R to select ON or OFF If preferred software upgrades can be searched for manually using Search for New Software Searching for new software 1 In the SOFTWARE UPGRADE menu press P or Q to select Search for N...

Страница 25: ...ead to switch the television to the correct Input socket Alternatively press the external source selection button Buntil the picture from connected equipment is shown Use the Input Selection if the television does not switch over automatically Input selection OUTPUT signal selection for SCART 2 This is a digital television which is integrated to allow the use of both digital and analogue services ...

Страница 26: ...ve services press the TEXT or RED button It may take a few seconds to load Using P and Q highlight the required subject and press OK Use the coloured buttons as instructed To return to normal viewing press TEXT 1 2 3 FEATURE SLEEP TIMER OFF CHILD LOCK TXT LANGUAGE ENGLISH LANGUAGE ENGLISH EXT 2 OUTPUT TV BLUE BACKGRND The TEXT 6 7button To view text services press TEXT Pressing again will split th...

Страница 27: ...Press8 9again to cancel the display The news flash page must be cancelled before changing programmes To display an initial page T At times it is convenient to hold a page of text Press q and qwill appear in the top left of the screen The page will be held on screen until the button is pressed again To hold a wanted page q To discover the solutions on quiz and joke pages press the rbutton To reveal...

Страница 28: ...e 6 then select the correct input by pressing B Why doesn t the video DVD being played show on screen Q For television operation queries please ring the helpline Remember Questions and Answers 28 A Interference or a weak signal Try a different television station FINE TUNING may help What can cause a poor analogue picture Q A Check the side switch on the remote control is in TV mode Check the batte...

Страница 29: ...ent potential negative consequences for the environment and human health which could otherwise be caused by inappropriate waste handling of this product For more detailed information about recycling A Use the Master PIN code of 1276 then change to a number of your choice Ensure that no one else can use the Master PIN by removing the Owner s Manual What can be done if the PIN number has been forgot...

Страница 30: ...30 Notes For your own records ...

Страница 31: ...31 Notes For your own records ...

Страница 32: ...bject to change without notice Originated by Kensa Creative S olutions S altash Cornwall Toshiba Information S ystems U K Limited All rights reserved Reproduction in whole or part without written permission is strictly prohibited Printed on recycled paper 100 Chlorine free Programme Positions 100 Stereo Nicam 2 carrier system Visible Screen Size 28YT 66cm approx 32YT 76cm Display 16 9 Sound output...

Отзывы: