Toro Workman 1100 Скачать руководство пользователя страница 8

gravity is high. Items such as bricks, fertilizer, or
landscape timbers stack higher in the box. The
higher a load is stacked, the more likely the
vehicle is to tip over. Distribute the load as low
as possible, making sure that the load does not
affect rear visibility. 

• 

Position the weight of the load evenly from side
to side. If you position the load toward one of the
sides, the vehicle is more likely to tip over while
turning. 

• 

Position the weight of a load evenly from front to
back. If you position the load behind the rear
axle, it will reduce the weight on the front
wheels. This may result in a loss of steering
control or cause the vehicle to tip over on hills or
bumpy terrain. 

• 

Use extra caution if the load exceeds the
dimensions of the box and when handling off-
center loads that cannot be centered. Keep loads
balanced and secure to prevent them from
shifting. 

• 

Always secure loads so that they do not shift. If a
load is not secured, or you are transporting a
liquid in a large container such as a sprayer, the
load can shift. This shifting happens most often
while turning, going up or down hills, suddenly
changing speeds, or while driving over rough
surfaces. Shifting loads can cause the vehicle to
tip over. 

• 

Never dump a loaded cargo box while the vehicle
is sideways on a hill. The change in weight
distribution may cause the vehicle to overturn. 

• When operating with a heavy load in the cargo box,

reduce your speed and allow for sufficient

braking distance. Do not suddenly apply the
brakes. Use extra caution on slopes. 

• 

Be aware that heavy loads increase your stopping
distance and reduce your ability to turn quickly
without tipping over. 

• 

The rear cargo space is intended for load carrying
purposes only, not for passengers. 

• 

Never overload your vehicle. The name plate
(located under dash on center column) shows
load limits for the vehicle. Never overload the
attachments or exceed the Gross Vehicle Weight
(GVW). 

Maintenance 

• 

Only qualified and authorized personnel shall be
permitted to maintain, repair, adjust, or inspect
the vehicle. 

• 

Before servicing or making adjustments to the
machine, stop the engine, set the parking brake,
and remove the key from the ignition to prevent
someone from accidentally starting the engine. 

• 

To make sure that the entire machine is in good
condition, keep all nuts, bolts, and screws
properly tightened. 

• 

To reduce the potential for fire, keep the engine
area free of excessive grease, grass, leaves, and
accumulation of dirt. 

• 

Never use an open flame to check the level or
leakage of fuel or battery electrolyte. 

• 

If the engine must be running to perform a
maintenance adjustment, keep your hands, feet,
clothing, and any parts of your body away from
the engine and any moving parts. Keep everyone
away. 

• 

Do not use open pans of fuel or flammable
cleaning fluids for cleaning parts. 

• 

Do not adjust the ground speed governor. To
ensure safety and accuracy, have an authorized

8

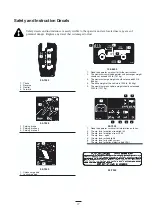
The weight of the box may be heavy. Hands or
other body parts could be crushed. 

• 

Keep hands and other body parts clear
when lowering the box. 

• 

Do not dump materials on bystanders. 

WARNING

Содержание Workman 1100

Страница 1: ...Form No 3326 290 Operator s Manual Workman 1100 Air Cooled Gasoline Utility Vehicle 07252TC 210000001 and Up E n g l i s h...

Страница 2: ...reas 26 Servicing the Air Cleaner 26 Cleaning the Filter Element 27 Greasing the Machine 27 Inspecting the Tires 29 Adjusting the Front Suspension 29 Servicing the Drive Belt 29 Adjusting the Starter...

Страница 3: ...numbers in the space below This manual identifies potential hazards and has special safety messages that help you and others avoid personal injury and even death Danger Warning and Caution are signal...

Страница 4: ...that operators are thoroughly trained and familiar with the operator s manual and all labels on the vehicle Be sure to establish your own special procedures and work rules for unusual operating condit...

Страница 5: ...dren to operate the vehicle Anyone who operates the vehicle should have a motor vehicle license While Operating The operator and passenger should remain seated whenever the vehicle is in motion The op...

Страница 6: ...e hot enough to cause burns If the machine ever vibrates abnormally stop immediately wait for all motion to stop and inspect the vehicle for damage Repair all damage before commencing operation Before...

Страница 7: ...onal roll over protection system kit when operating on rough terrain Loading and Dumping The weight and position of the cargo and passenger can change the vehicle center of gravity and vehicle handlin...

Страница 8: ...fficient braking distance Do not suddenly apply the brakes Use extra caution on slopes Be aware that heavy loads increase your stopping distance and reduce your ability to turn quickly without tipping...

Страница 9: ...n performance durability or its use may result in injury or death Such use could void the product warranty Sound Pressure Level This unit has an equivalent continuous A weighted sound pressure at the...

Страница 10: ...lo pe Fold along appropriate line Example Compare slope with folded edge Align this edge with a vertical surface tree building fence post pole etc T h is is a 1 0 S lo p e T h i s i s a 1 2 S l o p e...

Страница 11: ...ructions 2 The maximum combined operator and passenger weight should not exceed 400 lb 181 kg 3 The maximum cargo weight should not exceed 850 lb 386 kg 4 The base weight of the vehicle is 1000 lb 454...

Страница 12: ...7 Ignition off 8 Ignition on 9 To start the vehicle sit in the operator s seat Release the parking brake Turn the ignition on Pull the choke lever out if needed Depress the accelerator 10 To stop the...

Страница 13: ...iler tongue weight and gross trailer weight 2250 lbs 1021 kg total including all of the weights listed above Tongue weight 23 kg Maximum trailer weight 182 kg Tongue weight 45 kg Maximum trailer weigh...

Страница 14: ...oil dipstick Checking the Tire Pressure Check the tire pressure every 8 hours or daily to ensure proper levels The air pressure range in the front tires is 6 12 psi 41 83 kPa The air pressure range in...

Страница 15: ...er neck This empty space in the tank allows gasoline to expand Never smoke when handling gasoline and stay away from an open flame or where gasoline fumes may be ignited by a spark Store gasoline in a...

Страница 16: ...ward with the top of your foot To disengage depress the accelerator pedal If the vehicle is parked on a steep grade make sure the parking brake is applied Place blocks at the downhill side of wheels F...

Страница 17: ...necessary see Engine Oil Note The oil light may flicker This is normal and no action needs to be taken Light Switch Toggle the switch to activate the headlights Push to turn the lights on Fig 6 Power...

Страница 18: ...he operator 2 Move the gear shift selector to the desired position 3 Slowly step on the accelerator pedal Note The parking brake will automatically disengage when the accelerator pedal is depressed No...

Страница 19: ...and tailgate Figure 11 1 Tailgate latch New Vehicle Break In To provide proper performance and long vehicle life follow these guidelines for the first 100 operating hours Check the fluid and engine o...

Страница 20: ...down points Figure 12 1 Tie down points Towing the Vehicle In case of an emergency the vehicle can be towed for a short distance However we do not recommend this as a standard procedure Towing the veh...

Страница 21: ...ng suspension body structure or tires Always load a trailer with 60 of the cargo weight in the front of the trailer This places approximately 10 of the gross trailer weight on the tow hitch of the veh...

Страница 22: ...ttery cable connections Every 100 Hours Change the engine oil 1 Lubricate all grease fittings Clean the engine cooling areas 1 Inspect the air cleaner filter 1 Inspect the brake and parking brake Insp...

Страница 23: ...air filter Inspect engine cooling fins Check unusual engine noises Check unusual operating noises Check tire pressure Check fluid leaks Check instrument operation Check accelerator operation Check rid...

Страница 24: ...the front of the frame behind the towing tongue Fig 14 The jacking point at the rear of the vehicle is under the axle tubes Fig 15 Figure 14 1 Front jacking point Important 24 If you leave the key in...

Страница 25: ...ugh to take the slack out of the other shift cable 5 Check the first locknut to make sure that all of the slack is taken out 6 Start the engine and shift into Forward Reverse and Neutral to ensure tha...

Страница 26: ...00 hours of operation or more often under extremely dusty and dirty conditions Operating the engine with a blocked rotating screen dirty or plugged cooling fins or cooling shrouds removed will cause e...

Страница 27: ...e outside of the dry filter element Keep the air hose nozzle at least 5 cm from the filter and move the nozzle up and down while rotating the filter element To prevent damage to the filter element do...

Страница 28: ...afety The following inspections should be done every 100 hours Inspect the brake shoes for wear or damage If the lining brake pad thickness is less than 1 16 in 1 6 mm the brake shoes should be replac...

Страница 29: ...he centering bolts in the front A frame Fig 23 4 Remove the ride height adjustment bolt Fig 23 5 Rotate the front A frame to the desired position Fig 23 The distance from the bottom side of the front...

Страница 30: ...ter Loosen the nut on the adjusting carriage bolt Fig 25 4 Tilt the starter in the slot until the belt flexes 1 4 in 6 4 mm with 10 lb 4 5 kg of force 5 Tighten the carriage bolt nut and remove the pr...

Страница 31: ...the fuel filter to the fuel lines Figure 28 1 Fuel filter 4 Install the replacement fuel filter to the fuel lines with the clamps previously removed Mount the filter so that the arrow points toward th...

Страница 32: ...is at the bottom of the level indicator hole Fig 30 Changing the Transaxle Fluid Change the transaxle fluid every 800 operating hours or yearly whichever occurs first 1 Position the vehicle on a leve...

Страница 33: ...into the hood until it is firmly in place Note Applying soapy water to the outside of the seal may aid in sliding the seal into the hood Servicing the Battery Do not jump start the vehicle Service In...

Страница 34: ...th distilled water until the level is up to the fill line Replace the filler caps Do not overfill the battery Electrolyte will overflow onto other parts of the vehicle and severe corrosion and deterio...

Страница 35: ...n a cool atmosphere to avoid quick deterioration of the charge in the battery To prevent the battery from freezing make sure it is fully charged Charging the battery produces gasses that can explode N...

Страница 36: ......

Отзывы: