


Note
: Determine the left and right sides of the
machine from the normal operating position.
Think Safety First
Please carefully read all of the safety instructions and
decals in the safety section. Knowing this information
could help you or bystanders avoid injury.
Controls
Accelerator Pedal
The accelerator pedal (Fig. 4) gives the operator the
ability to vary ground speed of the vehicle.
Depressing the pedal starts the engine. Depressing the
pedal farther increases ground speed. Releasing the
pedal will slow the vehicle and the engine will stop
running. Maximum forward speed is 26 km/h.
Brake Pedal
The brake pedal is used to stop or slow the vehicle
(Fig. 4).
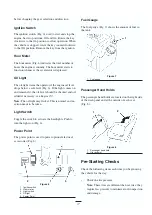
Parking Brake
The parking brake is a small plate at the top of the
brake pedal (Fig. 4). Whenever the engine is shut off,
the parking brake must be engaged to prevent
accidental movement of the vehicle. To engage the
parking brake, step on the brake pedal firmly and roll
forward with the top of your foot. To disengage,
depress the accelerator pedal. If the vehicle is parked
on a steep grade, make sure the parking brake is
applied. Place blocks at the downhill side of wheels.
Figure 4
1. Accelerator
pedal
2. Brake
pedal
3. Parking
brake
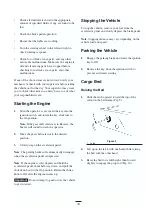
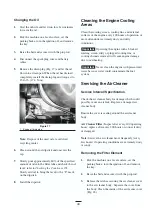
Choke Control
The choke control is located below and to the right of
the operator’s seat. To start a cold engine, close the
carburetor choke (Fig. 5) by pulling the choke control
outward to the ON position. After the engine starts,
regulate the choke to keep the engine running
smoothly. As soon as possible, open the choke by
pushing the control in to the OFF position. A warm
engine requires little or no choking.
Figure 5
1. Choke
2. Gear shift selector
Gear Shift Selector
The gear shift selector has three positions: forward,
reverse, and neutral (Fig. 5). The gear shift selector
will start and run in any of the three positions.
The vehicle should always be stopped
Important
16
Operation
Brakes can become worn or can be misadjusted
resulting in personal injury.
If brake pedal travels to within 1 in. of the vehicle
floor board, the brakes must be adjusted or repaired.
CAUTION
2
Содержание Workman 1100
Страница 36: ......