


Fuel System
Maintenance
DANGER
In certain conditions, fuel is extremely
flammable and highly explosive. A fire or
explosion from fuel can burn you and others
and can damage property.
Refer to
Fuel Safety (page 19)
for a complete
list of fuel related precautions.
Draining the Water
Separator
Service Interval:
Every 50 hours
1.
Park the machine on a level surface, engage the
parking brake, and lower the loader arms.
2.
Shut off the engine and remove the key.
3.
Open the rear access cover; refer to
the Rear-Access Cover (page 31)
4.
Remove the rear screen; refer to
Rear Screen (page 31)
5.
Place a container under the water separator.
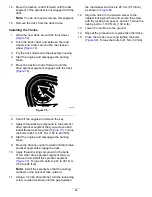
6.
Disconnect the wire harness from the water
separator (
g264250
Figure 57
1.
Water separator
3.
Drain valve
2.
Switch
7.
Unscrew the switch from bottom of the filter
canister and allow the water to drain (
).
8.
Install the switch (
).
9.
Connect the wire harness to the switch (
10.
Install the rear screen and tighten the knobs and
bolts to secure it.
11.
Close the rear-access cover and install the
fastener to secure it.
12.
Bleed the fuel system; refer to
.
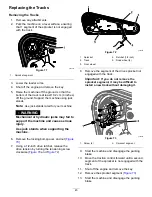
Replacing the Water
Separator Filter
Service Interval:
Every 500 hours
1.
Park the machine on a level surface, engage the
parking brake, and lower the loader arms.
2.
Shut off the engine and remove the key.
3.
Open the rear access cover; refer to
the Rear-Access Cover (page 31)
.
4.
Remove the rear screen; refer to
Rear Screen (page 31)
.
5.
Disconnect the wire harness from the water
separator.
6.
Unscrew the switch and drain the water
separator (
).
7.
Clean the area where the filter mounts.
8.
Remove the filter and clean the mounting
surface.
9.
Lubricate the gasket on the filter with clean oil.
10.
Install the filter by hand until the gasket contacts
the mounting surface; then rotate an additional
1/2 turn.
11.
Install the switch to the filter.
12.
Connect the wire harness to the switch.
13.
Install the rear screen and tighten the knobs and
bolts.
14.
Close the rear-access cover and install the
fastener.
37


