53
GTS 200
Crankshaft and Camshaft
Crankshaft and
Camshaft
Contents
Remove Crankshaft and Camshaft
53
. . . . . . . . . . . . . . . . . . . .
Remove Crankshaft
53
. . . . . . . . . . . . . . . . . . . . . . . . . . .
Inspect Crankshaft
53
. . . . . . . . . . . . . . . . . . . . . . . . . . . .
Inspect Camshaft
54
. . . . . . . . . . . . . . . . . . . . . . . . . . . . .
Check Compression Release
54
. . . . . . . . . . . . . . . . . . . .
Install Crankshaft and Camshaft
54
. . . . . . . . . . . . . . . . . . . . .
Install Crankshaft
54
. . . . . . . . . . . . . . . . . . . . . . . . . . . .
Install Camshaft
54
. . . . . . . . . . . . . . . . . . . . . . . . . . . . . .
Install Crankcase Sump
54
. . . . . . . . . . . . . . . . . . . . . . . .
Adjust Crankshaft End Play
55
. . . . . . . . . . . . . . . . . . . .
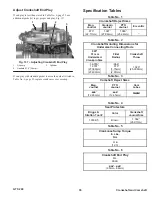
Specification Tables
55
. . . . . . . . . . . . . . . . . . . . . . . . . . . . . . .
Remove Crankshaft and
Camshaft
Before removing crankshaft from engine, remove rust, paint,
or burrs from power take off end of crankshaft. This will
eliminate or reduce chances of damaging oil seal and
crankcase sump bearing.
1. Drain oil from crankcase.
2. Remove crankcase cover or sump.
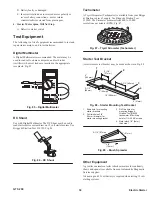
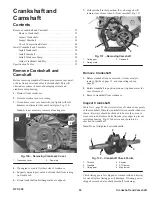
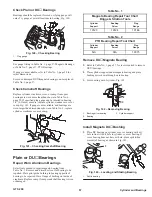
3. If crankcase cover or sump sticks, tap lightly with soft
hammer on alternate sides near dowel pins, Fig. 130.
Note: It is not necessary to remove locating pins.
1
2
2
2
Fig. 130 – Removing Crankcase Cover
1.
Crankcase cover
2.
Dowel pin
4. Tip engine over onto flywheel side of crankcase.
5. Support engine to prevent end of crankshaft from resting
on workbench.
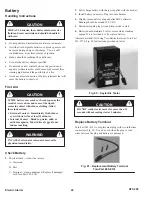
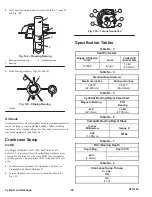
6. Rotate crankshaft until timing marks are aligned.
7. With camshaft in this position, the valve tappets will
remain clear of cam lobes. Lift out camshaft, Fig. 131.
3
2
1
2
Fig. 131 – Removing Camshaft
1.
Timing gear
2.
Timing mark
3.
Camshaft
Remove Crankshaft
1. Before crankshaft can be removed, it is necessary to
remove flywheel, page 15, and connecting rod cap,
page 49.
2. Rotate crankshaft to position piston at top dead center for
ease of removal.
3. Remove crankshaft from crankcase.
Inspect Crankshaft
Table No. 1, page 55 shows reject sizes of various wear points
of the crankshaft. Discard crankshaft if worn smaller than size
shown. Keyways should be checked to be sure they are not
worn or spread. Remove burrs from keyway edges to prevent
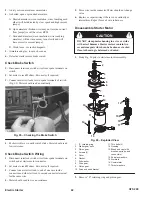
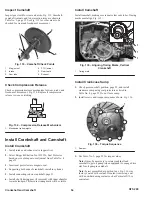
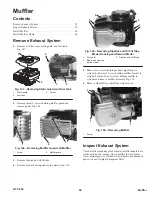
scratching bearing. Fig. 132 shows various points to be
checked on crankshaft.
Note: Do not straighten bent crankshafts.
6
5
4
3
2
1
Fig. 132 – Crankshaft Check Points
1.
Threads
2.
Crankpin
3.
Timing gear
4.
Keyway
5.
PTO journal
6.
Mag journal
Check timing gears for chipped or cracked teeth and keyway
for wear. Replace timing gear, if damaged. If timing gear is
chipped or cracked, also check camshaft for damage.

