3. Loosen the set screw in the adjusting knob on the
flow control.
4. If the center cutting unit is dropping too late, turn the
knob 1/4 turn counterclockwise. If the center cutting
unit is dropping too early, turn the knob 1/4 turn
clockwise.
5. After you have achieved your desired setting, tighten
the set screw.
ADJUST VALVE CLEARANCE
Initially, adjust valves after the first 50 hours of
operation, thereafter every 400 hours.
1.
Remove the breather hose and cylinder head cover
from the engine.
Note: Adjust valves when the engine is cold. Set
the No. 1 cylinder to top dead center and adjust the
clearances of intake/exhaust valves of No. 1
cylinder and exhaust valve of No. 2 cylinder. Then,
turn the crankshaft counterclockwise 240° (viewed
from front) to adjust clearance of intake valve of
No. 2 cylinder and intake/exhaust valves of No. 3
cylinder.
2.
Loosen the nut and adjust clearance of both intake
and exhaust valves to .0078" (.2mm).
3.
Install the cylinder head cover and gasket. Torque
the screws to 9–12 Nm. Install the breather hose.
TORQUE CYLINDER HEAD BOLTS
Initially, check head bolt torque after the first 50 hours of
operation, thereafter every 400 hours.
1.
Remove the breather hose and cylinder head cover
from the engine.
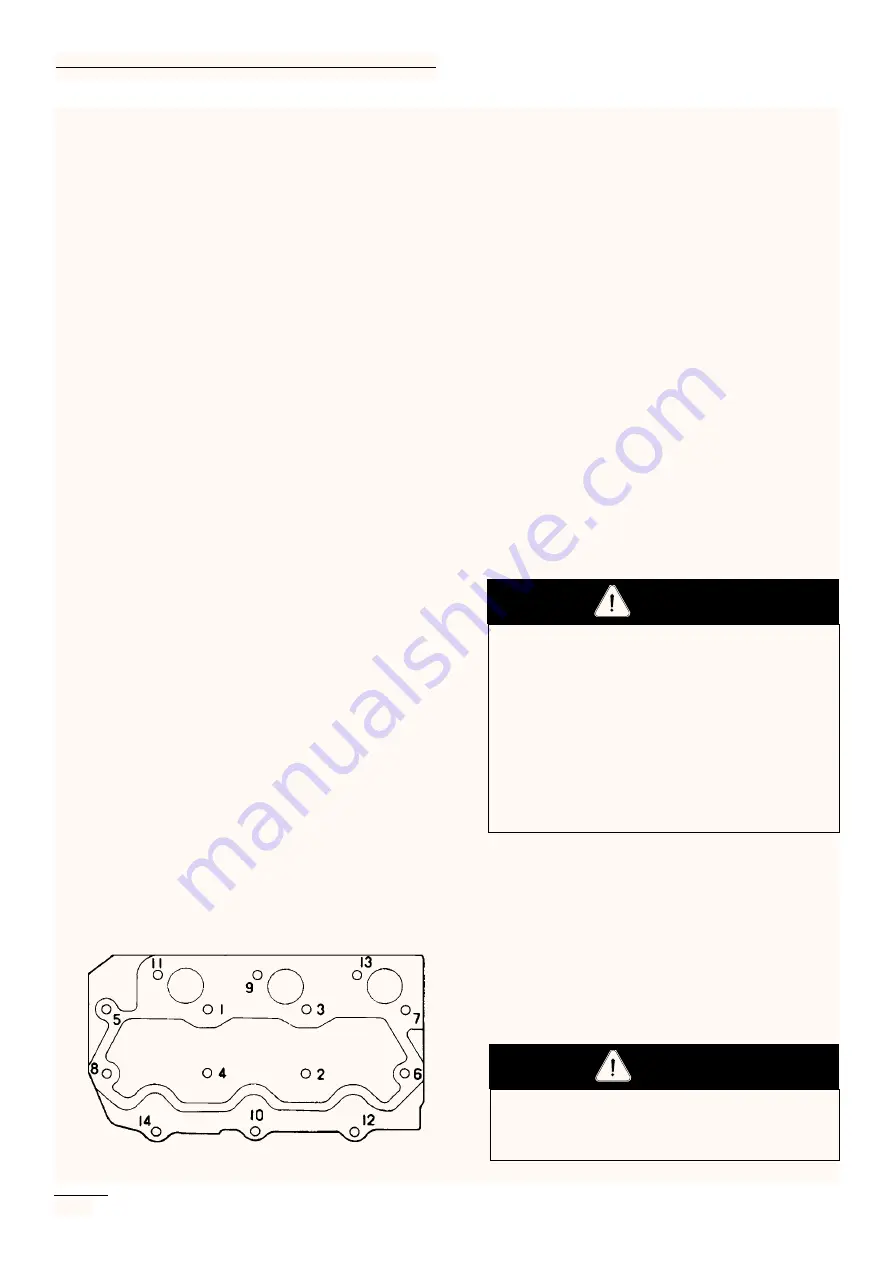
Figure 28
2.
Using the sequence in Figure 28, torque the head
bolts to 48 to 51 Nm.
3.
Install the cylinder head cover and gasket. Torque
the cover screws to 9–12 Nm. Install the breather
hose.
BATTERY CARE
1.
Battery electrolyte level must be properly
maintained and the top of the battery kept clean. if
the machine is stored in a location where
temperatures are extremely high, the battery will
run down more rapidly than if the machine is stored
in a location where temperatures are cool.
2.
Check the electrolyte level every 50 operating hours
or, if the machine is in storage, every 30 days.
3.
Maintain cell level with distilled or demineralized
water. Do not fill cells above the bottom of the split
ring inside each cell. Install the filler caps with
vents pointing to the rear (toward the fuel tank).
4.
Keep the top of battery clean by washing
periodically with a brush dipped in ammonia or
bicarbonate of soda solution. Flush the top surface
with water after cleaning. Do not remove the fill
caps while cleaning.
5.
Battery cables must be tight on the terminals to
provide good electrical contact.
28
Maintenance
Wear safety goggles and rubber gloves when
working with electrolyte. Charge the battery in a
well ventilated place so gases produced while
charging can dissipate. Since the gases are
explosive, keep open flames and electrical spark
away from the battery; do not smoke. Nausea
may result if the gases are inhaled. Unplug the
charger from the electrical outlet before
connecting to or disconnecting charger leads from
battery posts.
CAUTION
Connecting cables to the wrong post could result
in personal injury and/or damage to the electrical
system.
WARNING


