background image

Operation

Note:

Determine the left and right sides of the machine

from the normal operating position.

Adding Fuel

For best results, use only clean, fresh (less than 30 days
old), unleaded gasoline with an octane rating of 87 or
higher ((R+M)/2 rating method).

Ethanol

: Gasoline with up to 10% ethanol (gasohol)

or 15% MTBE (methyl tertiary butyl ether) by volume
is acceptable. Ethanol and MTBE are not the same.
Gasoline with 15% ethanol (E15) by volume is not
approved for use.

Never use gasoline that contains

more than 10% ethanol by volume

, such as E15

(contains 15% ethanol), E20 (contains 20% ethanol), or
E85 (contains up to 85% ethanol ). Using unapproved
gasoline may cause performance problems and/or engine
damage which may not be covered under warranty.

Do not

use gasoline containing methanol.

Do not

store fuel either in the fuel tank or fuel containers

over the winter unless a fuel stabilizer is used.

Do not

add oil to gasoline.

DANGER

In certain conditions, gasoline is extremely
flammable and highly explosive. A fire or explosion
from gasoline can burn you and others and can
damage property.

Fill the fuel tank outdoors, in an open area,
when the engine is cold. Wipe up any gasoline
that spills.

Never fill the fuel tank inside an enclosed trailer.

Do not fill the fuel tank completely full. Add
gasoline to the fuel tank until the level is 6 to 13
mm (1/4 to 1/2 inch) below the bottom of the
filler neck. This empty space in the tank allows
gasoline to expand.

Never smoke when handling gasoline, and stay
away from an open flame or where gasoline
fumes may be ignited by a spark.

Store gasoline in an approved container and
keep it out of the reach of children. Never buy
more than a 30-day supply of gasoline.

Do not operate without entire exhaust system in
place and in proper working condition.

DANGER

In certain conditions during fueling, static
electricity can be released causing a spark which
can ignite the gasoline vapors. A fire or explosion
from gasoline can burn you and others and can
damage property.

Always place gasoline containers on the ground
away from your vehicle before filling.

Do not fill gasoline containers inside a vehicle or
on a truck or trailer bed because interior carpets
or plastic truck bed liners may insulate the
container and slow the loss of any static charge.

When practical, remove gas-powered equipment
from the truck or trailer and refuel the equipment
with its wheels on the ground.

If this is not possible, then refuel such
equipment on a truck or trailer from a portable
container, rather than from a gasoline dispenser
nozzle.

If a gasoline dispenser nozzle must be used,
keep the nozzle in contact with the rim of the
fuel tank or container opening at all times until
fueling is complete.

WARNING

Gasoline is harmful or fatal if swallowed. Long-term
exposure to vapors can cause serious injury and
illness.

Avoid prolonged breathing of vapors.

Keep face away from nozzle and gas tank or
conditioner bottle opening.

Avoid contact with skin; wash off spillage with
soap and water.

Using Stabilizer/Conditioner

Use a fuel stabilizer/conditioner in the machine to provide
the following benefits:

Keeps gasoline fresh during storage of 90 days or less.
For longer storage it is recommended that the fuel tank
be drained.

Cleans the engine while it runs

Eliminates gum-like varnish buildup in the fuel system,
which causes hard starting

Important:

Do not use fuel additives containing

methanol or ethanol.

Add the correct amount of gas stabilizer/conditioner to
the gas.

Note:

A fuel stabilizer/conditioner is most effective

when mixed with fresh gasoline. To minimize the chance

15


Содержание GrandStand 74574

Страница 1: ...ting Unit Model No 74574 Serial No 315000001 and Up Model No 74575 Serial No 315000001 and Up Model No 74576 Serial No 315000001 and Up Model No 79574 Serial No 315000001 and Up Model No 79575 Serial No 315000001 and Up Register at www Toro com Original Instructions EN 3390 203 A ...

Страница 2: ...e riding lawn mower is intended to be used by professional hired operators or residential homeowners It is designed primarily for cutting grass on well maintained lawns on residential or commercial properties It is not designed for cutting brush or for agricultural uses Read this information carefully to learn how to operate and maintain your product properly and to avoid injury and product damage...

Страница 3: ...ster Wheel Hubs 32 Engine Maintenance 33 Servicing the Air Cleaner 33 Servicing the Engine Oil 34 Servicing the Spark Plug 36 Checking the Spark Arrester if equipped 37 Fuel System Maintenance 37 Draining the Fuel Tank 37 Servicing the Fuel Filter 38 Electrical System Maintenance 38 Servicing the Battery 38 Servicing the Fuses 40 Drive System Maintenance 40 Adjusting the Tracking 40 Checking the T...

Страница 4: ... to determine what accessories and attachments are needed to properly and safely perform the job Only use accessories and attachments approved by the manufacturer Wear appropriate clothing including a hard hat safety glasses long pants safety shoes or rubber boots gloves and hearing protection Important Long hair loose clothing or jewelry may get tangled in moving parts Inspect the area where the ...

Страница 5: ...hicle before filling Remove equipment from the truck or trailer and fuel it on the ground If this is not possible then add fuel with such equipment as a portable container rather than from a fuel dispenser nozzle Keep the nozzle in contact with the rim of the fuel tank or container opening at all times until fueling is complete Do not use a nozzle lock open device If fuel is spilled on clothing ch...

Страница 6: ...hat is wide enough to extend beyond the width of the machine Do not carry passengers Do not carry equipment on the machine Slope Operation All slopes and ramps require extra caution If you feel uneasy on a slope do not mow it Remove obstacles such as rocks tree limbs etc from the mowing area Watch for holes ruts or bumps Note Tall grass can hide obstacles Use caution near drop offs ditches or emba...

Страница 7: ... degrees Use the slope chart to determine the degree of slope of hills before operating Do not operate this machine on a slope greater than 20 degrees Fold along the appropriate line to match the recommended slope 2 Align this edge with a vertical surface a tree building fence pole etc 3 Example of how to compare slope with folded edge 7 ...

Страница 8: ... fire open flame or smoking 7 Wear eye protection explosive gases can cause blindness and other injuries 3 Caustic liquid chemical burn hazard 8 Battery acid can cause blindness or severe burns 4 Wear eye protection 9 Flush eyes immediately with water and get medical help fast 5 Read the Operator s Manual 10 Contains lead do not discard 106 5517 1 Warning do not touch the hot surface Manufacturer ...

Страница 9: ... Read the Operator s Manual 116 8772 1 Accessory 15A 3 Charge 25A 2 PTO 10A 4 Main 30A 116 8775 1 Read the Operator s Manual 2 Fill to bottom of filler neck warning Do not overfill the tank 117 0456 1 Height of cut HOC high 3 Height of cut HOC low 2 Height of cut HOC medium 119 0217 1 Warning stop the engine stay away from moving parts keep all guards and shields in place 9 ...

Страница 10: ...r with guards or shields removed 117 3626 1 Warning read the Operator s Manual 5 Thrown object hazard keep bystanders a safe distance from the machine 2 Warning do not operate this machine unless you are trained 6 Warning engage the parking brake stop the engine and remove the spark plug wire before performing any maintenance on the machine 3 Thrown object hazard keep deflector in place 7 Warning ...

Страница 11: ...perator presence switch 2 Fast 4 Neutral 6 Power Take off PTO disengage 120 6464 1 Parking brake engage 3 Power Take off PTO engage 5 Engine speed 7 Continuous variable setting 2 Parking brake disengage 4 Power Take off PTO disengage 6 Fast 8 Slow 11 ...

Страница 12: ...t off valve behind cushion 10 Hydraulic tank 5 Fuel tank 11 Mower deck 6 Controls 12 Front caster wheel g026964 1 2 3 4 5 6 7 8 9 10 11 12 Figure 5 60 inch machine 1 Side discharge chute 7 Control levers 2 Battery 8 Manual tube 3 Engine 9 Platform down position 4 Fuel shut off valve behind cushion 10 Hydraulic tank 5 Fuel tank 11 Mower deck 6 Controls 12 Front caster wheel 12 ...

Страница 13: ... lever 5 Fuel gauge 12 Blade control switch PTO 6 Height of cut lever 13 Left motion control lever 7 Height of cut pin Hour Meter The hour meter records the number of hours the engine has operated It operates when the engine is running Use these times for scheduling regular maintenance Figure 7 Fuel Gauge The fuel gauge is located on the top middle of the tank Figure 6 Safety Interlock Indicators ...

Страница 14: ... for use with the machine to enhance and expand its capabilities Contact your Authorized Service Dealer or Distributor or go to www Toro com for a list of all approved attachments and accessories Specifications Note Specifications and design are subject to change without notice 48 inch Mowers Width with deflector down 161 3 cm 63 5 inches Width with deflector raised 125 7 cm 49 5 inches Length wit...

Страница 15: ...not operate without entire exhaust system in place and in proper working condition DANGER In certain conditions during fueling static electricity can be released causing a spark which can ignite the gasoline vapors A fire or explosion from gasoline can burn you and others and can damage property Always place gasoline containers on the ground away from your vehicle before filling Do not fill gasoli...

Страница 16: ...on could help you or any bystanders avoid injury The use of protective equipment for eyes hearing feet and head is recommended CAUTION This machine produces sound levels in excess of 85 dBA at the operator s ear and can cause hearing loss through extended periods of exposure Wear hearing protection when operating this machine The use of protective equipment for eyes ears feet and head is recommend...

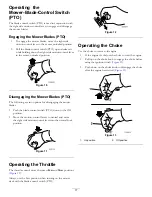
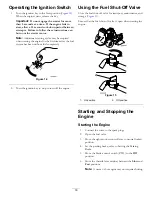
Страница 17: ...r blades Push the blade control switch PTO down to the Off position Move the motion control levers to neutral and move the right side motion control lever into the neutral lock position G009174 Figure 11 Operating the Throttle The throttle control moves between Fast and Slow positions Figure 12 Always use the Fast position when turning on the mower deck with the blade control switch PTO G008946 Fi...

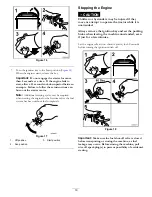
Страница 18: ...7 Figure 14 2 Turn the ignition key to stop to turn off the engine Using the Fuel Shut Off Valve Close the fuel shut off valve for transport maintenance and storage Figure 15 Ensure that the fuel shut off valve is open when starting the engine g026965 G008948 1 2 Figure 15 1 On position 2 Off position Starting and Stopping the Engine Starting the Engine 1 Connect the wires to the spark plugs 2 Ope...

Страница 19: ...TA RT RU N STO P G008947 Figure 17 1 Off position 3 Start position 2 Run position Stopping the Engine CAUTION Children or bystanders may be injured if they move or attempt to operate the tractor while it is unattended Always remove the ignition key and set the parking brake when leaving the machine unattended even if just for a few minutes Let the engine idle at slow throttle turtle for 60 seconds...

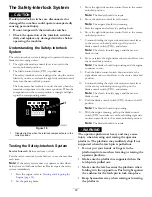
Страница 20: ...ontrol levers forward Note The engine should stop running 5 Start the engine and release the parking brake 6 Move the right side motion control lever to the center unlocked position 7 Continue holding the right side motion control lever in the center unlocked position pull up on the blade control switch PTO and release Note The clutch should engage and the mower blades rotate 8 Move or release the...

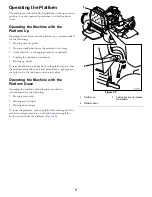
Страница 21: ...ng up slopes To raise the platform pull the back of the platform up so that the latch pin and knob lock it into place Push it tight against the cushion for the latch pin to lock it into place Operating the Machine with the Platform Down Operating the machine with the platform down is recommended for the following Mowing most areas Driving across slopes Driving down slopes To lower the platform pus...

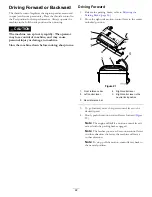
Страница 22: ...eleasing the Parking Brake page 16 2 Move the right side motion control lever to the center unlocked position G015234 4 5 1 2 3 3 4 Figure 21 1 Front reference bar 4 Right control lever 2 Left control lever 5 Right control lever in the neutral lock position 3 Rear reference bar 3 To go forward move the speed control lever to the desired speed 4 Slowly push the motion control levers forward Figure ...

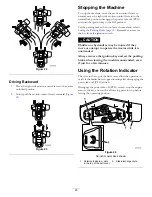
Страница 23: ...from the ignition switch CAUTION Children or bystanders may be injured if they move or attempt to operate the tractor while it is unattended Always remove the ignition key and set the parking brake when leaving the machine unattended even if just for a few minutes Using the Rotation Indicator The slots in the top of the belt covers allow the operator to verify if the blades have stopped rotating a...

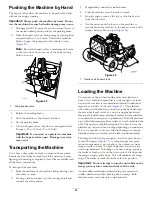
Страница 24: ...alve 6 Use the metal tie down loops on the machine to securely fasten the machine to the trailer or truck with straps chains cable or ropes Figure 26 g026967 Figure 26 1 Traction unit tie down loop Loading the Machine Use extreme caution when loading units onto trailers or trucks One full width ramp that is wide enough to extend beyond the rear tires is recommended instead of individual ramps for ...

Страница 25: ...tor discharge cover or complete grass catcher assembly mounted in place you and others are exposed to blade contact and thrown debris Contact with rotating mower blade s and thrown debris will cause injury or death Do not remove the grass deflector from the mower because the grass deflector routes material down toward the turf If the grass deflector is ever damaged replace it immediately Never put...

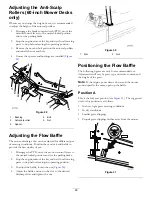
Страница 26: ...d baffle to provide the best quality of cut 1 Disengage the PTO move the motion control levers to the neutral locked position and set the parking brake 2 Stop the engine remove the key and wait for all moving parts to stop before leaving the operating position 3 To adjust the baffle loosen the nut Figure 30 4 Adjust the baffle and nut in the slot to the desired discharge flow and tighten the nut g...

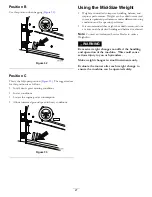
Страница 27: ...ce and improve performance Weights can be added or removed to create optimized performance under different mowing conditions and for operator preference It is recommended that weights be added or removed one at a time until the desired handing and balance is achieved Note Contact an Authorized Service Dealer to order a Weight Kit WARNING Excessive weight changes can affect the handling and operati...

Страница 28: ... and gap the spark plug Check the battery Check the electric clutch Check and clean the engine cooling fins and shrouds Service the hydraulic oil cooler in dirty conditions if equipped Check the mower deck belt Check the pump drive belt Check the hydraulic hoses Every 200 hours Change the engine oil filter Every 250 hours Replace the primary air filter Check the secondary air filter Change the hyd...

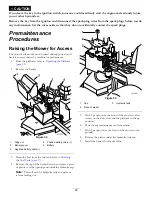
Страница 29: ...21 2 Remove the battery g018098 Figure 34 1 Wing nut 4 Positive battery cable 2 Battery cover 5 Battery 3 Negative battery cable 3 Drain the fuel from the fuel tank refer to Draining the Fuel Tank page 37 4 Remove the cap of the hydraulic tank and place a piece of plastic over the opening and install the hydraulic cap Note This will seal the hydraulic tank and prevent it from leaking out g017900 F...

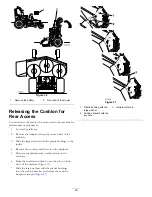
Страница 30: ...washers with the plastic bushings to the inside 4 Remove the cushion and lower it to the platform 5 Perform any maintenance or adjustment on the machine 6 Raise the cushion and slide it onto the pins on both sides of the machine Figure 37 7 Slide the large washers with the plastic bushings into the cushion bracket and secure them with a hairpin cotter pin Figure 37 g019209 Figure 37 1 Plastic bush...

Страница 31: ...dles more often in dirty or dusty conditions Every 800 hours Yearly whichever comes first Grease the front wheel bearings more often in dirty or dusty conditions Every 800 hours Yearly whichever comes first Grease the front caster pivots more often in dirty or dusty conditions Use the following graphics for locating the grease points G019356 Figure 38 g026968 Figure 39 g026969 Figure 40 Greasing t...

Страница 32: ...ll of the way onto the end of the axle Leave approximately 3 mm 1 8 inch from the outer surface of the spacer nut to the end of the axle inside the nut 9 Insert the assembled nut and axle into the wheel on the side of the wheel with the new seal and bearing 10 With the open end of the wheel facing up fill the area inside the wheel around the axle full of general purpose grease 11 Insert the second...

Страница 33: ... bright light on the outside of the filter Note Holes in the filter will appear as bright spots Note If the filter is damaged discard it g026970 Figure 42 1 Air cleaner clamps 3 Primary air filter 2 Air cleaner cover 4 Secondary air filter Servicing the Primary Filter 1 Do not clean the paper filter replace it Figure 42 2 Inspect the element for tears an oily film or damage to the rubber seal 3 Re...

Страница 34: ... Refer to the table below Figure 43 Checking the Engine Oil Level Note Check the oil when the engine is cold WARNING Contact with hot surfaces may cause personal injury Keep hands feet face clothing and other body parts away the muffler and other hot surfaces Important Do not overfill the crankcase with oil because damage to the engine may result Do not run engine with oil below the Low mark becau...

Страница 35: ...the engine and drive to a flat area 7 Check the engine oil level Changing the Engine Oil Filter Note Change the engine oil filter more frequently when operating conditions are extremely dusty or sandy 1 Drain the oil from the engine refer to Changing the Engine Oil page 34 2 Place a rag under the oil filter to soak up any spilled oil Important Spilled oil may drain under the engine and onto the cl...

Страница 36: ...cessary Type for all Engines NGK BPR4ES or equivalent Air Gap 0 75 mm 0 03 inch Removing the Spark Plug 1 Disengage the PTO move the motion control levers to the neutral locked position and set the parking brake 2 Stop the engine remove the key and wait for all moving parts to stop before leaving the operating position 3 Remove the spark plug as shown in Figure 48 g026971 Figure 48 Checking the Sp...

Страница 37: ... Maintenance Draining the Fuel Tank Note There is no other recommended way to drain fuel from the tank other than using a syphon pump A syphon pump can be purchased at a hardware store DANGER In certain conditions gasoline is extremely flammable and highly explosive A fire or explosion from gasoline can burn you and others and can damage property Drain gasoline from the fuel tank when the engine i...

Страница 38: ...owel to clean the battery case If the battery terminals are corroded clean them with a solution of four parts water and one part baking soda Apply a light coating of grease to the battery terminals to prevent corrosion Voltage 12 V WARNING CALIFORNIA Proposition 65 Warning Battery posts terminals and related accessories contain lead and lead compounds chemicals known to the State of California to ...

Страница 39: ...he positive red battery cable to positive battery terminal with a nut a washer and a bolt Figure 53 4 Slide the rubber cover over the post 5 Install the negative battery cable and the ground wire to the negative battery terminal with a nut a washer and a bolt Figure 53 6 Slide the rubber cover over the post Charging the Battery WARNING Charging the battery produces gasses that can explode Never sm...

Страница 40: ...chine pulls to one side Note If it does stop the machine and set the parking brake 3 Release the cushion from the rear of the machine 4 Rotate the right cable adjustment to position the right motion control in the center of the control panel neutral lock slot Figure 57 g015241 Figure 56 1 Left motion control lever 3 Neutral locked position 2 Right motion control lever 4 Align the control levers fr...

Страница 41: ...djusting the tracking 1 Ensure that the bolt attached to the motion control lever aligns with the proximity switch target Figure 58 2 If needed loosen the bolts and adjust the proximity switch until the target aligns with the bolt attached to the motion control lever Figure 58 3 Check the distance of the bolt to the proximity switch it needs to be between 0 51 to 1 02 mm 0 02 to 0 04 inches as sho...

Страница 42: ...ition 3 Remove the dust cap from the caster and tighten the lock nut Figure 60 4 Tighten the locknut until the spring washers are flat and then back off a 1 4 turn to properly set the preload on the bearings Figure 60 Important Make sure spring washers are installed correctly as shown in Figure 60 5 Install the dust cap Figure 60 Figure 60 1 Spring washers 3 Dust cap 2 Locknut Servicing the Caster...

Страница 43: ...ement and proper braking 1 Insert a 0 4 to 0 5 mm 0 01 to 0 02 inches feeler gauge through one inspection slot in the side of the assembly Note Make sure it is between the armature and the rotor friction surfaces Note The gap needs to be at least 0 4 mm 0 02 inches and not more than 0 5 mm 0 02 inches 2 If adjustment is needed use a 0 4 mm 0 02 inches feeler gauge to set each of the 3 adjustment s...

Страница 44: ...vice Interval Before each use or daily Before each use remove any buildup of grass dirt or other debris from the hydraulic oil cooler and fan This will help ensure adequate cooling correct engine speed and reduce the possibility of overheating or mechanical damage to the engine Note High pressure and over speeding the fan may cause fan failure Use care with compressed air to avoid over speeding th...

Страница 45: ...aving the operating position 3 Release the brake Note The brake bars should lift off the tires and the hand lever should travel forward to the end of the slot in the control panel Note Adjust the brake if needed 4 Engage the brake lever until the brake bars first contact the tire Figure 65 5 Measure the gap from the front of the hand lever to the end of the slot in the control panel when the brake...

Страница 46: ... To loosen the brake rotate the yoke down 8 Secure the yoke to the lower brake lever with the hairpin cotter and clevis pin Figure 66 9 Tighten the jam nut Figure 66 10 Check the brake operation again refer to Checking the Parking Brake page 45 g015371 1 2 3 4 5 6 Figure 66 1 Jam nut 4 Hairpin cotter 2 Yoke 5 Flat washer 3 Clevis pin 6 Lower brake lever 11 After the brake is adjusted check the lev...

Страница 47: ...elt covers 4 Loosen the front idler pulley by loosening the nut Figure 68 and Figure 69 5 Remove the worn mower belt Figure 68 and Figure 69 6 Install the new mower belt around the deck pulleys and clutch pulley Figure 68 and Figure 69 7 Using a ratchet in the idler arm tighten the idler pulley until the spring is stretched 16 5 cm 6 5 inches from hook to hook Figure 68 and Figure 69 8 Tighten the...

Страница 48: ... deck belt 4 Tilt the machine refer to Raising the Mower for Access page 29 5 Remove the shoulder bolt the nut and the washer from the engine deck and connected spring Figure 70 G015402 1 2 3 5 4 6 Figure 70 1 Hydraulic pumps 4 Clutch retainer 2 Idler pulley 5 Pump drive belt 3 Clutch pulley 6 Shoulder bolt nut and washer 6 Remove the pump drive belt Figure 70 7 Install the new belt around the clu...

Страница 49: ...rol lever aligns horizontally with the left motion control lever Figure 71 Figure 71 1 Left motion control lever 3 Check the horizontal alignment here 2 Right motion control lever in the neutral locked position 4 Right motion control lever 5 To adjust the right motion control lever horizontally the cam needs to be adjusted 6 Release the cushion from the rear of the machine 7 Loosen the nut holding...

Страница 50: ... 73 1 Left motion control lever 3 Neutral locked position 2 Right motion control lever 4 Align the control levers front to back 2 Ensure the right motion control lever moves easily into the neutral lock position Note Turn the cable adjustment clockwise to move the motion control handle forward Turn the cable adjustment counterclockwise to move the motion control handle rearward 3 Rotate the cable ...

Страница 51: ... level should be below the hot level of the baffle when the fluid is warm Figure 75 9 Install the cap on the filler neck WARNING Hydraulic fluid escaping under pressure can penetrate skin and cause injury If hydraulic fluid is injected into the skin it must be surgically removed within a few hours by a doctor familiar with this type of injury Gangrene may result if this is not done Keep your body ...

Страница 52: ...ired Note Do not overfill Replacing the Hydraulic Filter Service Interval After the first 8 hours WARNING Hot hydraulic fluid can cause severe burns Allow the hydraulic fluid to cool before performing any maintenance to the hydraulic system Important Do not substitute with an automotive oil filter or severe hydraulic system damage may result 1 Disengage the PTO and set the parking brake 2 Stop the...

Страница 53: ...3 Raise the rear of the machine onto jack stands high enough to raise the drive wheels off the ground 4 Start the engine and move the throttle control to the idle position Note If the drive wheel does not rotate it is possible to assist the purging of the system by carefully rotating the tire in the forward direction 5 Check the hydraulic fluid level as it drops and add fluid as required to mainta...

Страница 54: ... a slot forming in this area immediately install a new blade Figure 79 Figure 79 1 Cutting edge 3 Wear slot forming 2 Curved area 4 Crack Checking for Bent Blades 1 Disengage the PTO move the motion control levers to the neutral locked position and set the parking brake 2 Stop the engine remove the key and wait for all moving parts to stop before leaving the operating position 3 Rotate the blades ...

Страница 55: ...ains balance if the same amount of material is removed from both cutting edges Figure 82 1 Sharpen at the original angle 2 Check the balance of the blade by putting it on a blade balancer Figure 83 Note If the blade stays in a horizontal position the blade is balanced and can be used Figure 83 1 Blade 2 Balancer 3 If the blade is not balanced file some metal off the end of the sail area only Figur...

Страница 56: ...from a level surface 2 Measure the blade at points B and C 5 The difference between measurements B and C should be no more than 6 mm 1 4 inch Note If it is not correct refer to Changing the Mower Deck Side to Side Height page 56 Changing the Mower Deck Side to Side Height Changing the side to side height is done by adjusting the rear tire pressure and U plates on the side of the engine deck 1 Chan...

Страница 57: ...ront and rear nuts on the adjustment rods Figure 89 4 For 60 inch mower decks loosen both the front and rear nuts and lift links on the adjustment rods Figure 90 Note The weight of the mower deck must be resting on all 3 of the 2x4 pieces Figure 89 Note The back lip of the mower deck is built 6mm 1 4 inch lower than the front lip of the mower deck 5 For 60 inch mower decks tighten the lift links F...

Страница 58: ...ition one blade front to rear 4 Measure at A and from a level surface to the cutting edge of the blade tips Figure 91 Note The measurement should be 7 6 cm 3 inches Figure 91 1 Measure from a level surface 2 Measure the blade at point A 5 If it does not measure correctly locate the height of cut rod on the right side of the machine Figure 92 6 Adjust the adjustment bolt until the blade tips match ...

Страница 59: ...posite deck lift spring Replacing the Grass Deflector WARNING An uncovered discharge opening could allow the lawn mower to throw objects in the operator s or bystander s direction and result in serious injury Also contact with the blade could occur Do not operate the lawn mower unless you install a cover plate a mulch plate grass deflector or bagger 1 Remove the locknut bolt spring and spacer hold...

Страница 60: ... the brake refer to Servicing the Brake in Brake Maintenance page 45 5 Service the air cleaner refer to Servicing the Air Cleaner in Engine Maintenance page 33 6 Grease the machine refer to Greasing and Lubrication in Lubrication page 31 7 Change the engine oil refer to Servicing the Engine in Engine Maintenance page 33 8 Check the tire pressure refer to Checking the Tire Pressure in Drive System ...

Страница 61: ...ces Paint is available from your Authorized Service Dealer 13 Store the machine in a clean dry garage or storage area Remove the key from the ignition switch and keep it in a memorable place Cover the machine to protect it and keep it clean 61 ...

Страница 62: ...ole in the fuel cap is plugged 6 Clean or replace the fuel cap 7 Dirt in the fuel filter 7 Replace the fuel filter Engine loses power 8 Dirt water or stale fuel is in the fuel system 8 Contact an Authorized Service Dealer 1 Engine load is excessive 1 Reduce the ground speed 2 Oil level in the crankcase is low 2 Add oil to the crankcase The engine overheats 3 Cooling fins and air passages under the...

Страница 63: ...sion 2 Pump drive belt is off pulley 2 Install drive belt and check adjusting shafts and belt guides for correct position 3 Mower deck belt is worn loose or broken 3 Install new deck belt 4 Mower deck belt is off pulley 4 Install deck pulley and check the idler pulley idler arm and spring for correct position and function 5 Broken or missing idler spring 5 Replace the spring 6 Electric clutch out ...

Страница 64: ...Schematics g0181 10 Hydraulic Schematic for 48 inch mower models Rev A g017891 COOLER Hydraulic Schematic for 52 and 60 inch Mower Models Rev A 64 ...

Страница 65: ...g026979 Electrical Schematic Rev A 65 ...

Страница 66: ...Notes 66 ...

Страница 67: ...Notes 67 ...

Страница 68: ... the Service Dealer s analysis or with the assistance provided contact us at RLC Customer Care Department Toro Warranty Company 8111 Lyndale Avenue South Bloomington MN 55420 1196 888 865 5676 U S Customers 888 865 5691 Canada customers Owner Responsibilities You must maintain your Toro Product by following the maintenance procedures described in the Operator s Manual Such routine maintenance whet...

Отзывы: