


5
Note: Grease the wheels.
4
1
5
3
2
m–4760
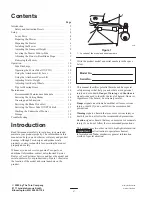
Figure 2
1.
Carrier arm
2.
Wheel
3.
Grease fitting facing in
4.
Shoulder bolt
5.
Lock nut, 3/8 in. (with
patch)
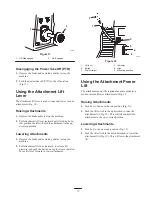
3. Install link bracket between mower bracket and carrier
lift arm (Fig. 3).
4. Secure with washers (1/2 in.) and cotter pins (1 in.)
(Fig. 3).
2
1
3
4
m–4617
Figure 3
1.
Link Bracket
2.
Carrier lift arm
3.
Washer 1/2 in.
4.
Cotter pin 1 in. (26 mm)
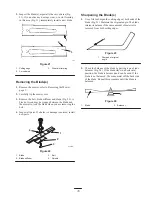
5. Rotate adjustable links so bolt heads are up and place
between brackets, as shown, on front of the mower
(Fig. 4).
6. Secure to brackets with washers (1/2 in.) and cotter pins
(1 in.) (Fig. 4).
m–3285
2
4
3
1
4
3
Figure 4
1.
Adjustable link
2.
Bracket
3.
Washer, 1/2 in.
4.
Cotter pin, 1 in.
7. Place springs into brackets on mower with hooked ends
over raised back (Fig. 5).
8. Align grass deflector with holes in brackets and spring
straight ends in space under hinge and above deflector
(Fig. 5).
9. Secure deflector to bracket with bolts (3/8 x 3-1/2)
through grass deflector, springs and brackets. Secure
with lock nuts (3/8 in.) (Fig. 5).
10. Lift grass deflector and check that it is spring loaded
and pivots freely to the full down position.
Important
Grass deflector must be spring loaded in the
down position. Lift deflector up to test that it snaps to the
full down position.
Содержание 78281
Страница 20: ...20 ...


