9
Part No.
Description:
1
Halogen Lamps
2
Temperature Sensor
3
Drying Chamber
4
Pan Shield
5
Pan Support
6
Pan Handle
7
Disposable Pan
8
Pan Shield Posts
Adjustable Legs
10
Level Indicator
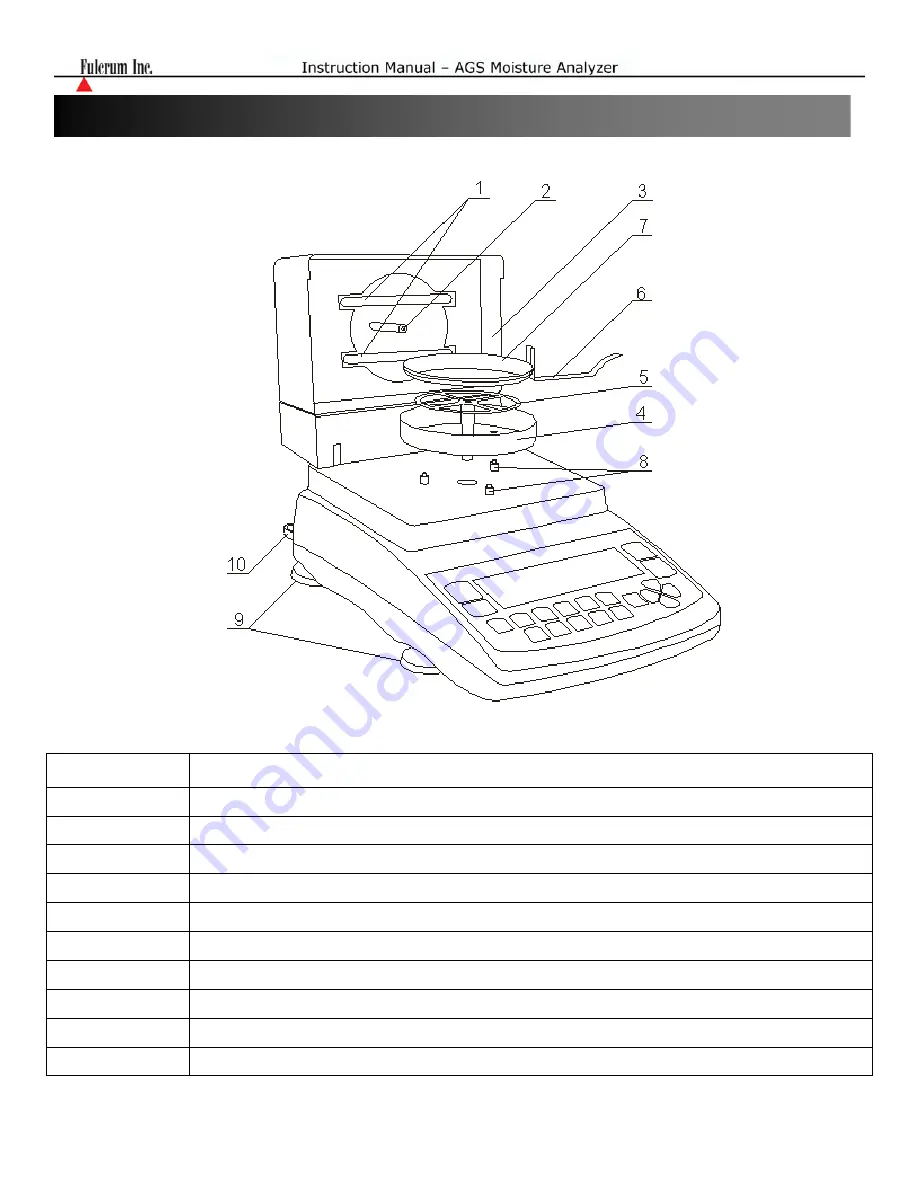
Chapter 5: Parts Description
Страница 1: ...4 Sample Quantity 8 5 Sampling Interval 8 6 Drying Time 8 7 Saving the Configuration and Parameters 9 RAP Configuration 10 Preparing the Sample 10 1 Using a Glass Fibre Filter 11 Making a Moisture Ana...
Страница 2: ...ubstances Do not put anything on the perforated top cover of the unit Do not pass anything over the top of the unit when drying is in progress Never pass fluids over the perforated cover a spill can b...
Страница 3: ...pan When loading a new sample into the Drying Chamber using the pan handle make sure the disposable sample pan and sample are centered and that the sample has been leveled The maximum sample height mu...
Страница 4: ...2 HOT Parts and Surfaces Many parts of the Moisture Analyzer get very HOT during use Familiarize yourself with these internal parts and always allow adequate time for cooling before touching or handl...
Страница 5: ...umidity or dust levels Do not connect cables in ways other than those designated in this manual Be sure to set the Analyzer on a firm stable horizontal surface Never stand on or lean on this product E...
Страница 6: ...Analyzer Resolution 0 01 Moisture Measurement Accuracy 0 1g to 5g 0 3 5g to 15g 0 06 15g 0 04 Maximum Drying Temperature 160 C Sampling Time 1 sec to 180 sec Maximum Drying Time 10 hours Drying Power...
Страница 7: ...osition is encountered in which added moisture is driven off as drying continues because of decomposition Prepare the sample properly This includes obtaining uniformity of initial weight leveling the...
Страница 8: ...er used to print data to a printer or transfer data to a PC via the RS232 communication port Number 7 key N A Number 8 key F1 START Number 1 key F2 SET Number 2 key F3 STAT Number 3 key F4 MEM Number...
Страница 9: ...o Description 1 Halogen Lamps 2 Temperature Sensor 3 Drying Chamber 4 Pan Shield 5 Pan Support 6 Pan Handle 7 Disposable Pan 8 Pan Shield Posts 9 Adjustable Legs 10 Level Indicator Chapter 5 Parts Des...
Страница 10: ...ng the leveling feet until the level indicator shows the air bubble is in the center position of the sight glass The level indicator is located on the rear left side of the unit 6 After leveling the s...
Страница 11: ...rying is terminated when a set Drying Time is reached 2 Short Mode See graph below drying is terminated when the mass loss between successive samples Sample Quantity is smaller than the threshold valu...
Страница 12: ...antity and compare the weight result of each When the weight of the samples does not differ by more than 2mg the analysis will stop This configuration method is particularly helpful when an adequate D...
Страница 13: ...e will be displayed Use the navigation key to alternate between the Time Mode and the Short Mode Once a desired mode is displayed press the ENTER key to confirm the selection Short Mode the analysis w...
Страница 14: ...0 initial wet weight m current weight and W moisture as a 1 W m0 m m0 100 where moisture is determined in relation to initial weight 2 W m m m 100 where moisture is determined in relation to current w...
Страница 15: ...arameter must be set when using the analyzer in the Short Mode See the Notes and Parameter descriptions in Section 7 2 1 Use the navigation key to select Samples Quantity and press the ENTER key 2 Use...
Страница 16: ...desired Time Interval has been entered press the ENTER key to confirm the entry 8 6 Drying Time 1 Use the navigation key to select Drying Time and press the ENTER key Drying Time is specified in the f...
Страница 17: ...t configurations can be saved To save a configuration for future use follow the step below 1 Use the navigation key to select Save Parameters and press the ENTER key 2 Use the navigation keys to selec...
Страница 18: ...ng allows the User to assign a name of the person performing the analysis The name will appear on the Drying Report printout maximum 20 characters total Notes this setting allows the User to enter imp...
Страница 19: ...press the ENTER key to save and confirm the selection 4 For Product Name Executive and Notes parameters it is recommended you use an external keyboard which can be connected to the PS2 keyboard port...
Страница 20: ...ample at the same time the samples should be placed in separate hermetically sealed plastic bags or containers Make sure the sample does not lose moisture while it is inside the container the containe...
Страница 21: ...the top surface hardening which will make the analysis more difficult as well as inaccurate A sample should always be placed in uniform layers measuring 2 to 5mm in thickness and weighing 5 to 15g dep...
Страница 22: ...n your moisture analysis by following the steps below 1 Open the Drying Chamber 2 Using the Pan Handle place the Disposable Pan on the Pan Support Note Be sure the Pan Handle is not touching the Pan S...
Страница 23: ...the Disposable Pan as per the instructions listed in Chapter 11 5 Close the Drying Chamber 6 Press the F1 START key The unit will indicate on the display that Heating is in progress The moisture conte...
Страница 24: ...listed in Chapter 1 7 When the analysis is finished END will be displayed in the lower right corner of the LCD The Final result will remain displayed To clear the result and prepare the unit for the n...
Страница 25: ...is possible to estimate its course and determine the time needed to dry the sample as well as analyze its moisture content The X axis of the chart represents 160 time intervals for longer time interv...
Страница 26: ...F4 MEM key to access the unit s Memory Bank 2 Use the navigation keys to select a desired set of stored parameters 3 Once the set has been selected press the ENTER key 4 Stored parameters will be upl...
Страница 27: ...14 Report Printing Drying started Date 2006 10 17 Time 13 03 24 Drying parameters Product Drying temperature 119 C Mode m0 m m0 100 Finished time over Initial weight 0 000 g Final weight 0 000 g Dryi...
Страница 28: ...t medical advice if irritation develops Sodium Tartrate Dihydrate is a chemical compound that can be used as a standard to check the accuracy of the Moisture Analyzer When the chemical is heated to 15...
Страница 29: ...ce the mass in the middle of the pan The weighed result may be taken when the stabilization indicator appears on the display 16 1 Taring 1 If a container is used for weighing it may be tared In taring...
Страница 30: ...shed taring the balance will return to Weighing Mode The display will indicate 0 and the NET indicator will be shown on the display signaling the next weight taken is a NET result Note Do not touch or...
Страница 31: ...tainer on the Analyzer s pan and press the T key to tare After taring the container manually count out the sample you want to be used for calculating the average piece weight of your counting transact...
Страница 32: ...TER key 6 Using the numeric keys enter the value of your sample size placed in the container and press the ENTER key 7 Once your custom sample size value has been entered use the navigation keys to se...
Страница 33: ...oved from the scale To exit parts counting and return to basic weighing select Deactivate from the parts counting menu 17 2 Counting Based on a Known Individual Piece Weight 1 Place a container on the...
Страница 34: ...counted parts 6 Once the exact individual piece weight has been entered use the navigation keys to select option number 1 Activate and press the ENTER key 7 The scale will display 0pcs At any time pr...
Страница 35: ...the Menu key to enter the Main Menu of the weighing mode 2 Use the navigation keys to select CALIBRATION and press the ENTER key 3 To change the calibration mass use the navigation keys to select EXT...
Страница 36: ...ENTER key to start the calibration process 6 Before calibration begins the scale will perform an automatic tare 7 After the tare is complete the screen requests that the External Load whose value is s...
Страница 37: ...he unit the screen requests a waiting period which is followed by a screen showing dashes After completing the calibration process the unit will return to the Calibration Menu 11 To get a Report Print...
Страница 38: ...utotaring function select option 1 and press the ENTER key 4 To change the auto zeroing range use the navigation keys to select option 2 Correction Range and press the ENTER key 5 Using the numeric ke...
Страница 39: ...navigation keys to select RS232 and press ENTER 3 To configure the RS232 Port use the navigation keys to select the desired parameter press the ENTER key and then once again use the navigation keys to...
Страница 40: ...ustment and press ENTER 3 In order to have the Measurement Number or the Date and Time printed on the weighing report use the navigation keys to make a selection and press the ENTER key 19 4 Time and...
Страница 41: ...NTER key to move to the next segment 5 To change the date select Date with the navigation keys and press ENTER Using the numeric keys to enter the current date The date is entered in segments day mont...
Страница 42: ...key 19 6 LCD Setting 1 Enter the main menu by pressing the MENU key 2 Use the navigation keys to select LCD SETTINGS and press ENTER 3 To change the contrast of your LCD display select Contrast and p...
Страница 43: ...ely turn off the back light of the LCD display select Back Light and press ENTER 6 Using the left and right arrow navigation keys select OFF Once the back light is turned off press the ENTER key to sa...
Страница 44: ...e from fingerprints Even a small amount of oil from your fingers can cause the bulb to break when it is turned on Replacing the Halogen Bulb Replace the halogen bulbs when they are defective or when y...
Страница 45: ...sample Error Cause Explanation Solution Load error Scale load at start up exceeds 10 of the scale MAX capacity The pan was not empty while the scale was initiating at start up Clear the pan and restar...
Страница 46: ...check sum error EEPROM Error EEPROM1 or EEPROM2 memory error CRC Error xx Check sum error number xx in EEPROM memory Service switch OFF Attempt to access the Service mode with the Service Switch in th...
Страница 47: ...47 Description Part No Power Cord AGS9250 Pan Assembly AGS9260 RS232 Printer Cable AGS9270 Disposable Pans AGS9280 Halogen Bulbs AGS9290 Sodium Tartrate Dihydrate AGS9291 Chapter 23 Replacement Parts...
Страница 48: ...d that the product was tampered with misused overloaded abused mishandled placed in an improper environment improperly installed or adjusted used for a purpose other than that for which it was designe...