28
For installation with standard angle stop incoming water supply valve (See Figure 14).
A.
Shut off the water at the angle stop valve.
B.
Use a wrench to loosen the compression nut on the angle stop riser tube/flex line to upper
faucet.
C.
Install the incoming water supply valve onto the angle stop. Use the wrench to tighten the
compression nut on the incoming water supply valve.
Do not over
-
tighten.
D.
Reconnect the riser tube to the other end of the incoming water
supply valve.
Do not overtighten.
Caution: A longer riser tube assembly will be required if a gentle
loop cannot be made.
(See Figure 13).
E. Fully insert the
1/4”
tube into the speedfit/John Guest style con
-
nection. The new incoming water valve can be swiveled to position
the tubing out of the way.
F.
Make sure the incoming water supply valve is off before turning
the angle stop valve on. Check for leaks.
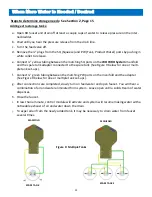
Figure 13:
Flexible Hose Positions
Install the Incoming Water Supply Valve
Figure 14: Installation with Flexible Hoses
Incorrect Correct
Содержание WOW RO System
Страница 4: ...4 Figure 1 Installation Diagram...
Страница 5: ...5 Section 1 Installation Start up Procedures...
Страница 8: ...8 Installation Kit Contents A B C D E F G H I G...
Страница 17: ...17 Figure 7 Refrigerator Icemaker...
Страница 24: ...24 Modular Expandability Parallel Processing...
Страница 25: ...25 Section 4 Plumbing the Sink...
Страница 29: ...29 Section 5 Maintenance...
Страница 35: ...35 Section 6 Troubleshooting...

