27
The most convenient installation will allow the use of an existing spray attachment or soap dis-
penser hole. If either hole is not available, then follow the basic procedures outlined below.
Drilling a stainless steel sink:
A.
Mark the sink location for the center of the spigot.
B.
Impact punch the sink top to provide a starting point for the drill bit.
C.
Drill a
1/4”
pilot hole in the sink using a high
-
speed drill bit.
D.
Drill a
1/2”
diameter hole to accept the bolt of a
1”
Greenlee Chassis Punch.
E.
Set the punch and turn the nut with a wrench to cut the hole. Follow Greenlee instructions.
Drilling a porcelain clad steel or cast
-
iron sink:
Caution: Be careful when the drill is about to penetrate the base metal of the sink. Reduce the
speed and support the drill so the drill chuck does not impact the porcelain or enamel.
A.
Position the faucet for customer convenience and then secure the faucet on the sink.
B.
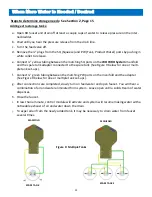
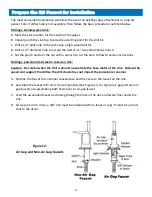
Assemble the faucet with all of the components (See Figure 12, for typical air
-
gap and non air
-
gap faucet) pre
-
assembling both drain lines to air
-
gap faucet.
C.
Feed the assembled faucet and tubing through the hole in the sink and fasten from under the
sink.
D.
Air
-
Gap return to drain; a
3/8”
line must be installed with no loops or sags. It must be a direct
shot to the drain.
Figure 12:
Air Gap and Non
-
Air Gap Faucets
Prepare the RO Faucet for Installation
Содержание WOW RO System
Страница 4: ...4 Figure 1 Installation Diagram...
Страница 5: ...5 Section 1 Installation Start up Procedures...
Страница 8: ...8 Installation Kit Contents A B C D E F G H I G...
Страница 17: ...17 Figure 7 Refrigerator Icemaker...
Страница 24: ...24 Modular Expandability Parallel Processing...
Страница 25: ...25 Section 4 Plumbing the Sink...
Страница 29: ...29 Section 5 Maintenance...
Страница 35: ...35 Section 6 Troubleshooting...

