background image

62

Recording and Playing

7.1.2

Current programme recording

You can record the current pro-

gramme including the bits that

you have already watched as

long as you have not changed
services at all. To do so, select
the

Recording

menu.

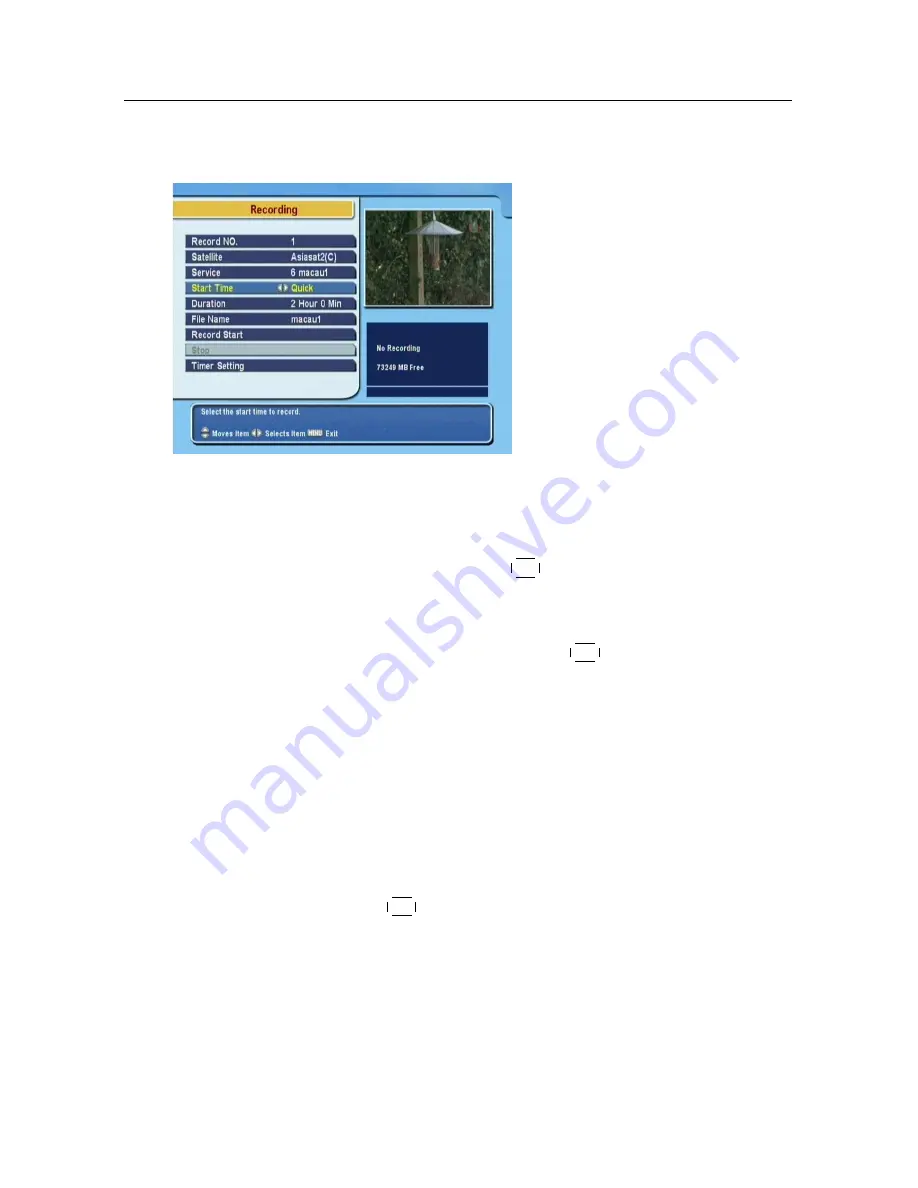
You can record two services at the same time. Set the

Record

No

option to distinguish two recordings.

Set the

Satellite

option to the satellite which transmits the ser-

vice you want. Pressing the


OK

button on this option displays

a satellite list, from which you can select your desired satellite.

Set the

Service

option to the service which provides the pro-

gramme you want. Pressing the


OK

button on this option

displays a services list, from which you can select your desired
service.

To start recording immediately from now on, set the

Start Time

option to

Quick

. If you are watching a programme by time

shift and wish to record it from the beginning, set this option
to

Current Event

.

Set the

Duration

option to a desired time, in which the recording

will be finished.

Pressing the


OK

button on the

File Name

option displays the

on-screen keyboard, with which you can specify a file name
for the timer recording. If you do not specify anything, it will
be named after the service name. See §

6.3

for how to use the

on-screen keyboard.

Содержание TF 4000 PVR Plus

Страница 1: ...TOPFIELD TF 4000 PVR Plus User Guide Digital Satellite Receiver Personal Video Recorder...

Страница 2: ......

Страница 3: ...Setup 8 2 1 Unpacking 8 2 2 Safety precautions 8 2 3 Rear panel connections 10 2 4 Connecting up your digital receiver 11 2 4 1 Connecting the antenna 12 2 4 2 Connecting to your television 13 2 4 3 C...

Страница 4: ...urn on the time shift feature 25 4 Service Search 26 4 1 Searching broadcasting services 26 4 1 1 Configuring LNB settings 26 4 1 2 Configuring DiSEqC 1 2 settings 29 4 1 3 Configuring USALS settings...

Страница 5: ...diting satellite and transponder list 52 6 5 2 Editing television and radio services list 55 6 5 3 Editing favourite list 56 7 Recording and Playing 58 7 1 Recording a programme 59 7 1 1 Instant recor...

Страница 6: ...ookmark 79 7 3 5 To play back a recording repeatedly 80 7 3 6 To play back recordings in sequence 81 7 3 7 To play back a scrambled recording 82 7 4 Editing a recording 82 7 5 Copying a recording 83 7...

Страница 7: ...na logue broadcasts however digital broadcasts are not all as signed to their own frequencies instead multiple television broadcasts are transmitted through a single frequency The fre quency in digita...

Страница 8: ...ours of television in case of 250 gigabytes in excellent picture and sound quality Time shift is a special technical feature available on the TF 4000 PVR Plus You can pause the programme you are watch...

Страница 9: ...ls REMOTE lamp lights up whenever you press a button on the remote control STANDBY button switches the digital receiver between standby mode and operation mode CH c a buttons switch to previous or nex...

Страница 10: ...imer 6 Numeric buttons are used to enter a service number for service change or to specify values for menu options 7 switches between the current service and the previously viewed one 8 displays the s...

Страница 11: ...verse playback Subsequent presses increase the rewind speed 21 resumes normal playback speed or displayes the progress bar for navigation on playback or time shift To play a recorded programme see but...

Страница 12: ...recording 34 is used to display the list of recorded programmes that are stored on the internal hard disk drive See 7 2 for more details 35 displays the services list for sub screen It is also used t...

Страница 13: ...vice you want to watch 2 Insert the subscription card into the conditional access module 3 Insert the conditional access module into a common in terface on the front of the digital receiver To view th...

Страница 14: ...batteries for the remote control AAA 1 5 V User manual NOTE Accessories may vary according to your local area 2 2 Safety precautions Please read carefully the following safety precautions The mains po...

Страница 15: ...cabinet make sure there is a minimum space of 10 centimetres around it For the physical specification of the digital receiver refer to Table 2 2 Protect the power cord from being walked on or pinched...

Страница 16: ...irst tuner 2 IF 1 OUT Satellite broadcasting signal output socket through the first tuner 3 LNB 2 IN Satellite broadcasting signal input socket for the second tuner 4 IF 2 OUT Satellite broadcasting s...

Страница 17: ...eo RGB YUV video output Left right audio output VCR CVBS video output Left right audio output CVBS S Video RGB video input for bypass Left right audio input for bypass S PDIF Dolby digital audio outpu...

Страница 18: ...ve two antennas without DiSEqC switch then you have to connect a cable from the other antenna directly to the LNB 2 IN connector rather than using the loop cable If you have another digital receiver l...

Страница 19: ...tion To use the SCART connector For best results with a standard television set you should use a SCART cable plugging one end into the TV socket on the digital receiver and the other end into a free S...

Страница 20: ...AUDIO L white and AUDIO R red sockets on the digital re ceiver and the other end into the matching sockets on your television or audio system To enjoy Dolby digital audio your televi sion or audio sys...

Страница 21: ...nt by remov ing the lid and then insert the batteries observing the polarity which is marked on the base of the battery compartment If the digital receiver no longer reacts properly to remote con trol...

Страница 22: ...16 Setup need to temporarily connect the composite video connector VIDEO to your television set so that you can see the on screen menus in order to configure the video settings...

Страница 23: ...title track should be output Select the System Setting Lan guage Setting menu You should see a screen like the left figure Menu language The digital receiver supports many menu languages Dutch English...

Страница 24: ...ny available language no subtitle will be displayed Apart from this setting you can select a subtitle track with the button See 5 2 5 for detailed description Audio language Set the 1st Audio Language...

Страница 25: ...pe option to PAL In that case if you switch to a service of the NTSC standard the digital receiver will presents the pictures converting into the PAL standard However it is inevitable to lose a little...

Страница 26: ...linked to your video cassette recorder or such an appliance via the VCR SCART connector In that case the digital receiver will operate differently depending on the setting of the VCR Scart Type option...

Страница 27: ...ide screen pictures then will be cut out on the left and right sides equally to fit to the width of the normal screen 3 2 5 Sound mode Basically there are two audio sources as you can find two audio s...

Страница 28: ...lection option to one among the following Normal from all transponders CAS TP from transponders of pay services User Select from transponders specified by you If you set it to User Select then the Sat...

Страница 29: ...iyadh Moscow St Petersburg GMT 3 30 Tehran GMT 4 00 Abu Dhabi Muscat Baku Tbilisi GMT 4 30 Kabul GMT 5 00 Ekaterinburg Islamabad Karachi Tashkent GMT 5 30 Bombay Calcutta Madras New Delhi GMT 6 00 Alm...

Страница 30: ...you will be asked your Personal Identifica tion Number PIN The number is initially set to 0000 If you wish to block 15 or above rated programmes set the Censorship option to 15 age Setting it to No bl...

Страница 31: ...ire Its available range is from 1 to 30 seconds If you set this option to No Info Box the information box will not be displayed when you switch services However pressing the button will display the in...

Страница 32: ...na settings according to your antenna system in the following order 1 Configure LNB settings Refer to 4 1 1 2 Set the position of your desired satellites if you have a motorized antenna You can contro...

Страница 33: ...a LNB Select the Installation LNB Set ting menu to configure the LNB settings You should see a screen like the left figure Pressing the OK button on the Satellite Name option displays the satellite li...

Страница 34: ...in the correct LNB frequency The absolute difference between a broadcasting frequency and its LNB fre quency must be within 950 to 2150 MHz For example if the frequency band of your desired satellite...

Страница 35: ...ings Your motorized antenna will turn toward your desired satellites horizontally by DiSEqC 1 2 When you switch to an service if the service is provided by a satellite other than current one it will t...

Страница 36: ...every trans ponder and choose the best one at the Transponder or Frequency option It will be helpful to your fine tuning 6 Finally set the Motor Control option to Store to save the tuned position whe...

Страница 37: ...he My Longitude option and the My Latitude option with the V V and numeric but tons 4 Enter the position of your selected satellite to the Satellite Angle option if it is not correct 5 Select the Goto...

Страница 38: ...of a SMATV Satellite Master Antenna Television system Searching every service of a satellite To search every service of a satellite perform the following steps 1 Choose your desired satellite at the...

Страница 39: ...up to date channel information as searching services but it takes rather longer time NOTE You may get transponder information from a satellite magazine or website such as http www satcodx com or http...

Страница 40: ...it with the numeric buttons 4 Enter the symbol rate of your desired transponder to the Symbol Rate option with the numeric buttons 5 Set the Polarization option to the polarization of your desired tra...

Страница 41: ...d tuner s services list select the Tuner 1 to Tuner 2 option To copy on the contrary select the Tuner 2 to Tuner 1 option To copy reciprocally select the ALL option 4 3 Resetting to factory settings T...

Страница 42: ...e button Press it again to restore the sound to previous level 5 2 Watching television To change services press the P or P button Pressing the button switches to the previously viewed service In ad di...

Страница 43: ...or down Entering a service number with the numeric buttons puts the highlight bar on its entry You can switch between the television services list and the radio services list by pressing the button Pr...

Страница 44: ...ber to watch or unlock it To delete the highlighted service select the Delete option then you are asked for confirmation If you select Yes it will be deleted If you want to restore it as before you ha...

Страница 45: ...hightlight bar on a desired group and press the V button a highlight bar appears on its favourite services list Once you select a desired service with the OK button it will be presented Otherwise to...

Страница 46: ...r Transponder information Signal level and quality Programme name Programme classification symbol Programme summary Broadcasting time Current time In addition you might see the following symbols Subti...

Страница 47: ...le symbol will be marked on the infor mation box Pressing the button displays available subtitle tracks Once you select a subtitle track it will be displayed 5 2 6 Viewing teletext On some services su...

Страница 48: ...the button To switch it back press the button again Pressing the button displays the programme guide in the form of a spreadsheet To switch it back press the button again You can make a timer recordin...

Страница 49: ...called time shifted tele vision Then you can skip com mercials until you catch up to the live broadcast In order to use the time shift feature the Time Shifting option must be set to Enable See 3 6 Wh...

Страница 50: ...t see 7 1 5 To end time shift press the button The live pro gramme will be presented When time shift option is disabled and pause is kept for more than 10 seconds the time shift feature will be switch...

Страница 51: ...e available services in the services list may be limited 4 Pressing the button moves the sub screen counter clockwise and pressing the button moves it clock wise 5 Pressing the SAT button swaps the ma...

Страница 52: ...the services list Select the Organizing Services menu You should see a screen like the left figure There are editing options on the left column and service entries on the right column Once you put th...

Страница 53: ...sition Press the OK button to fix it You can lock some services to prevent your children from watching them To lock a service select the Lock option and select a desired service then the selected serv...

Страница 54: ...rite list centre Services list right The services list contains all available services whereas the favourite list contains only chosen services that have been added to the highlighted group As you mov...

Страница 55: ...o add more entries 3 Press the button and the highlight bar get moved to the favourite list You can delete a favourite entry with the OK button 4 To select another group press the button again By pres...

Страница 56: ...or to the right of the desired letter on the input line and then select the Del key You must select the Save key to complete naming otherwise if you press the EXIT button it will not be named 6 4 Tran...

Страница 57: ...rt the target digital receiver when the data transfer is complete 6 5 Editing channel data on your computer You can edit the channel data on your computer by using a channel editor programme Vega With...

Страница 58: ...al receiver Data transfer will start as soon as it is turned on Of course you can open a std file instead of importing the chan nel data from the digital receiver if you have one When you have finishe...

Страница 59: ...1 2 enter the value into the Position Index field If you do not you have to perform the Motorized DiSEqC 1 2 menu of the digital receiver Refer that menu to 4 1 2 After making a new satellite entry b...

Страница 60: ...tream identification for your new transponder Pressing the OK button will save a new transponder entry To delete a tansponder entry choose your desired transponder entry at the TP List list box and th...

Страница 61: ...the TV Service list and press the Delete key on your keyboard When a confirmation dialog box appears the selected service entry will be deleted by pressing the Yes button on it Checking the CAS check...

Страница 62: ...st is displayed and related menus become enabled To delete a favourite group choose your desired favourite group at the Favorite Group Name drop down list box and then select the Function Fav Group De...

Страница 63: ...add services to the new group choose your desired services at the All Service list box on the left of the screen and then press the right arrow button on the center of the screen Then the selected se...

Страница 64: ...ature You can record two different services while playing back a previously recorded programme You can record two different services while watching one of them using the time shift feature See 5 5 for...

Страница 65: ...erefore you can only change to a limited number of services while the two programs are being recorded CAUTION Do not move the digital receiver nor pull out the plug while it is running It may cause da...

Страница 66: ...nd press the OK button the recording will end at the specified time If the information about the next programme is provided by the electronic programme guide the After this program and After next prog...

Страница 67: ...watch or record another service To additionally record another service switch to the service you want to record and press the button Once a recording is started it is put on the recorded programme lis...

Страница 68: ...t the Service option to the service which provides the pro gramme you want Pressing the OK button on this option displays a services list from which you can select your desired service To start record...

Страница 69: ...7 1 Recording a programme 63 Once the Record Start option is selected the recording is started and the Stop option becomes enabled To stop the recording select the Stop option...

Страница 70: ...d To add a new timer event press the button and a box like the left figure appears Take the fol lowing steps 1 Set the Record option to On to make a recording If this option is set to Off the digital...

Страница 71: ...day month year day of the week Set the Start Time option to a desired time at which the recording will be started The time format is hour minute 7 Set the Duration option to a desired time in which t...

Страница 72: ...hange its settings in the same manner as making a new one To delete a timer event put the highlight bar on the entry you want to remove and press the button then you are asked for confirmation If you...

Страница 73: ...a service you want to record with the V and V buttons 3 Select a programme you want to record with the P and P buttons 4 To make a timer event without recording press the OK button the letter P is di...

Страница 74: ...n record it by performing the following steps 1 Press the button to display the progress bar 2 To move to the beginning of the desired scene hold down the or button until it is reached 3 Press the but...

Страница 75: ...owing steps 1 Select a programme of a pay service you want to record 2 Make sure that the subscription card is inserted in the slot on the front of the digital receiver 3 Start recording 4 Do not swit...

Страница 76: ...ying duration file size and so on You can play move delete rename and lock a recording file You can also sort the recording files by file name playing dura tion or file size In addition you can make a...

Страница 77: ...dings To sort the recordings perform the following steps 1 Press the button to display the additional options 2 Set the Sorting option to Alphabetic Time or Size as you want 3 Press the EXIT button 4...

Страница 78: ...e following steps 1 Put the highlight bar on a desired recording 2 Press the button to display the additional options 3 Set the Lock option to Locked 4 Press the EXIT button 5 The lock symbol is displ...

Страница 79: ...ecording perform the following steps 1 Put the highlight bar on a desired recording 2 Press the button to display the additional options 3 Select the Rename option and the on screen keyboard appears C...

Страница 80: ...ecording and Playing 7 2 5 To make a new folder To make a new folder press the button then a new folder named GROUP is created You can change its name in the same manner as renaming a recording See ab...

Страница 81: ...lay the list of recorded pro grammes 2 Put the highlight bar on a desired recording 3 Press the OK button to start playback 4 To stop playback press the button During a playback you can enjoy the foll...

Страница 82: ...ard hold down the button To bookmark a position refer to 7 3 4 If there are no bookmarks you can jump forward 30 seconds at a time by pressing the button You can jump backward 10 seconds at a time by...

Страница 83: ...rding 77 7 3 2 To play in slow motion To watch in slow motion during a playback press the button If you press it repeatedly the playback speed changes in 3 steps 1 2 1 4 and 1 8 times To resume normal...

Страница 84: ...it repeatedly the playback speed changes in 3 steps 2 4 and 6 times To resume normal speed press the button You can play not only forward but also backward in fast mo tion To play backward press the...

Страница 85: ...again afterwards To make bookmarks perform the following steps during play back 1 Press the button to display the progress bar 2 To add a bookmark press the button at a desired scene then you will se...

Страница 86: ...l it press the button again To play back in part perform the following steps 1 Press the button to display the progress bar 2 Move to the beginning scene of the part you want to play repeatedly by hol...

Страница 87: ...e button to display the list of recorded pro grammes 2 Select each desired recording with the button once a recording is selected it gets numbered 3 Press the OK button to start playback 4 The selecte...

Страница 88: ...not been descrambled at all Refer to 7 1 6 for how to record a pay service programme 7 4 Editing a recording You can cut out or save a part such as a commercial from a recording by performing the foll...

Страница 89: ...to play the original recording then pressing button until the speed has increased to six times then pressing the button The copy will be done at six times normal speed 7 6 Formatting the hard disk You...

Страница 90: ...an update utility which runs on most versions of Windows from the Topfield website http www i topfield com 8 1 Checking the firmware information You have to check the firmware information of your dig...

Страница 91: ...8 1 Checking the firmware information 85 NOTE You can only update with firmwares of which system identifi cation is identical to that of yours Otherwise you will fail in firmware update...

Страница 92: ...irmware applicable to your digital receiver from the Topfield website 2 Turn off the digital receiver 3 Plug one end of a RS 232 cable 9 pin D sub cable into the RS 232 port on the dig ital receiver a...

Страница 93: ...end of a RS 232 cable 9 pin D sub cable into the RS 232 port on the dig ital receiver and the other end into the matching port on the other digital receiver 3 Turn on the source digital receiver if n...

Страница 94: ...ing the Start option starts firmware update Satellite Astra 19 2 E Frequency 12603 MHz Symbol Rate 22000 KS s Polarisation Horizontal PID 347 On the left table is presented the transponder information...

Страница 95: ...Alphabetic 71 Astra 88 AUDIO L 14 AUDIO L R 10 AUDIO R 14 Auto 32 Button 4 C band 26 CAM 6 CAS 55 CAS only 34 CAS TP 22 CAS FTA 38 48 Censorship 24 Center extract 21 Change PIN Code 24 CI 6 Common Int...

Страница 96: ...nd 27 keyboard 50 Language Setting 17 Letter Box 21 LNB 27 LNB 1 IN 10 LNB 1 IN 12 27 28 LNB 2 IN 10 LNB 2 IN 12 27 28 LNB Frequency 28 LNB Power 28 LNB Setting 27 Local Time 22 Lock 38 47 55 72 Locke...

Страница 97: ...8 71 Sound Mode 21 Space 50 specifications 9 11 Start 88 Start Search 34 Start Time 62 65 std 51 52 stereo 21 Stop 63 Store 30 subtitle 41 Symbol Rate 33 34 System ID 84 System Setting 25 teletext 41...

Страница 98: ...92 INDEX VCR Scart Type 20 Vega 51 VIDEO 10 VIDEO 13 14 Video Output 20 Weekly 65 wide screen television 20...

Страница 99: ......

Страница 100: ...either the retailer where they purchased this product or their local government office for details of where and how they can dispose this product for environmentally safe recycling Business users shou...

Отзывы: