background image

5

Chapter 2 – User Interface Description

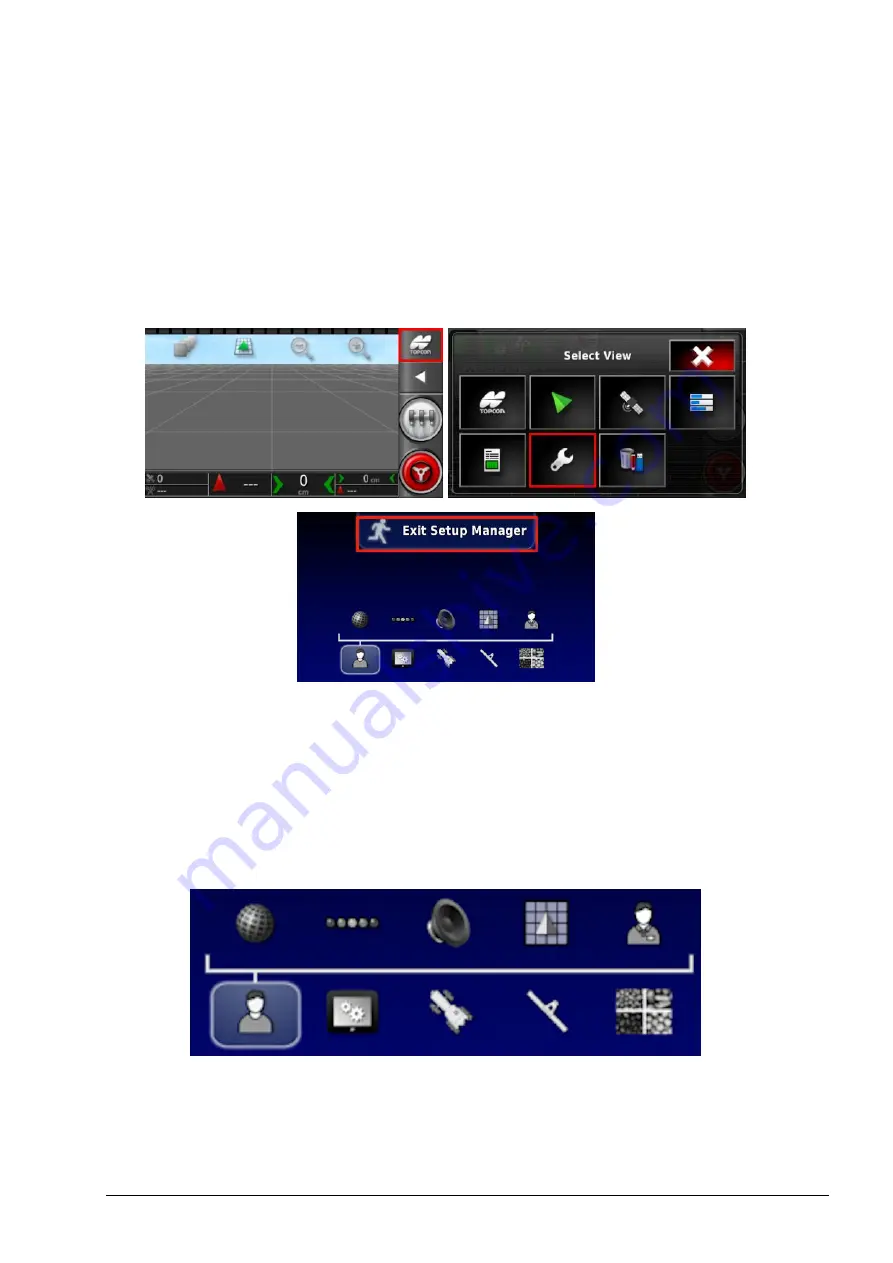
2.1. Switching between setup and operation
screen

The console has two main screens; the Operation screen and the Setup
screen.

Use the highlighted buttons to switch between the screens.

2.2. Setup screen controls

This section describes the Setup screen controls.

The Setup screen has the following types of controls:

Menus

Menu items are selected from the base of the screen to display the
next level of sub-options. When features are enabled, more items may
appear in the menus.

Содержание AGA5495

Страница 1: ...www topconpositioning com X14 Console Guidance Auto Steering Operator s Manual...

Страница 2: ......

Страница 3: ...ght Topcon Precision Agriculture April 2016 All contents in this manual are copyrighted by Topcon All rights reserved The information contained herein may not be used accessed copied stored displayed...

Страница 4: ......

Страница 5: ...X PROSTEER EAGLE KEE Technologies Topcon Topcon Positioning Systems and Topcon Precision Agriculture are trademarks or registered trademarks of the Topcon Group of companies Microsoft and Windows are...

Страница 6: ...THE PRODUCT INCLUDING ANY IMPLIED WARRANTY OR MERCHANTABILITY OR FITNESS FOR ANY PARTICULAR USE OR PURPOSE TPA IS NOT RESPONSIBLE FOR THE OPERATION OF GNSS SATELLITES AND OR AVAILABILITY CONTINUITY AC...

Страница 7: ...t it must be severed without affecting the validity and enforceability of the remainder of these Terms and Conditions Service Information Service assistance can be provided by contacting your local TP...

Страница 8: ...her electronic device l Connecting the equipment to another circuit that is not linked to the radio To reduce potential interference operate the equipment at the lowest gain level that will allow succ...

Страница 9: ...dealer in the event of loss or damage If a used vehicle has been purchased make sure all safety signs are in the correct location and can be read Replace any safety signs that cannot be read or are m...

Страница 10: ...s products However it is always advisable not to handle damaged elec tronic equipment This Topcon product may contain a sealed lithium battery Always dispose of any electronic equipment thoughtfully a...

Страница 11: ...quipped with Topcon products read and understand the following product specific safety precautions Important Safety Information Operator Alertness and Responsibility The console helps the operator to...

Страница 12: ...appears in the path or the vehicle moves away from the wayline On Off and Manual Control WARNING Ensure the steering switch is Off to prevent unintentional engagement of the assisted steering When rep...

Страница 13: ...nted To Get the Best Out of the Product Back up data regularly The console has large but limited storage capacity Use the Diagnostics Mini view to view capacity available A warning screen displays if...

Страница 14: ...dance toolbar 9 2 4 2 Menu icons 9 2 4 3 Navigation window icons 12 2 4 4 View controls 12 2 4 5 Other icons 13 Chapter 3 Quick Setup Guide 15 3 1 Software update instructions 15 3 2 Getting started 1...

Страница 15: ...ement Setup 47 7 1 Selecting an implement 48 7 2 Setting up a new implement 48 7 3 Setting the implement geometry 49 7 4 Setting up section control 50 7 4 1 Setting timing 50 7 4 2 Setting up the sect...

Страница 16: ...ting a boundary from coverage 79 11 3 2 Creating a boundary from a shapefile 80 11 3 3 Editing a boundary 82 11 3 4 Removing a boundary 82 11 4 Setting flag points 83 11 4 1 Removing or changing a fla...

Страница 17: ...e options 103 15 2 Compensating for GPS drift 103 15 2 1 Compensating correctly for GPS drift 104 15 2 2 High accuracy correction sources 105 Chapter 16 Inventory Manager 107 16 1 Searching categories...

Страница 18: ...xiv...

Страница 19: ...ng please read the safety instructions and learn about the controls by reading this manual carefully The console is a touchscreen To select something on the screen touch the area with the tip of a fin...

Страница 20: ...the center of the alarm window Note that extra details may be displayed for some alarms by dragging the window downwards 6 Confirm the GPS receiver is connected correctly and communicating Note If th...

Страница 21: ...n the base of the screen Question marks appear on the screen next to the icons Select the screen element showing a question mark to view the names USB eject The USB port is on the harness This can be...

Страница 22: ...ntrol adjusts the brightness of the display Use plus or minus to adjust display Day night mode Day night mode changes the brightness of the display Settings are Day Night and Auto Auto light mode will...

Страница 23: ...p screen Use the highlighted buttons to switch between the screens 2 2 Setup screen controls This section describes the Setup screen controls The Setup screen has the following types of controls Menus...

Страница 24: ...tion lists Selection lists are used to choose one or more items from a list A message is displayed if too many items are selected in a multiple choice list Selections must be confirmed using the tick...

Страница 25: ...ypads are used to enter alphanumeric characters or numeric characters Entries must be confirmed Wizards Wizards are used to guide the operator through a complex configuration of the system by answerin...

Страница 26: ...ted information from the system for monitoring Refer to Monitoring on the dashboard page 62 4 Navigation window Displays a list of selectable views information screens the setup screen and the invento...

Страница 27: ...essure l Yellow Section is on and not flowing intentionally typically due to auto section control stopping the flow l Green Section is on and flowing l Orange Section is on and not flowing unintention...

Страница 28: ...78 Complete field boundary recording 78 Boundary recording offset 78 Clear field boundary 82 Create boundary from shapefile 80 Create boundary from coverage 79 Job menu Job menu 85 Select job 86 Creat...

Страница 29: ...2 Create new AB line 89 Set A point 90 Open manual AB line entry window 90 Steering options menu Steering options menu 95 Auto steer status 95 Auto steer tuning parameters 98 Auto steer calibration 67...

Страница 30: ...ation 103 2 4 3 Navigation window icons System information 55 Guidance 56 GPS information 60 System diagnostics 61 Job information 55 Auto section control 28 Inventory manager 107 Switch box 51 Setup...

Страница 31: ...Chapter 2 User Interface Description 13 Zoom out in 60 2 4 5 Other icons Master switch 51 Auto steer engage 95...

Страница 32: ...2 4 Icon descriptions 14...

Страница 33: ...1 Insert the USB containing the upgraded software 2 Go to the Setup screen and select System Utilities 3 Select CONSOLE SOFTWARE UPGRADE Selecting this option displays a message that the console will...

Страница 34: ...geometry of the implement see page 48 7 Go to the Operation screen 8 Go to Select Field and create new Client Farm and Field see page 77 9 Go to New Job and create a new job see page 85 The system is...

Страница 35: ...17 l Enable the Auto Section Control feature in System Features Implement AUTO SECTION CONTROL see page 28 12 To control any of the enabled features from the Operation screen use the buttons on the Na...

Страница 36: ...3 2 Getting started 18...

Страница 37: ...d units l Lightbar Sets operation of the LED bar for guidance use l Environment Sets up console interaction l Map Sets how maps work on the Operation screen l Access Level Selects access levels to det...

Страница 38: ...epresented by a period or a comma 4 1 2 Time date setup The date information is used on the console for job start and end dates as shown on job reports The current date is supplied from the GPS signal...

Страница 39: ...ided because gallons fluid ounces and bushels have different measurements in the US and the UK Note Changing this setting will not override the selection of individual units Pressure Area etc that hav...

Страница 40: ...behavior when the operator presses the up down buttons to change the requested product application rate These can either change by a fixed rate or by a percentage of the rate set for RATE PRESET1 Appl...

Страница 41: ...20 and 30 cm another green LED illuminates l Yellow LEDs illuminate at 40 50 and 60 cm l Red LEDs illuminate at 70 80 and 90 cm l Once the cross track reaches 100 cm or more all LEDs turn off except f...

Страница 42: ...r to Inventory Manager page 107 Automatic steering status window Displays a Steering Status window when the Auto Steer Engage button is selected on the Operation screen if the steering is unable to en...

Страница 43: ...his has been enabled and past job information has been recorded New coverage is shaded green If this option is not enabled both the previous coverage from the loaded job and the newly recorded coverag...

Страница 44: ...ble to the user To change the access level 1 Select User Access Level The Access Level may be set at Easy Standard or Expert A password may be set for the Standard and Expert levels to prevent inexper...

Страница 45: ...he System menu option provides the following menu items l Features Enables or disables optional features l GPS Sets up the functionality of the connected GPS receiver l Alarms Sets alarm functionality...

Страница 46: ...AB lines identical curves pivots and guidelock are all enabled by default If some guideline types are not required they can be disabled It is not possible to disable all guideline types at the same t...

Страница 47: ...s selected under GPS RECEIVER l GGA 0 2 seconds 5Hz l VTG 0 2 sec 5Hz l ZDA 15 seconds RS 232 communications l 19200 baud rate preferred 8 data bits No Parity 1 Stop bit 19200 8N1 Firmware upgrade Ini...

Страница 48: ...normally done prior to receiver installation but the file can be updated in the field via USB if required Baud rate The data transmission rate for modems GPS receiver baud rate can be changed from the...

Страница 49: ...Use Multi functional Satellite Augmentation System East Asia only Precision sub meter OmniSTAR VBS Use OmniSTAR Virtual Base Station VBS correction Precision sub meter RTK Use Real Time Kinematic navi...

Страница 50: ...compensation algorithm used to provide better pass to pass performance Available with the following correction sources Autonomous WAAS EGNOS MSAS OmniSTAR VBS Note This option must be purchased separ...

Страница 51: ...al cross border data charges useful if working near the border of another country l NTRIP Mount point The ID of the base station either real or virtual The GSM and CELL ROAMING settings can be obtaine...

Страница 52: ...ms Alternatively each general alarm may be enabled or disabled independently Note that for safety reasons the Steering Engage Disengage audible alarm may not be disabled The End of Row alarm requires...

Страница 53: ...firmware l The No GPS Time alarm displays the time date setup screen to enter the correct local time 5 3 2 Alarms list This is a list of all the alarms on the console and their descriptions Alarm Des...

Страница 54: ...rofile or contact your dealer for assistance Invalid obsolete profile loaded Triggered when an old implement or vehicle profile is active on the system This can occur if upgrading from a very old vers...

Страница 55: ...ters do not match the geometry configuration in the steering system Re select the vehicle on the Setup screen or ensure the vehicle geometry in the vehicle geometry screen is correct Path too far away...

Страница 56: ...subsystem Select the correct vehicle profile for this vehicle Steering restart needed Triggered if the steering subsystem needs to be power cycled Occurs for some types of steering subsystem after ca...

Страница 57: ...nsole software upgrade This option is used if the console software is being upgraded via a USB Insert the USB containing the upgraded software Selecting this option displays a message that the console...

Страница 58: ...5 5 Setting up utilities 40...

Страница 59: ...icle then more than one vehicle profile must be set The Vehicle menu option provides the following menu items l Select Select a vehicle from the previously created profiles l New Create a new vehicle...

Страница 60: ...pre defined factory vehicle templates displays Templates contain standard measurements and steering parameter information where this is available Measurements can be adjusted to correct for the partic...

Страница 61: ...Select Other A list of steering controllers displays l ACU 1 Autosteering Control Unit l AES 25 Accurate Electric Steering l AF AutoFarm valve block l RST Raven SmarTrax valve l Other Any other steeri...

Страница 62: ...the middle of the axles to the GPS receiver This is a positive number if the receiver is to the right of the middle of the axle and negative if the receiver is to the left l GPS Antenna The horizontal...

Страница 63: ...tomatically detect the controller options that are available in the list so the specific controller must be selected if it is an available option Selecting AES 25 as the controller adds extra options...

Страница 64: ...s selected the measurements for the location of this antenna must be entered Forward offset to AGI 4 or AGI 3 Enter the distance forward from the center of the AGI 4 to the center of the antenna use a...

Страница 65: ...s or guidelines This allows the creation of coverage maps and provides waylines for auto steering and guidance Refer to the Sprayer operator manual for detailed implement information The following inf...

Страница 66: ...ed To select an existing implement 1 Select Implement Select 2 Highlight the required implement and confirm or Select to import an implement profile from a USB 7 2 Setting up a new implement Creates a...

Страница 67: ...implement dimension Dimensions requested vary according to the type of implement selected 3 Add or adjust dimensions where needed and confirm The following lists measurements used in the system l Swa...

Страница 68: ...To set the section width for all sections select Width next to All 4 Enter the section width for all sections and confirm 5 To set individual widths for sections select the width next to a section ent...

Страница 69: ...can be either Virtual on the console screen or External a physical switch connected to the ASC 10 ECU or console To configure the switches 1 Select Implement Section Control Section Switch 2 Select T...

Страница 70: ...r to activate deactivate coverage map and master switch input External ECU sense Enables the master switch to be operated via an external switch a physical switch box master switch connected to the AS...

Страница 71: ...have urea saved once with different calibration figures for each bin 1 Select Product The Liquid Product Setup wizard is displayed For each product the following information must be defined l Rate in...

Страница 72: ...8 1 Setting up the product database 54...

Страница 73: ...display information screens the guidance screen and the inventory manager The following options are available System information Displays software and system information summaries Use the arrows and s...

Страница 74: ...ontrol configuration Refer to Implement setup page 28 for setup Refer to the sprayer manual for operation Virtual switchbox Refer to Setting up the section switch page 51 Setup Opens the setup screen...

Страница 75: ...owing objects on the operation screen l boundaries refer to Editing a boundary page 82 l flag points refer to Removing or changing a flag point page 83 Select visible map layers 1 Select to choose whi...

Страница 76: ...r by pressing the left right arrows to scroll through the list with a live preview of that layer in the map in the background Coverage shows in green Applied rate shows in selectable colors Legend dis...

Страница 77: ...rs and ranges used Toggle map view mode 1 Select to toggle views of the map North Up Overhead or Perspective In North Up View the top of the screen represents North In Overhead View the top of the scr...

Страница 78: ...gs and the grid numbers on the north south vertical axis are called Northings 2 Select the Vehicle Orientation tab This shows altitude heading degrees actual speed of the vehicle and roll pitch degree...

Страница 79: ...ormation from the satellites 9 5 Viewing system diagnostics To view diagnostic information 1 Select System Diagnostics from the Navigation window Memory usage and trouble codes display 9 6 Viewing job...

Страница 80: ...on the dashboard 2 Press again on the particular panel to be customized and further options display 3 Deselect and select options as required 4 Confirm the new dashboard display The chosen options app...

Страница 81: ...ources are detected If a specific source was chosen during GPS setup then the system will seek to detect the chosen system Refer to page 31 for more information on correction sources and to page 60 fo...

Страница 82: ...ield additional information such as obstacles and boundaries can be stored Under each job information about the job can be stored It is important to create clear names for farms fields and jobs so tha...

Страница 83: ...1 Jobs are named as follows l Implement Name _YYYYMMDD_XX The Implement Name is that of the currently loaded implement followed by the date in the format Year Month Day The _XX is appended if a job of...

Страница 84: ...9 10 Understanding default file names 66...

Страница 85: ...es To ensure accurate calibration the vehicle should have open sky visibility and be well away from trees high voltage power wires and buildings It is recommended to remove the implement if it is a tr...

Страница 86: ...bjects Then select next 4 Drive the vehicle in a circle at approximately 75 of full lock the direction does not matter Once 1 and turns have been completed stop and select next 5 Drive the vehicle str...

Страница 87: ...Calibration The Steering Calibration screen displays 2 Select WHEEL ANGLE SENSOR If the component reports as calibrated still complete the calibration procedure if the receiver has not been calibrate...

Страница 88: ...ceeding 7 Select next 8 The system will begin to save calibration data Wait until the screen states that the calibration is completed successfully and then confirm Note Some steering controllers may c...

Страница 89: ...el this calibration will adjust for the actual position WARNING Ensure the vehicle has sufficient space to travel in a straight line for at least 70 m 230 ft and then turn at each end of the wayline 1...

Страница 90: ...reen an audible tone will sound and an engage message will flash on screen to indicate the auto steering has engaged If steering does not engage when Auto Steer Engage is selected the steering status...

Страница 91: ...mph 16 Steer along the wayline back to the B waypoint previously created When the Distance To B is less than 50 m the blue line on the Calibration Progress bar will move from 50 and the percentage wil...

Страница 92: ...rm the recommended procedures below to fix the errors View Error Steering controller not initialized The steering subsystem is not turned on or is not ready for use Check to see that the steering subs...

Страница 93: ...vehicle geometry screen is correct Receiver Disconnected The AGI receiver has shutdown lost power or the receiver console serial connection has been broken Check the power supply to the receiver and...

Страница 94: ...tion moves when steering axle is turned Confirm wheel angle sensor harnesses and connections Check wheel sensor condition Failed wheel angle sensor Wheel Angle Sensor Not Detected Wheel angle sensor v...

Страница 95: ...ded when naming options appear It is highly recommended that the operator names items in a thoughtful and structured way to allow easy use in future seasons 2 Select CLIENT NAME or select an existing...

Страница 96: ...age 79 or created from shapefiles see page 80 The interior of a created boundary defaults to a work region however any boundaries created within that boundary default to an excluded region shown as gr...

Страница 97: ...into account any offset 5 Select Pause to pause recording This is useful if an obstacle prevents driving on the boundary The icon will change to show the record option Select Record to resume The bou...

Страница 98: ...ge area l Minimum excluded area Any gap in coverage smaller than the area specified here will not automatically create an excluded region This prevents very small gaps in coverage inside the boundary...

Страница 99: ...Chapter 11 Field Menu 81 6 Select a folder to open it Find the required file and select it It will display as white and next is now enabled 7 Confirm to import the shapefile boundary...

Страница 100: ...ion Where there are a large number of boundaries assigning each a category may be useful for example to include areas while spraying but exclude those areas while seeding Categories may then be used t...

Страница 101: ...ield 1 Drive to the item to be flagged 2 Select Field Menu Set Flag Point 3 To flag the obstacle choose a flag symbol to be placed at that spot on the map Note To change Flag Point presets refer to Se...

Страница 102: ...ading a field The Unload field option may be used to exit from a field and its associated flag points boundaries etc This prevents new coverage being added to the field if the vehicle has been moved t...

Страница 103: ...nd structured way to allow easy use in future seasons 4 Confirm the new job 12 1 1 Setting up job regions If one or more boundaries in the current field have a named Category refer to Editing a bounda...

Страница 104: ...st of existing jobs select Job Menu Select Job 3 Select the job and confirm Note Changing the client farm or field at the top of the Select Job window allows importing of a job from a neighboring fiel...

Страница 105: ...he product and choose the unit of measurement 12 4 Exporting a job report Job records can be exported in PDF format to a USB Exporting a job places the PDF report in D Reports and in D Client Farm Fie...

Страница 106: ...ssing or corrupt 12 5 Clearing a job This action will remove any coverage information on the screen and delete job data that has been recorded on the current job It does not affect field information o...

Страница 107: ...ines page 91 Guidelock Guidance mode page 92 Note To clear a guideline once it has been created refer to Inventory Manager page 107 Select the required Category then select the guideline to be deleted...

Страница 108: ...and choose Line Numbers This requires a field boundary refer to Setting a new boundary page 78 13 1 1 Setting AB lines manually It is also possible to set AB lines using coordinates 1 Select Guideline...

Страница 109: ...Menu Change Guidance Mode if necessary to choose Identical Curves 3 Select Create New Identical Curve 4 Select GUIDELINE NAME 5 Enter a name if desired and confirm Confirm the new guideline 6 Drive to...

Страница 110: ...elock guidance mode Guidelock is a coverage based guidance mode It generates a curve based on existing coverage regardless of when that coverage was laid This is convenient if wanting to steer around...

Страница 111: ...93 1 From the Guidelines Menu select the required guideline mode then select Select Guideline 2 Select client select farm and select field Existing guideline sets will display 3 Choose the guideline...

Страница 112: ...13 5 Selecting an existing guideline 94...

Страница 113: ...the conditions required for auto steering Red indicates that the conditions are not met and therefore steering is not ready 1 To review the status of the auto steering select Steering Options Menu Au...

Страница 114: ...ntial correction displays with red Confirm setup in console matches the correction source requirements 29 Position accuracy displays with red Allow time for convergence to occur What color is the sate...

Страница 115: ...eview geometry 42 43 Steering calibrated displays with red Confirm calibrations have been done for this vehicle Drive to an open space away from power lines and obstacles reboot and repeat calibration...

Страница 116: ...wheel and try again Speed displays with red Adjust speed to between 1 and 25 kph 0 7 15 mph The necessary speed may vary with the vehicle Cross track error displays with red Drive closer to the guidel...

Страница 117: ...vehicle s safe capability 4 Smoothing Radius for Curve Waylines sets how tight or loose the auto steering will adhere to curved waylines 2 Set Online Aggressiveness to suit the precision necessary fo...

Страница 118: ...teering on the console page 28 l Calibrated the steering page 67 l Confirmed that all Steering Status items are green page 95 l Set the auto steering tuning to suit the task and vehicle type page 98 l...

Страница 119: ...ngage if conditions are met within 15 seconds If conditions are not met it will return to red 3 Correct any issue displaying red in the Steering Status Panel work through issues displayed from the top...

Страница 120: ...ge OR l If using an external steering switch disengage using the switch WARNING Before leaving the vehicle disengage auto steer turn off the steering switch and remove the key Note A visual and audibl...

Страница 121: ...ed NUDGE OFFSET 4 Use Nudge Left or Nudge Right on the Nudge Options screen or on the Nudge menu to nudge the lines 5 TOTAL NUDGE calculates the total distance nudged Select this to set a total nudge...

Страница 122: ...The compensation value may be selected by Entering a positive or negative value in the NORTH and or EAST field and confirming Or Entering the required value in the GPS DRIFT INCREMENT field and then s...

Страница 123: ...move the vehicle to the location of the flag point The GPS drift compensation that is applied is remembered when the console is restarted However this compensation may no longer be accurate if conditi...

Страница 124: ...15 2 Compensating for GPS drift 106...

Страница 125: ...e Search the selected category Access items from a USB When browsing for USB items the display is blue instead of grey Back up all system data onto a USB Restore All Note This overwrites any data on t...

Страница 126: ...p the file hierarchy before pressing the search button to search through all items below that level The search results display the full path to items found Note Jobs may be searched using more detaile...

Страница 127: ...nd the implement used The date is shown as DD MM YYYY or MM DD YYYY depending on the date format selected see Time date setup page 20 3 Once the required jobs are displayed click to highlight the job...

Страница 128: ...16 2 Searching exporting jobs 110...

Страница 129: ...Code Fault Action Page U1052 Steering subsystem firmware version is incorrect Upgrade the firmware 29 U1054 Steering subsystem is in fault mode Please power cycle steering controller U1055 Steering co...

Страница 130: ...U1068 Vehicle profile does not match steering subsystem settings Confirm steering subsystem is turned on Return to main setup menu and reset vehicle and steering 42 45 U1069 Steering subsystem steeri...

Страница 131: ...replace faulty sensor Contact dealer U1080 Wheel angle sensor has short circuited Contact dealer Sensor may need to be replaced U1082 Compact flash file system has less than 1 space remaining Confirm...

Страница 132: ...rect field and job chosen Create waylines if necessary 48 77 86 89 92 U5003 Could not engage due to steering controller lockout Confirm road switch is OFF U5004 Implement is not defined Confirm correc...

Страница 133: ...age U6905 Unknown machine type Return to main setup menu and revise vehicle setup 43 U8505 Factory calibration not present Calibrate compass wheel angle sensor and mounting bias 67 70 TC8 No 12V power...

Страница 134: ...17 1 Common error messages 116...

Страница 135: ...orthing Eastings and Northings show the Universal Transverse Mercator UTM position and zone of the vehicle They are measured in meters The grid numbers on the east west horizontal axis are called East...

Страница 136: ...Firmware A computer program that is permanently embedded in the hardware of a device GDOP Geometric Dilution of Precision GDOP is a metric used to quantify the accuracy of GNSS satellite geometry GLO...

Страница 137: ...with the DGPS system Mounting Bias Mounting bias refers to whether the receiver is exactly level when installed MSAS Multi functional Satellite Augmentation System This is a Japanese SBAS which suppl...

Страница 138: ...ional satellite broadcast messages SBAS correction sources are commonly composed of multiple ground stations which take the measurements of one or more GNSS satellites and the satellite signals and en...

Страница 139: ...Appendix B Technical Information Console specifications Operating voltage l 9 to 36 V DC Operating temperature l 30 to 65oC Storage temperature l 40 to 85oC Power consumption l current at 13 5 V DC 0...

Страница 140: ...18 2 Appendix B Technical Information 122...

Страница 141: ...3 coverage map 58 dashboard 62 date 20 diagnostics 61 field exit 84 new 77 select 78 unload 84 file names 65 flag points customize 83 remove 83 set 83 setup 38 glossary 117 GPS accuracy 60 correction...

Страница 142: ...3 section control 50 section switch 51 timing 50 software upgrade 15 39 steering calibration 67 steering controller 45 system diagnostics 61 time 20 troubleshooting 111 units 21 upgrade 39 upgrade sof...

Страница 143: ......

Страница 144: ...14 Park Way Mawson Lakes SA 5095 Australia Phone 61 8 8203 3300 Fax 61 8 8203 3399 Topcon Precision Agriculture Europe Avenida de la Industria 35 Tres Cantos 28760 Spain Phone 34 91 804 92 31 Fax 34 9...
Отзывы: