background image

48

BASIC OPERATIONS

BASIC OP

ERATIONS

Se
lecting

 the Patien

t an
d Se

ttin
g the

 Ph
oto
grap
hy

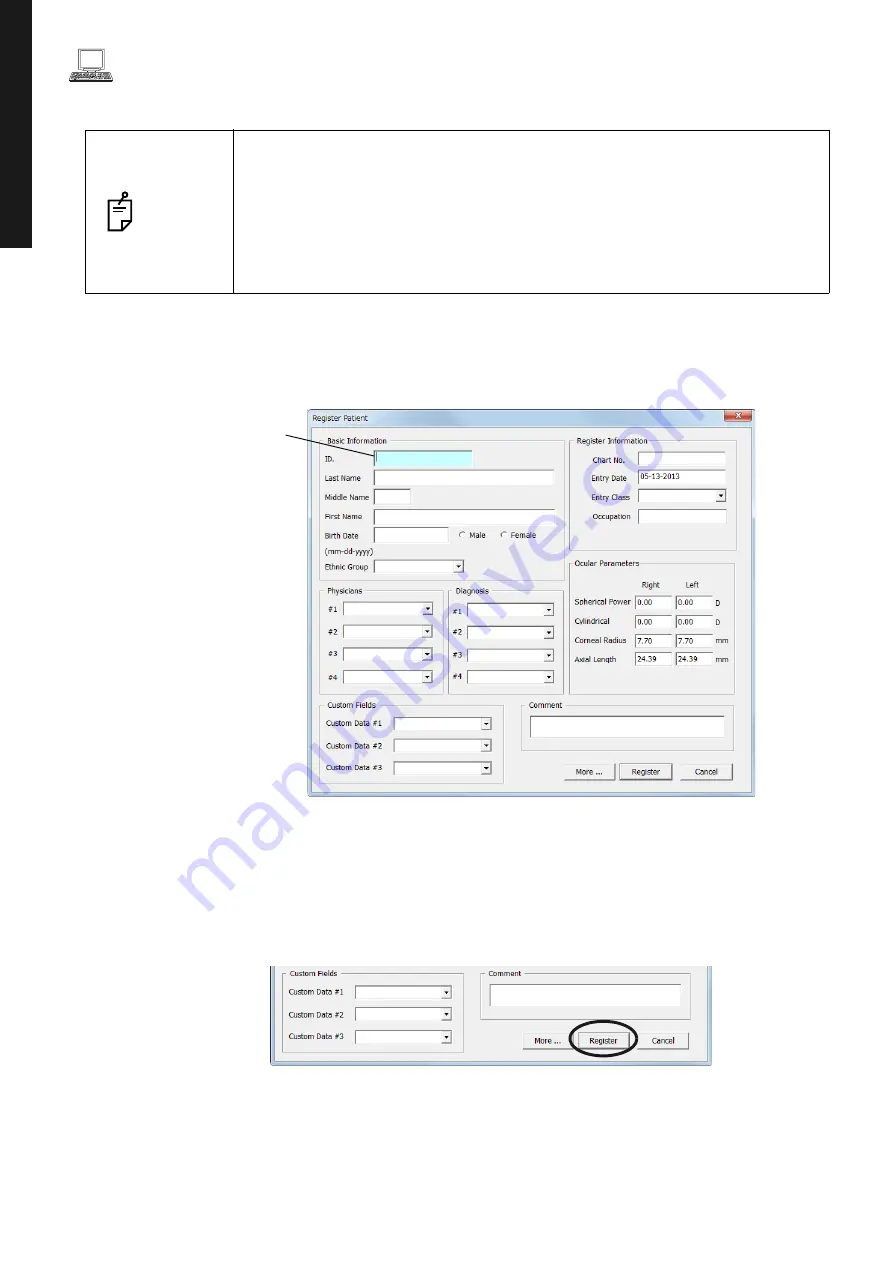
Register a New Patient

Register the patient information for new patients.

1

Enter the patient information in the dialog box, as desired.

Be sure to input the ID

.

2

You can enter the eyeball refraction data to [Ocular Parameters.].

3

To add additional patient information, click More... .

4

Click [Register].

 NOTES

When entering the patient ID through the 3D OCT-1, a bar code reader, a card
reader, IMAGEnet, Multi-Viewer, etc., you must use only the alphabet, numerals
and "-". 
Moreover, the following symbols cannot be used for the patient ID.
" \ / : 'Space' * ? . <> | _ ! # $ %&
If you use a patient ID which does not meet the above conditions, the
report cannot be output correctly from time to time.

Patient ID

Содержание 3D OCT-1

Страница 1: ...USER MANUAL for instrument body 3D OPTICAL COHERENCE TOMOGRAPHY 3D OCT 1 Version 1 2x...

Страница 2: ......

Страница 3: ...he fundus and anterior segment can be recorded on the following device The commercial personal computer connected to this instrument The observed photographed images are displayed on the built in cont...

Страница 4: ...ect to change without prior notice and without legal obligation 3 The contents of this manual are correct to the best of our knowledge Please inform us of any ambiguous or erroneous descriptions missi...

Страница 5: ...EL POSITION 44 BASIC OPERATIONS 45 FLOW OF OPERATION 45 PREPARATION FOR PHOTOGRAPHY 46 Selecting the Patient and Setting the Photography 47 FUNDUS TOMOGRAPHY 52 Check for photographic data and report...

Страница 6: ...ECTRIC RATING 105 DIMENSIONS AND WEIGHT 105 SYSTEM CLASSIFICATION 106 OPERATION PRINCIPLE 107 CHECKPOINTS FOR MAINTENANCE 108 DISPOSAL 108 MAINTENANCE 109 DAILY CHECKUPS 109 ORDERING CONSUMABLES 109 R...

Страница 7: ...patient s eyes or nose with the instrument during operation The patient may be injured Handling the cord on this product or cords associated with accessories sold with this product will expose you to...

Страница 8: ...main unit If the vent is covered the temperature of the power supply unit may rise abnormally and cause a malfunction To prevent the instrument from malfunctioning do not drop any liquid into the ven...

Страница 9: ...bjective lens may be cleaned by the user For details see Cleaning the objective lens on page 113 DISCLAIMERS TOPCON shall not take any responsibility for damage due to fire earthquakes actions by thir...

Страница 10: ...injury CAUTIONS Incorrect handling by ignoring this display may lead to personal injury or physical damage NOTES Useful functions to know Paying attention to these will prevent the noted problems Symb...

Страница 11: ...e chinrest up down switch be careful not to pinch the patient s hand The patient may be injured PR CAUTION Prendre garde de ne pas pincer la main du patient en op rant le commutateur haut bas du sup p...

Страница 12: ...sin Power supply unit Chin rest unit External fixation target External I O terminal cover Control panel Forehead rest 1 Canthus marker Chin rest paper pin Chin rest 1 Objective lens Power switch Main...

Страница 13: ...a variety of operations by touching the screen NOTES Operate the control panel with your fingers or the attached touch pen Do not use any sharp tools e g ball point pen The touch panel may be damaged...

Страница 14: ...screen Status display area Displays the message Capture icon display area By selecting a tab the capture icons registered in each tab are dis played When color fundus photography is set to OFF or whe...

Страница 15: ...vie area 2 Displays the image of the anterior segment stereoscopic camera which is nearer to the captured eye than the other Align the eye height to the canthus marker of the chin rest unit with the l...

Страница 16: ...operations can be performed selecting the small pupil diaphragm turning ON OFF the color fundus photography changing the diopter compensation lens and selecting the Cataract mode When the instrument...

Страница 17: ...utomatic small pupil diaphragm function can be set While this function is set the small pupil diaphragm is automatically set to ON and the instrument takes a color picture of fundus if the pupil diame...

Страница 18: ...a value other than 0 the split lines disappear At the same time the functions of auto focus auto shoot and auto small pupil diaphragm are invalidated The OCT auto focus function is validated Cataract...

Страница 19: ...right left anterior segment stereoscopic camera Manual mode button Tap the Manual mode button The system stops automatic adjustment of the captured eye and shifts to the Manual adjustment mode screen...

Страница 20: ...ge of the anterior segment stereoscopic camera 1 Movie area 2 Displays the image of the anterior segment stereoscopic camera 2 Processing message Displays the current processing status BACK button Ret...

Страница 21: ...n frame Interference figure display area Displays the interference figure When optimizing is successful the area is encircled with a green frame Processing message Displays the current processing stat...

Страница 22: ...green frame is not displayed for the area and the pupil mark is orange Tomogram display area Displays the tomogram When interference is not good the green frame is not displayed for the area IQ value...

Страница 23: ...ture STOP button On the photography screen manual adjustment mode by using the internal fixation position adjustment button and the external fixation target adjust the fixation position to place the p...

Страница 24: ...lor fundus photography image is changed to the IR fundus photography image OK button Shifts to the next photographic capture session Delete button Deletes the photography result When tapping the Delet...

Страница 25: ...t left eye and flash level are displayed and you can adjust the illumination level in the control panel Refer to page 25 Displays the scan position adjustment range and the fine adjustment but tons in...

Страница 26: ...nt Press the lower part of the button and the base moves away from the patient Fundus move button Tap the upper lower right and left buttons on the screen to adjust the whole fundus position finely Th...

Страница 27: ...reen line shows the scan position and the arrow shows the scan advance direction The arrow direction for the right eye is reversed for the left eye The yellow line is displayed for the scan patterns e...

Страница 28: ...ished the icon is lit OCT LFV image When ON is set for OCT FLV the OCT LFV image is displayed NOTES When color fundus photography is set to OFF or when the instrument without the fundus photography fu...

Страница 29: ...uto Z Z Lock and Auto Polarization the tomogram live image is placed in the Z lock position Z lock position display bar Indicates the Z lock position changeable range By tapping an optional position o...

Страница 30: ...ality level meter Displays the Image Quality level with a meter Live image Displays the live tomogram image Color display is possible Monochrome display is initially set Optimize button You can perfor...

Страница 31: ...ion target shape selector button Tap this button and two types point and cross of the shape the patient sees are changed to each other The display on the screen is not changed Manual button Press the...

Страница 32: ...eing displayed When ON is set for the OCT LFV image it is displayed on the live image in Area 2 Advance button Set this button to ON when performing the advanced adjustment in the manual adjustment mo...

Страница 33: ...eset to the initial status Scan position move button Tap the upper lower right and left buttons on the fundus image to adjust the scan position finely Moving the scan position can be done in all scan...

Страница 34: ...ivity Scan possible range red Displays the range of 12 0mm 12 0mm at the focal point on the fundus This is the maximal range where you can obtain a tomogram with this instrument The edge of the scan l...

Страница 35: ...t displayed it is displayed on the fundus and its shape is not changed Tap this shape selector button when the fixation tar get is displayed and the target shape will change to and alternately After 3...

Страница 36: ...button to When the patient s eye has a strong hyperopia set the diopter compensation lens selector button to Compensation range 0 13 12D 12 33D 11 40D When the diopter compensation lens is set to a va...

Страница 37: ...ndus photography peripheral fixation target pho tography and anterior segment photography Set this button to ON and 30 is displayed in the photography information display area The system enlarges the...

Страница 38: ...r at the right Page number Displays the current setting menu page s number in page order Icon layout setting area Sets the icons that will be displayed on the Capture icon selection screen which is th...

Страница 39: ...ea the icon is added to the left side or upper right corner of the capture icon Delete icon button Deletes the capture icon which is selected in the icon layout setting area After deleting the remaini...

Страница 40: ...icon name Item name Displays the objective items of the parameters for the selected cap ture icon Item value selector button Displays the set value of each item Select the desired item OK button Vali...

Страница 41: ...page s number in page order Utility button Displays the objective items on the current setting menu page Select the desired item Page forward backward button Shifts to other pages in the setting menu...

Страница 42: ...1 Monitor cleaner 1 LAN cable 1 Chin rest paper pins 2 External fixation target 1 Dust cover 1 Spare parts case 1 Stylus pen 1 User manuals Instrument body software and Unpacking and assembly manual...

Страница 43: ...alling parts Also holding areas other than the bottom and holding the External I O terminal cover may cause injury as well as damage to the instrument To prevent damage and injuries do not install the...

Страница 44: ...be seen 3 Connect the power cable to the Power inlet 4 Insert the power cable plug into the 3 pin AC grounding receptacle CAUTIONS Be sure to connect the power plug to an AC 3 pin receptacle equipped...

Страница 45: ...rminal of the instrument 3 Connect the other end of the LAN cable to the PC etc 4 Replace the External I O terminal cover CAUTIONS To avoid electric shock do not touch the external connection terminal...

Страница 46: ...a few seconds the measurement screen will be displayed and measurement is enabled ADJUSTING THE CONTROL PANEL POSITION The control panel may be positioned by swinging and tilting the control panel to...

Страница 47: ...to shut down Page59 Turn on the power Starting the 3D OCT 1 Program Check for photography results Check for photographic data and report output Page58 Selecting the capture icon and selecting the eye...

Страница 48: ...yed To Start the 3D OCT Program 1Double click the 3DOCT icon on the desktop NOTES After the Title screen is displayed the screen is blank for about 10 seconds because the built in graphics are initial...

Страница 49: ...ady exists in database select the patient from the Search Patient panel 1Enter the patient ID and click the patient Search button Result of the search if there is no appropriate patient new patient re...

Страница 50: ...l refraction data to Ocular Parameters 3 To add additional patient information click More 4 Click Register NOTES When entering the patient ID through the 3D OCT 1 a bar code reader a card reader IMAGE...

Страница 51: ...OPERATIONS Selecting the Patient and Setting the Photography Selecting the Patient 1Select the patient from the Search Patient panel Then click the Capture button 2 Photography screen appears Capture...

Страница 52: ...select the fundus tomogramcapture icon You can select and display a capture icon from the icons shown in the following table Capture icon Capture icon name Scan length Scan resolution Fixation positi...

Страница 53: ...the Photography 2 Select an eye to be captured 5Line Cross 9 0mm 1024 Macula 4 3D Wide 12 0 9 0mm 512 128 Wide Capture icon Capture icon name Scan length Scan resolution Fixation position Color Anter...

Страница 54: ...for the position where the flare is the least visible on the monitor screen Set the flash level to the lowest setting the environment will allow Then take a picture To avoid injury of the patient be...

Страница 55: ...anthus marker on the chin rest post Let the patient rest his her forehead on the forehead rest Tap the screen to place the pupil within the blue frame 4 Instruct the patient to look at the green light...

Страница 56: ...atic operation is not possible for certain reasons the manual adjustment screen is automatically accessed You can also access the man ual adjustment screen by tapping the Capture STOP button For opera...

Страница 57: ...n position with the chin rest up down button press the capture start button Automatic photography starts The following steps are automatically executed in the order listed below 1Alignment to pupil is...

Страница 58: ...iven time has passed on the capture timer photography starts automatically 4 After the photograph is taken the result is automatically displayed When color fundus photography is set to OFF or when the...

Страница 59: ...ograph the other eye operate as indicated in step 4 and below on page 53 Where single eye is selected or both eyes have been photographed back to the step Select ing the capture icon and selecting the...

Страница 60: ...t 1Select the thumbnail that has been analyzed and the button on the tool bar are validated In some of the scan patterns these buttons are not validated 2 After displaying the report click the Export...

Страница 61: ...n the instrument 1 Turn OFF the of the instrument NOTES When the instrument is not in use for a long time unplug the power cords of the instrument external recording device and others from the outlet...

Страница 62: ...is a bright spot on the center of the picture The patient s pupil is small This condition includes the case of When the small pupil diaphragm is set to ON The flash level is high Alignment is not adju...

Страница 63: ...in position with the chin rest up down button press the capture start button Automatic photography starts The following steps are automatically executed in the order listed below 1 Alignment to pupil...

Страница 64: ...o the waiting status for the capture start and the capture timer starts After the given time has passed on the capture timer photography starts automatically 4 After the photograph is taken the result...

Страница 65: ...a and M macula center in this order Set the picture position to C for the middle position of optic disc and macula M for macula D for optic disc and External fixation target for anterior segment INTER...

Страница 66: ...ge 52 Anterior segment photography After adjusting the chin position with the chin rest up down button press the capture start button The system shifts to the manual adjustment screen 1 Perform adjust...

Страница 67: ...65 OBJECTIVE OPERATIONS 2 After the photograph is taken the result is automatically displayed 1234ABCD...

Страница 68: ...st adjustment screen and the manual adjustment mode screen You can set the following six fixation patterns on the setting menu For setting refer to page 85 Setting up the patient Refer to Preparing th...

Страница 69: ...ture start button Automatic photography starts Before starting the photography make sure that the desired fixation tar get is selected The following steps are automatically executed in the order liste...

Страница 70: ...given time has passed on the capture timer photography starts automatically 4 After the photograph is taken the result is automatically displayed Press the OK button and the system returns to the scre...

Страница 71: ...one of the following operations Set the patient properly press the Retry button and perform automatic alignment again according to the message Press the Manual button to shift to the manual adjustment...

Страница 72: ...trouble such as blink is detected right before photography shift to the manual adjustment mode After adjusting press the capture start button to continue the photography After the photograph is taken...

Страница 73: ...ation target position Manual adjustment P 33 For changing the diopter compensation lens refer to Photography screen Focus Manual adjustment P 34 Photography with 3D Optic disc and 3D Wide When you per...

Страница 74: ...graphy to access the internal fixation target adjustment mode The internal fixation target is displayed on Area 2 Perform adjustment by pressing the upper lower right and left arrow buttons For the de...

Страница 75: ...photography Tap the of the Flash level display on the fundus anterior segment live image area and the flash level increases Tap the and the flash level decreases When color fundus photography is set t...

Страница 76: ...ompensation lens for the patient s eye DELETING DATA Press the Delete button while the preview screen is being displayed The following check message is displayed Press OK and the data that is displaye...

Страница 77: ...S SAVING DATA Data is saved on the personal computer For details refer to the instruction manual for software PRINTING DATA Data is printed on the personal computer For details refer to the instructio...

Страница 78: ...CORD on page 42 2 Turn ON I the of the instrument Displaying the setting menu screen 1 Check the capture icon selection screen which is the initial screen 2 Press the button on the capture icon selec...

Страница 79: ...re icon which is displayed on the capture icon selection screen and the parameters for each capture icon For details on the buttons refer to page 36 and page 38 PAGE 1 Initial screen How to delete the...

Страница 80: ...78 DETAILS OF THE SETTING MENU 2 Press the button 3 Make sure that the icon is deleted The remaining icons are moved to the left side or upper right corner Delete icon...

Страница 81: ...79 DETAILS OF THE SETTING MENU How to add the displayed icon 1 Tap and select the capture icon to be added from the capture icon list It is highlighted 2 Press the button Add icon...

Страница 82: ...80 DETAILS OF THE SETTING MENU 3 Make sure that the icon is added...

Страница 83: ...change the parameters for the icons 1 Tap and select the icon of the capture icon for which the parameters should be checked and changed in the icon layout setting area It is highlighted 2 Press the...

Страница 84: ...tton whose setting should be changed The selectable item values are displayed Tap and change the value to the desired one Press the OK button to decide the change If you press the button the value bef...

Страница 85: ...detailed tomogram can be obtained and at the same time the data quantity is increased So it takes a longer time to process the read data and the saved data is increased 4 Color Fundus Photography You...

Страница 86: ...vertical or horizontal five scan lines The settable range is 0 15mm 0 20mm 0 25mm 0 30mm and 0 35mm In the initial setting of this instrument 0 25mm is set 9 Re scan If the patient blinks and his her...

Страница 87: ...rnal fixation tar get CONSTANT Lighting FLICKERING Blinking SPEED NORMAL Hz This is valid when the internal fixation target is set to FLICKERING Blinking Set the blinking speed for all other states ex...

Страница 88: ...Color Mode 0 9 BS AC 2 1 Adjust Flash at Peripheral Photo 0 4 1 Adjust Flash at 30 Mask Photo 4 4 1 Peripheral Photo Sequence Chin rest screen Capture screen Peripheral Photo Pattern 4X 4 5X 5 8 9 Per...

Страница 89: ...Sec 10 20 30 10 One Touch Auto Focus OFF one time sequence OCT Focus Split OCT Split OCT OCT Retry ON OFF ON Small Pupil 1 This function is usable only when the color fun dus capture icon is selected...

Страница 90: ...atically and always displays the fun dus tomogram clearly during observation OFF ON Z lock After Auto Z After Auto Z the pho tographed fundus image is fixed OFF ON Auto Pola Adjusts the output sensi t...

Страница 91: ...m button Item selector button At shipment System Setting Measurement Sound Sets ON OFF for the measurement sound OFF ON Power Save Timer Min Sets the time until the power save function is ON 0 60 At i...

Страница 92: ...Icon Capture Icon name Color Fundus Photography Scan Size Scan Resolution Fixation Position OCT Focus Position Over Scan Count Color Anterior Photography Raster Scan Step Re scan OCT Live Color Line...

Страница 93: ...the connection to the external PC An error has occurred in the communication between the instrument and the external personal computer Check if the LAN cable is con nected to the instrument and the e...

Страница 94: ...tion of Y axis motor EEPROM data error The EEPROM data of the built in PCB is not normal TRC focus motor initialization error An error has occurred during the initialization of TRC focus motor Split u...

Страница 95: ...on level display on the control panel to adjust the illumination level 73 Darken room and thoroughly dilate patient s pupil Periphery of captured image is dark Alignment is incorrect Adjust alignment...

Страница 96: ...ter Patient s face position is incorrect The chin and forehead are not cor rectly on the rests or the patient faces sideways Have patient adjust his her position accordingly 52 Patient s face height i...

Страница 97: ...rest unit Main unit Control panel Chin rest unit Power supply unit Control PCB CPU PCB Image board Fundus optical system Interference system spectroscope XYZ drive unit USB terminal LAN terminal Exte...

Страница 98: ...less Vertical direction 3 9mm 5 or less Scan pattern 3D scan horizontal vertical Linear scan Line scan Cross scan Radial scan Scan speed 50 000 A Scans per second Lateral resolution 20 m In depth reso...

Страница 99: ...ns is used 11D to 40D in fundus photography SLD light source Medium Super luminescence diode SLD Class of laser Class 3B Output Min 8mW Wavelength 840nm Half width Min 45nm Pulse width Min 6 sec LED l...

Страница 100: ...Article code Cable Shielded Ferrite Core Length m AC power cable for 3D OCT 1 41840 50100 No No 1 5 LAN cable 47005 35100 No Yes 2 0 USB cable for mouse Yes No 1 8 USB memory Personal computer 47010 7...

Страница 101: ...line s to line s 2 kV line s to earth 1 kV line s to line s 2 kV line s to earth Main power quality should be that of a typical commercial or hospital environ ment Voltage dips short interruptions and...

Страница 102: ...F transmitters as determined by an electromagnetic site sur vey a should be less than the compliance level in each frequency range b Interference may occur in the vicinity of equipment marked with the...

Страница 103: ...he 3D OCT 1 can help prevent electromagnetic interference by maintaining a minimum distance between portable and mobile RF communications equipment transmitters and the 3D OCT 1 as recommended below a...

Страница 104: ...onnect any device which is not recognized as one component of the system The total 1kVA is the maximum allowable load of the auxiliary power supply socket for the insulation transformer which is provi...

Страница 105: ...VRAM of 512MB with OpenGL capability Network card On board LAN to connect with LAN Expansion LAN card applicable to PCI Express Gigabit for connecting OCT Expansion slot At least one free slot of PCI...

Страница 106: ...AGE PERIOD 1 Storage without wrapping without package Temperature 10 C to 40 C Humidity 10 to 95 without dew condensation Air pressure 700hPa to 1060hPa THIS INSTRUMENT DOES NOT MEET THE TEMPERATURE R...

Страница 107: ...E Temperature 20 C to 50 C Humidity 10 to 95 ENVIRONMENTAL CONDITIONS FOR PACKAGING IN TRANSPORTAION Temperature 40 C to 70 C Humidity 10 to 95 ELECTRIC RATING Source voltage AC 100 240V 50 60Hz Power...

Страница 108: ...of protection against harmful ingress of water defined in IEC 60529 is IPx0 Classification according to the method s of sterilization or disinfection recommended by the manu facturer not applicable Th...

Страница 109: ...ated This wave is separated by the diffraction grating and is then converted into the electric signal by the line CCD This signal is then pro cessed to observe photograph and record the anterior segme...

Страница 110: ...disposal and recycling NOTES This symbol is applicable for EU member countries only To avoid potential damage to the environment and possibly human health this instrument should be disposed of i for...

Страница 111: ...objective lens is stained clean it following the instructions for Cleaning the objective lens on page 113 When not in use always turn the OFF ORDERING CONSUMABLES When ordering consumables and spare...

Страница 112: ...PLACING THE XENON LAMP The xenon lamp is not mounted on the instrument without the fundus photography function CAUTIONS To avoid electric shock and burns do not replace the lamp by yourself Ask your d...

Страница 113: ...ction Cleaning the optical system Cleaning the base unit Checking the operation Within 12 months from the last maintenance Anterior segment observation function Internal fixation target Display on the...

Страница 114: ...and remove the power cord before cleaning the instrument NOTES Do not spray liquid on the instrument The instrument may be damaged or those that come into contact with the instrument may be injured b...

Страница 115: ...s cleaning paper 2 If your lens cleaning paper is dirty replace it with a clean one and repeat step 1 3 Repeat steps 1 and 2 until no stain is seen on the lens When the stain is persistent 1 Moisten a...

Страница 116: ...u want to take a picture of the patient s ante rior segment use this attachment By mounting this attachment onto the instrument s forehead rest it is possible to take a tomogram of anterior segment Sp...

Страница 117: ...resolution Be sure to move from the start point to the end point 5 Line Cross Scan In the scan range move on the five cross lines blue lines in the figure below which pass through the center point by...

Страница 118: ...rform scanning by the specified diameter and by the step divided by the given res olution 6 0mm is fixed for the scan length The start point for Line Scan and rotating direction are reversed for each...

Страница 119: ...Hz Type A Peru 220V 60Hz Type A Venezuela 110V 50Hz Type C E Bolivia Paraguay 220V 60Hz Type A Most common Type H Infrequently Chile 220V 60Hz Type A Colombia 110V 50Hz Type C Brazil 220V 60Hz 127V 60...

Страница 120: ...lumination level Flash level in OCT Color photography and Color photography Display level Ratio of radiance 1 0 354 2 0 500 3 0 707 4 1 000 Display level High Display level Normal 0dB Display level Lo...

Страница 121: ...ware Qt including its instruc tion manual and other documents separately or collectively the SOFTWARE only on the 3D OCT 1 instrument you use INSTRUMENT 2 RESTRICTION 2 1 USER shall NOT a use the SOFT...

Страница 122: ...shall immediately cease to use the INSTRU MENT in any manner Any memory paid by USER shall not be refunded after use or installation by USER of the INSTRUMENT for any reason whatsoever including any...

Страница 123: ...apanese or U S law or regulation is strictly prohibited USER shall not export nor re export to any country the SOFTWARE or any part or copy thereof without first obtaining all required authorization f...

Страница 124: ...n 11 ENTIRE AGREEMENT These LICENSE TERMS constitute the entire agreement between USER and TOPCON with respect to the subject matter hereof and shall supersede and cancel any and all prior written or...

Страница 125: ...power supply unit Period of use Please inform us of the date of purchase Defective condition Please provide us with as much detail as possible on the problem 3D OPTICAL COHERENCE TOMOGRAPHY 3D OCT 1 U...

Страница 126: ...3D OPTICAL COHERENCE TOMOGRAPHY 3D OCT 1 47010 91942 Printed in Japan 1307 100TH 2...

Отзывы: