background image

35

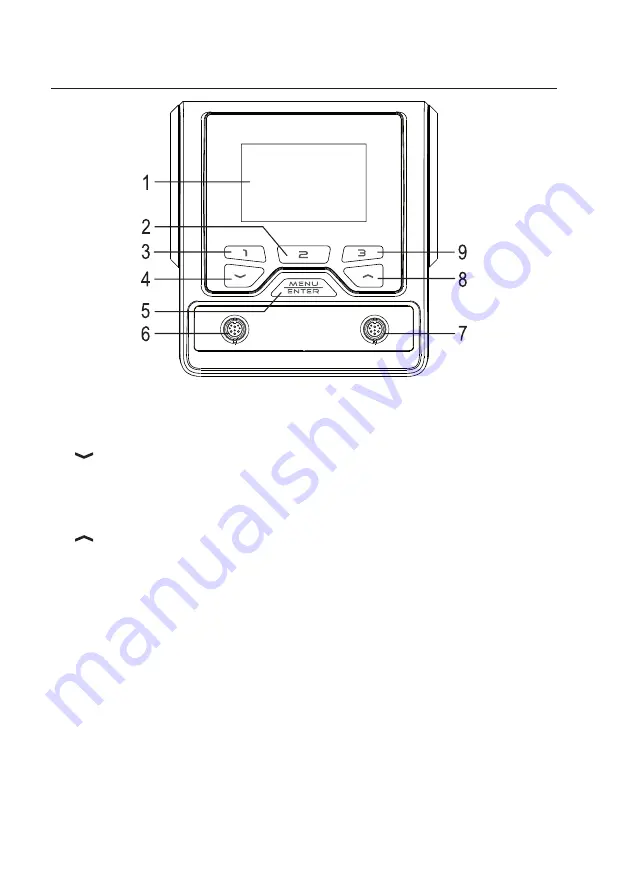
7. Connections and control elements

1.  Display
2.  Button “2”
3.  Button “1”
4.  “

” button

5.  “MENU/ENTER” button
6.  Connection channel 1 for soldering iron or soldering tweezers
7.  Connection channel 2 for soldering iron or soldering tweezers
8.  “

” button

9.  Button “3”

Содержание 2108748

Страница 1: ...Bedienungsanleitung Digitale Lötstation 200 W TPS 200 Best Nr 2108748 Seite 2 26 Operating Instructions 200 W Digital soldering station TPS 200 Item No 2108748 Page 27 51 ...

Страница 2: ... Lötpinzette 12 c Potentialausgleich 13 d Netzanschluss 13 9 Bedienung 14 a Ein Ausschalten 14 b Anzeigeelemente im Display 14 c Kanal auswählen 15 d Temperatur manuell einstellen 15 e Temperatur per Schnellwahl Tasten wählen 15 f Kanal ein ausschalten 15 10 System und Kanal Menü 16 a System und Kanal Menü aufrufen 16 b Einstellungen im System Menü 16 c Einstellungen im Kanal Menü 1 und 2 18 11 Wa...

Страница 3: ...Inbetriebnahme und Handhabung Achten Sie hierauf auch wenn Sie dieses Produkt an Dritte weitergeben Heben Sie deshalb diese Bedienungsanleitung zum Nachlesen auf Alle enthaltenen Firmennamen und Produktbezeichnungen sind Warenzeichen der jeweiligen Inhaber Alle Rechte vorbehalten Bei technischen Fragen wenden Sie sich bitte an Deutschland www conrad de Österreich www conrad at Schweiz www conrad c...

Страница 4: ...alter mit Tro ckenreiniger Messingwolle sind ebenfalls im Lieferumfang enthalten Ein großes Display dient zur Anzeige und Bedienung aller Funktionen Drei Schnellwahl Tasten können Sie mit einer Temperatur vorbelegen für jeden Kanal separat möglich Die Lötstation ist nur zum Betrieb an der Netzspannung geeignet siehe Kapitel Technische Daten Eine Verwendung ist nur in geschlossenen Räumen also nich...

Страница 5: ... downloads herunter oder scannen Sie den abgebildeten QR Code Befolgen Sie die Anweisungen auf der Webseite 5 Merkmale und Funktionen Großes beleuchtetes LC Display Drei programmierbare Schnellwahl Tasten Zwei getrennt einstellbare Kanäle beide Kanäle gleichzeitig verwendbar und separat ein ausschaltbar Menü für diverse Einstellungen Menüzugang kann per Passwort abgesichert werden Programmierbare ...

Страница 6: ... Der Aufenthalt von Kindern und unbefugten Personen im Arbeitsbe reich ist nicht gestattet Lassen Sie andere Personen nicht das Gerät bzw heiße Teile berühren b Allgemein Aus Sicherheits und Zulassungsgründen ist das eigenmächtige Umbauen und oder Verändern des Pro dukts nicht gestattet Zerlegen Sie es niemals Das Produkt ist kein Spielzeug Halten Sie es von Kindern und Haustieren fern Lassen Sie ...

Страница 7: ...ecker aus der Netzsteckdose Ist die Lötstation beschädigt so betreiben Sie sie nicht mehr Bringen Sie das komplette Produkt in eine Fachwerkstatt oder entsorgen Sie es umweltgerecht Ein beschädigtes Netzkabel muss durch ein baugleiches Netzkabel ersetzt werden Stecken Sie das beschädigte Netzkabel ab und entsorgen Sie es umweltgerecht Eine Reparatur des beschädigten Netz kabels ist nicht zulässig ...

Страница 8: ...Schutzschalter abschalten so dass die Netzsteckdose allpolig von der Netzspannung getrennt ist Ziehen Sie erst danach den Netzstecker des Netzkabels aus der Netzsteckdose Betreiben Sie das Produkt anschließend nicht mehr sondern bringen Sie es in eine Fachwerkstatt oder entsorgen Sie es umweltgerecht e Betrieb Betreiben Sie die Lötstation nicht in Räumen oder bei widrigen Umgebungsbedingungen wo b...

Страница 9: ...ren Oberflächen Achten Sie auf benachbarte Materialien da diese durch die Hitze beschädigt werden können Betreiben Sie das Produkt nur in gemäßigtem Klima niemals in tropischem Klima Beachten Sie für die zulässigen Umgebungsbedingungen das Kapitel Technische Daten Betreiben Sie das Produkt niemals gleich dann wenn es von einem kalten Raum in einen warmen Raum gebracht wurde Das dabei entstehende K...

Страница 10: ...Anschlüsse und Bedienelemente 1 Display 2 Taste 2 3 Taste 1 4 Taste 5 Taste MENU ENTER 6 Anschluss Kanal 1 für Lötkolben oder Lötpinzette 7 Anschluss Kanal 2 für Lötkolben oder Lötpinzette 8 Taste 9 Taste 3 ...

Страница 11: ...11 10 Netzschalter 11 Sicherungshalter 12 Netzbuchse 13 Buchse zum Anschluss des RS232 Kabels 14 Klinkenbuchse für Potentialausgleich ...

Страница 12: ...chlussstecker des Lötkolbens mit einer der beiden Buchsen 6 bzw 7 Schieben Sie den Stecker in richtiger Orientierung in die Buchse anschließend kann er über den Verrie gelungsring gesichert werden Wenden Sie dabei keine Gewalt an b Lötpinzette Setzen Sie die Lötpinzette in den zugehörigen Ablagehalter ein Die Lötpinzette verfügt über zwei kleine Lötspitzen Beispielsweise in kleiner SMD Widerstand ...

Страница 13: ...t Klinkenbuchse wird über den 3 5 mm Stecker und einem Widerstand z B 1 MΩ oder 150 kΩ mit der Erdung verbunden Die Lötspitzen von Lötkolben und Lötpinzette sind über den gewählten Widerstandswert mit der Erdung verbunden Der mitgelieferte Klinkenstecker evtl ist er bei Lieferung bereits auf der Rückseite der Lötstation in der entsprechenden Buchse eingesteckt verfügt über mehrere Lötkontakte Dies...

Страница 14: ...ung B Aktuelle Temperatur an Kanal 1 C Ziel Temperatur für Kanal 1 das Schloss Symbol steht für eine aktivierte Tastensperre D Modellnummer für angeschlossenen Lötkolben bzw Lötpinzette an Kanal 1 E Eingestellte Temperatur für Schnellwahl Taste 1 F Eingestellte Temperatur für Schnellwahl Taste 2 G Temperatureinheit C oder F umschaltbar H Eingestellte Temperatur für Schnellwahl Taste 3 I Modellnumm...

Страница 15: ... Werk voreingestellten Werte lassen sich im Funktionsmenü verändern und Ihren Wünschen anpassen Voreinstellung Schnellwahl Taste 1 Temperatur 200 C Voreinstellung Schnellwahl Taste 2 Temperatur 300 C Voreinstellung Schnellwahl Taste 3 Temperatur 400 C f Kanal ein ausschalten Die Lötstation bietet zwei separate Kanäle für die gleichzeitige Verwendung von Lötkolben und Lötpinzette Dadurch ist es mög...

Страница 16: ...e Sekunden keine Taste drücken so werden die vorgenommenen Einstellungen gespeichert und das System bzw Funktions Menü automatisch verlassen Mit der Taste bzw kann der gewünschte Menüpunkt ausgewählt werden siehe nachfolgende Tabelle Drücken Sie dann kurz die Taste MENU ENTER um den Einstellmodus aufzurufen und verändern Sie die Ein stellung mit der Taste bzw Drücken Sie kurz die Taste MENU ENTER ...

Страница 17: ...n die Passwort Funktion mit dem alten Passwort auszuschalten Anschließend kann ein neues Passwort eingegeben wer den Tastenton engl Keypad Tone Beim Drücken einer Taste wird in der Grundeinstellung ein kurzes Tonsignal ausgegeben Falls dieser Tastenton störend ist können Sie ihn hier ausschalten Displaykontrast engl LCD Contrast Abhängig von der Umgebungsbeleuchtung oder dem Ablesewinkel des Displ...

Страница 18: ...y Delay Einstellung einer Zeitdauer nach der die Lötspitzentemperatur auf die Absenk Temperatur zurückgeregelt wird Abschalt Verz Shutdown Delay Einstellung einer Zeitdauer nach der die Heizung abgeschaltet wird Taste 1 Temp Shortcut Temp 1 Temperatur Voreinstellung für Schellwahl Taste 1 Taste 2 Temp Shortcut Temp 2 Temperatur Voreinstellung für Schellwahl Taste 2 Taste 3 Temp Shortcut Temp 3 Tem...

Страница 19: ...peratur für die Schnellwahl Taste 2 ein Taste 3 Temp engl Shortcut Temp 3 Stellen Sie hier die gewünschte Temperatur für die Schnellwahl Taste 3 ein Temp Sperre engl Fix Temp Sie können hier eine bestimmte Temperatur einstellen die später nicht veränderbar ist Zusammen mit einem akti vierten Passwortschutz wird verhindert dass eine bestimmte Temperatureinstellung eigenmächtig verändert wird Um die...

Страница 20: ...ne Gewalt an da es sonst zu einer Beschädigung des Lötkolbens kommen kann Verlust von Gewährleistung Garantie Stecken Sie die Spitze des Lötkolbens wie in 1 gezeigt in eine der Öffnungen des Halters Schieben Sie die Lötspitze nach in der Öffnung nach vorn 2 Ziehen Sie den Lötkolben nach oben 3 so dass die Lötspitze in der Halterung verbleibt Schieben Sie dann eine neue Lötspitze bis zum Anschlag i...

Страница 21: ... zu entfernen damit ein Abstreifen des Lötzinns wieder möglich ist Nehmen Sie dazu die Messingwolle aus den Ablagehaltern heraus vorher ggf noch warten bis sich gerade ab gestreiftes Lötzinn vollständig abgekühlt hat Klopfen Sie dann die Messingwolle aus entsorgen Sie Lötzinnreste umweltgerecht d Allgemein Eine Reparatur darf nur vom Fachmann durchgeführt werden Gleiches gilt für andere als in die...

Страница 22: ...stet wird Die Zieltemperatur kann nicht erreicht bzw gehalten werden Verwenden Sie ggf eine Lötstation mit höherer Leistung Fehler E5 Überstrom Kurzschluss beim Heizelement Das Heizelement ist defekt Kurzschluss Tauschen Sie das Heizelement bzw den Lötkolben die Lötpinzette gegen eine neue Einheit aus Fehler E6 Netzspannungs Fehler Die Netzspannung oder die Frequenz der Netzspannung liegt außerhal...

Страница 23: ...ratur verringert sich nach einer bestimmten Zeit selbstständig Der Standby Modus ist aktiviert nach einer bestimmten einstellbaren Zeit wird Temperatur heruntergeregelt Schalten Sie diese Funktion im Kanal Menü aus Keine Temperatureinstellung möglich Die Temperatursperre im Funktions Menü ist aktiviert Der Bereich der Temperatureinstel lung ist zu klein Im Kanal Menü wurde eine obere und oder unte...

Страница 24: ...ollieren Sie die Sicherung z B mit einem geeigneten Messgerät Digitalmultimeter auf elektrischen Durch gang Ist die Sicherung defekt so tauschen Sie sie durch eine neue baugleiche Sicherung aus Sicherungstyp siehe Kapitel Technische Daten am Ende dieser Bedienungsanleitung Verwenden Sie niemals eine Sicherung mit anderen Spezifikationen Überbrücken Sie eine defekte Siche rung niemals Es besteht Br...

Страница 25: ...stung je Kanal max 150 W Gesamtausgangsleistung Kanal 1 2 max 200 W Temperaturgrenzen einstellbar ja Betriebsbedingungen Temperatur 0 C bis 40 C Luftfeuchte 0 bis 80 relativ nicht kondensierend Lagerbedingungen Temperatur 20 C bis 40 C Luftfeuchte 0 bis 80 relativ nicht kondensierend Abmessungen 226 x 152 x 152 mm T x B x H Gewicht ca 3 24 kg b Lötkolben Typ Y130 Leistung 130 W Betriebsspannung 24...

Страница 26: ...26 ...

Страница 27: ...37 c Potential equalization 38 d Mains connection 38 9 Operation 39 a Switching on off 39 b Display elements 39 c Selecting the channel 40 d Manually setting the temperature 40 e Setting the temperature using the quick selection buttons 40 f Switching a channel on off 40 10 System and channel menu 41 a Accessing the system and channel menu 41 b System menu settings 41 c Settings in channel menu 1 ...

Страница 28: ...up and using the product Do not give this product to a third party without the operating instructions Keep these operating instructions in a safe place for future reference All company and product names are trademarks of their respective owners All rights reserved If there are any technical questions please contact www conrad com contact 12 Error messages on the display 48 13 General troubleshooti...

Страница 29: ...tputs The product comes with two storage holders with a dry sponge wire sponge The product features a large display which displays status information for different functions There are three quick selection buttons that you can use to program a preset temperature for each channel The soldering station is only suitable for connection to a mains voltage see Technical data This product is intended for...

Страница 30: ... at www conrad com downloads or scan the QR code shown Follow the instructions on the website 5 Features and functions Large illuminated LC display Three programmable quick selection buttons Two separately adjustable channels both channels can be used at the same time and switched on off separately Menu with a wide range of settings menu access can be password protected Programmable upper and lowe...

Страница 31: ...nformation The unauthorised conversion and or modification of the product is prohibited for safety and approval reasons Never dismantle the product This device is not a toy Keep it out of the reach of children and pets Do not leave packaging material lying around carelessly It may become a dangerous plaything for chil dren Suffocation hazard In schools educational facilities hobby and DIY workshop...

Страница 32: ...or areas It must not become damp or wet Moisture on the mains cable power adapter or in the soldering station may cause a fatal electric shock Avoid direct sunlight intense heat and cold temperatures Keep the soldering station away from dust and dirt Place the soldering station on clean level surface of a sufficient size Protect the soldering station against vibrations Do not place the soldering s...

Страница 33: ...es va pours or dust are or may be present This may cause an explosion Do not cover or fasten any items to the soldering station as this constitutes a fire hazard Do not move the soldering station using the connected cables or pull on the cables Do not use the product when you are not concentrating Never work under the influence of alcohol or medication The soldering station is designed to be conne...

Страница 34: ... cooled down completely Always solder on non flammable surfaces Ensure that there are no neighbouring materials that may be damaged by the heat generated from the soldering iron Only use the product in temperate climates It is not suitable for use in tropical climates Refer to the Technical data section for information on the permitted ambient conditions Never use the product immediately after it ...

Страница 35: ...ontrol elements 1 Display 2 Button 2 3 Button 1 4 button 5 MENU ENTER button 6 Connection channel 1 for soldering iron or soldering tweezers 7 Connection channel 2 for soldering iron or soldering tweezers 8 button 9 Button 3 ...

Страница 36: ...36 10 On off switch 11 Fuse holder 12 Power in socket 13 Socket for connecting the RS232 cable 14 Jack socket for potential equalization ...

Страница 37: ...ering iron in the support holder provided Insert the soldering iron connector into one of the two sockets 6 or 7 Insert the connector into the socket in the correct orientation and secure it in place using the locking ring Do not use force b Soldering tweezers Place the soldering tweezers in the support holder provided The soldering tweezers have two small soldering tips For example with a small S...

Страница 38: ...ng tweezers are potential free Soft grounded The jack socket is connected to the earth via the 3 5 mm plug and a resistor e g 1 MΩ or 150 kΩ The soldering tips on the soldering iron and soldering tweezers are are connected to the earth via the selected resistance value The jack plug may already be inserted into the corresponding socket on the back of the soldering station upon delivery has numerou...

Страница 39: ...temperature on channel 1 C Target temperature for channel 1 the lock symbol indicates that the button lock is enabled D Model number for connected soldering iron or soldering tweezers on channel 1 E Preset temperature for speed dial button 1 F Preset temperature for speed dial button 2 G Temperature unit C or F H Preset temperature for speed dial button 3 I Model number for connected soldering iro...

Страница 40: ...ings can be changed via the functions menu to suit your needs Default setting for quick selection button 1 200 C Default setting for quick selection button 2 300 C Default setting for quick selection button 3 400 C f Switching a channel on off The soldering station has two separate channels to enable the simultaneous use of the soldering iron and soldering tweezers This allows you to quickly switc...

Страница 41: ...utton 2 to revert to the system menu If no button is pressed for several seconds the settings will be saved and the display will automatically exit the system functions menu Use the or buttons to select the desired menu option see following table Briefly press the MENU ENTER button to access the selected option and then use the or buttons to change the setting Briefly press the MENU ENTER button t...

Страница 42: ...tion using the old password see above for instructions You can then create a new password Keypad Tone Keypad tones are enabled by default You will hear a short beep each time a button is pressed If you do not wish to hear this beep you can use this option to disable keypad tones LCD contrast Use this option to increase decrease the display contrast to suit the ambient brightness or the angle of vi...

Страница 43: ...temperature for standby mode Standby Delay Set a timer after which the temperature of the soldering tip will drop to the reduced temperature Shutdown Delay Set a timer after which the heating function will be disabled Shortcut Temp1 Preset temperature for quick selection button 1 Shortcut Temp 2 Preset temperature for quick selection button 2 Shortcut Temp 3 Preset temperature for quick selection ...

Страница 44: ...tion button 1 Shortcut Temp 2 Set the desired temperature for the quick selection button 2 Shortcut Temp 3 Set the desired temperature for the quick selection button 3 Fix Temp Use this option to set a specific temperature that cannot subsequently be changed Together with password protec tion this function prevents unauthorized changes to the preset temperature To disable this function select OFF ...

Страница 45: ...45 Exit Use this menu option to exit the functions menu alternatively wait a few seconds without pressing any buttons ...

Страница 46: ...ot use force as this may damage the soldering iron and will void the warranty guarantee Insert the tip of the soldering iron into one of the openings on the holder as shown in 1 Slide the soldering tip forwards in the opening 2 Lift the soldering iron upwards 3 so that the soldering tip remains in the holder Then slide a new soldering tip as far as it will go into the soldering iron 4 The solderin...

Страница 47: ...om the wire sponge to ensure that you can continue to remove solder To do this take the wire sponge out of the support holders if nec essary wait until any hot solder on the sponge has completely cooled down Shake out the wire sponge dispose of solder resi due in an environmentally friendly manner d General information Repair work must be done by a technician The same applies for maintenance proce...

Страница 48: ... heating element to overload The target temperature cannot be reached or maintained Use a more powerful soldering station Error E5 overcurrent short circuit in the heating element The heating element is faulty short circuit Replace the heating element or the soldering iron soldering tweezers with a new unit Error E6 mains voltage error The mains voltage or mains voltage frequency is outside of the...

Страница 49: ...lly decreases after a certain duration Standby mode is enabled the temperature decreases after a certain preset duration Disable this function in the channel menu The temperature cannot be set The temperature lock in the functions menu is enabled The range of the temperature setting is too small An upper and or lower temperature limit was programmed in the channel menu The value on the quick selec...

Страница 50: ...at screwdriver Remove the fuse from the fuse holder Perform a continuity test on the fuse e g with an appropriate meter digital multimeter If the fuse is defective replace it with a new fuse of the same type see Technical data at the end of these operat ing instructions Never use a fuse with other specifications Never bridge a defective fuse This may cause a fire or a fatal electric shock Insert t...

Страница 51: ...r per channel max 150 W Total output power channel 1 2 max 200 W Adjustable temperature limits yes Operating conditions Temperature 0 C to 40 C Humidity 0 to 80 relative non condensing Storage conditions Temperature 20 C to 40 C Humidity 0 to 80 relative non condensing Dimensions 226 x 152 x 152 mm D x W x H Weight approx 3 24 kg b Soldering iron Type Y130 Power 130 W Operating voltage 24 V DC c S...

Страница 52: ...Publikation entspricht dem technischen Stand bei Drucklegung Copyright 2020 by Conrad Electronic SE This is a publication by Conrad Electronic SE Klaus Conrad Str 1 D 92240 Hirschau www conrad com All rights including translation reserved Reproduction by any method e g photocopy microfilming or the capture in electronic data processing systems require the prior written approval by the editor Repri...

Отзывы: