


9(16)
they are replaceable and so that any leaking water can be easily detected. The
units must be installed in rooms with a waterproof floor, in a distribution cabinet,
or in a custom space. If a distribution cabinet is used, the installation instructions
for this must be followed. After mounting, the installation must be checked for
leaks with the tap water installation's existing water pressure according to the
instructions on www.säkervatten.se
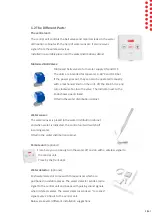
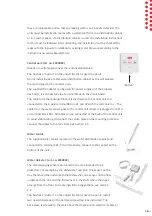
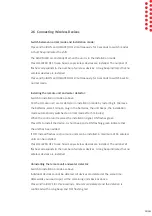
Central unit: (art. no. 2220082)
Mount in a suitable place near the motorised ball valve.
The box has a "button" on the underside that is used to open it.
Do not install inside a metal water distribution cabinet as this will weaken
the radio signals to the wireless units.
The supplied DC adapter can be used for power supply or if the property
has 12vdc, it is connected via a terminal block on the circuit board.
The cable from the motorised ball valve is drawn to the central unit and
connected to the 6-pole terminal K80 on V1 and V2 with the red cable to +. The
cable from the water sensor goes to the central unit where it is plugged in to Prb
on terminal block K81. All cables can be connected at the back of the central unit
to avoid visible wiring, disconnect the centre plate on the mounting plate and
connect the cables to the terminals. See Section 2.5.
Water sensor:
The supplied water sensor is placed in the water distribution cabinet and
connected to terminal K81, Prb. Alternatively, connect to the contact on the
bottom of the unit.
Water detector: (art. no. 2220042)
The accompanying sensors are placed in the area intended to be
protected. For example by the dishwasher and sink: One sensor on the
tray that should be underneath the dishwasher, one sensor on the floor
underneath the sink and the final sensor in the shaft where the pipes
emerge from the floor. For more installation suggestions, see section
1.2.
The box has a "button" on the underside that is used to open it. Install
two new AA batteries in the battery compartment as instructed. The
back piece is screwed to the wall. Check that there are no electrical cables or
"Button"


