background image

3

Welcome to the world of Digital TV

Welcome to the world of Digital TV

All set top boxes (STB) have been tested in the factory for proper operation. In case you 

experience any problems, please follow these simple steps to troubleshoot your problems.

Please make sure your TV and STB are plugged in and powered up, and that the STB is properly 

connected to your TV by either a RF cable or a A/V cable set (red white yellow connectors on

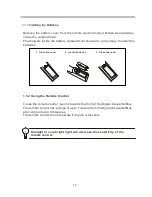
each end) following the guideline below.  Don't forget to properly insert batteries into the remote 

control unit.

Connection option RF:

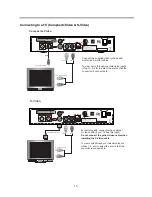
The STB can be operated in RF mode to connect to your TV. In this case the RF-OUT connector

of the STB connects to your Antenna Input on your TV. Your TV must be tuned to either channel

3 or 4 and the STB needs to be set to the corresponding channel selected on theback of the STB

by utilizing the small slide switch.

Connection option A/V:

If you TV is equipped with an A/V input, sometimes referred to as AV1 or AVin, Then you may want

to choose the A/V connection for a better quality picture. ARF connection as described above has 

some inherent limitation and a somewhat lower quality than A/V.

Please make your connection before turning on your devices and plug in the yellow terminated 

cable to the AV-in on your TV and the AV-out on the STB. Similarly, connect the red and white 

terminated cable to the corresponding Audio-in on your TV and Audio-out on the STB.

Once a connection utilizing option RF or option A/V is made turn on your TV first and then your STB.

The STB is turned on by pressing the power button on the front, or using the remote, power up the

STB. You should see a logo come up on your TV as the STB turns on.

Since channel programming is different in various regions, you must set up your set top box with 

your channels by using the auto scan feature.

Make sure a suitable antenna is connected to the antenna input, labeled as RF-In on the STB, 

and after turning on your TV and STB, press the Menu button on your remote. Use the cursor 

keys around the OK button to move the highlighted field to Channel-Scan and press OK. You 

may need to reorient your antenna to achieve best results. If you have an external antenna, it 

may have already been oriented such that it point to the transmitter stations.

To help in orienting your antenna, a signal strength indicator can be turned on in the STB. Use 

the menu button and select signal strength or signal quality item to display a signal quality bar

on the screen.

Although digital TV will give a very clear picture when a signal is received in sufficient strength, a

weak signal will result in dropouts or no picture at all. Analog stations would just be received with 

noise in the sound and snow in the picture, Digital transmissions will dropout or have large blocks

of images missing if the RF signal is of insufficient strength or quality. Reorienting your antenna or

getting a better quality antenna may solve this problem. Some experimenting may be required to

obtain the best results.

Thank you for choosing a Tivax Set Top Box and enjoy the new world of Digital Television.

Содержание STB-T12

Страница 1: ...USER MANUAL STB T12...

Страница 2: ...g and maintenance servicing instructions in the literature accompanying the appliance Dolby Digital Certification Manufactured under license from Dolby Laboratories Dolby and the double D symbol are t...

Страница 3: ...ation may be blocked Your Tivax comes with a standard polarized plug one blade is wider than the other with a third plug for grounding Use outlets designed for this type of plug for your safety If you...

Страница 4: ...tilizing option RF or option A V is made turn on your TV first and then your STB The STB is turned on by pressing the power button on the front or using the remote power up the STB You should see a lo...

Страница 5: ...STB es encendnido presionando el bot n de la energ a en el frente o con el control remoto encienda el STB Usted debe ver un logo que aparece en su TV mientras que el STB se enciende Puesto que la pro...

Страница 6: ...5 STB STB RF AV RF RF RF OUT Antenna Input 3 4 A V A V AV1 AV In A V RF A V A V AV OUT AV IN RF A V Power TIVAX RF IN Menu OK Channel Scan OK Menu Tivax...

Страница 7: ...1 Front Panel 13 1 3 Connecting The Digital Converter Box 14 1 3 1 Connecting Antennas 14 1 3 2 Connecting to a TV TV Aerial 15 1 3 3 Connecting to an Audio System 17 1 3 4 Quick Start Guide 18 2 On...

Страница 8: ...swer Unless you have a Digital TV set YES Don t worry You can combine your Tivax with your cable or satellite receiver We ll show you how Question 4 Do I need an antenna to receive FREE Digital televi...

Страница 9: ...l TV set Your Analog TV cannot receive the amazing world of digital television 2 You must have a Digital TV tuner Tivax is a Digital TV tuner 3 You must pay for cable or satellite remember cable and s...

Страница 10: ...only get ONE Digital Television signal at that moment in time A good example when this happens if during Prime Time 8 pm to 11 pm Football and baseball games are commonly transmitted in High Definitio...

Страница 11: ...n antenna The mini antenna provided with your Tivax will work in most cases but it may not be your best option depending on your location Q Can I use my existing indoor antenna A Yes but it may not gi...

Страница 12: ...our Favorite s List 9 ADD DEL Press to add viewing channel to Favorite s List Press again to remove from Favorite s List 10 MUTE Press to turn off sound Press again to restore sound 11 CLOSED CAPTION...

Страница 13: ...s 1 Open the cover 2 Install batteries 3 Close the cover 1 1 2 Using the Remote Control To use the remote control point it towards the front of the Digital Converter Box The remote control has a range...

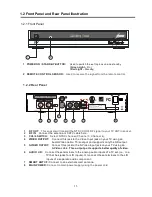
Страница 14: ...annel 3 Channel 4 4 VIDEO OUTPUT Connect this jack to the Video Input jack on your TV using an Audio Video cable This output port supports only the SD output 5 S VIDEO OUTPUT Connect this jack to the...

Страница 15: ...ox You may need a 75 adaptor or a combiner NOTES A If your antenna has separate leads for VHF UHF signals you will need to purchase a combiner to combine it before connect to the receiver B The Digita...

Страница 16: ...e rear of your TV To view tune Ch 3 or 4 on your TV choose the channel that does not have an active or strong signal Slide the CH 3 4 accordingly Analog Pass Through Please follow the procedure below...

Страница 17: ...to select the source that the convertor is connected to To TV Audio L R Input white red For better quality connect with an optional S Video cable if your TV has this input Do not connect the yellow v...

Страница 18: ...AUDIO OUTPUT AUDIO OUTPUT Front Left Speaker Front Right Speaker Center Channel Surround Right Speaker Surround Left Speaker Dolby Surround Connection Example To Dolby Surround Equipped Receiver L R...

Страница 19: ...ng using then press OK to confirm and auto scanning will proceed Auto Channel Scan Your converter box searches for available channels in your area and stores them in the channel memory To stop scan du...

Страница 20: ...lectronic Program Guide EPG is the electronic equivalent of a printed TV program guide You can view a list of programs scheduled for the next few hours Press Guide on the remote control to display the...

Страница 21: ...ontrol three times or press MENU button on the remote control to display On Screen Menu and follow the steps below 1 Using arrow buttons highlight Reminder List OK to set Reminder Release OK Reminder...

Страница 22: ...the screen will be directed to the first scanned channel 4 Once Auto Scan is completed the total number of channels found will be indicated Press arrow buttons to select channel viewable or favorite c...

Страница 23: ...to display the On Screen Menu and follow the steps below 1 In the Setup submenu press buttons to highlight System Setting press OK to confirm 2 OSD Language English Spanish French 3 Auto Language Eng...

Страница 24: ...eneral audience PG Parental guidance suggested PG 13 Unsuitable for children under 13 R Restricted under 17 requires adult NC 17 No one 17 and under admitted X Mature audiences only NR No rating TV Ra...

Страница 25: ...Presee MENU button on the remote control to display the On Screen Menu and follow the steps below 1 In the Setup submenu press buttons to highlight Time Zone 2 Select a time zone Hawaii Alaska Pacifi...

Страница 26: ...save Factory Default allows you to reset the converter box to the factory default setting and will erase all preset options Press MENU button on the remote control to display the On Screen Menu and fo...

Страница 27: ...ontrol to increase VOL Press VOL on the remote control to decrease VOL Press MUTE to turn sound off or restore sound Press SIGNAL on the remote control to display signal quality and signal strength ME...

Страница 28: ...anning function to add the channels not included in the memory Signal from the TV station may be weak Reposition antenna Q TV blocked at certain channels A Use the automatic scanning method to add the...

Страница 29: ...dio Format Dolby Digital audio R F Signal Input Output ATSC Antenna Cable RF In F Connector NTSC Ch3 4 RF out F Connector Antenna Impedance 75 Ohms Channels VHF 2 13 UHF 14 69 Smart Antenna interface...

Страница 30: ...spect ratios and it includes surround sound Variations of fps frames per second lines of resolution and other factors of 480p and 480i make up the 12 SDTV formats in the ATSC standard HDTV High defini...

Страница 31: ...included with the returned unit A copy of the original sales invoice from your vendor Model number serial number of the unit A detailed description of the problem associate electrical connection and...

Страница 32: ...Michley Electronics Inc U S A www tivax com...

Отзывы: