background image

SPARK PLUG
NOTE! 

This engine uses a CHAMPION RCJ6Y spark plug 

with 0.6-0.7mm electrode gaps. Use a suitable 
replacement and replace once a year. You can it replace 
with “CHAMPION” or “NGK” as an alternative.

1. Inspect the spark plug at least every 25 hours or prior 
to long-term storage over 30 days if the use has not been 
this high. Clean or replace with a new spark plug if 
necessary.
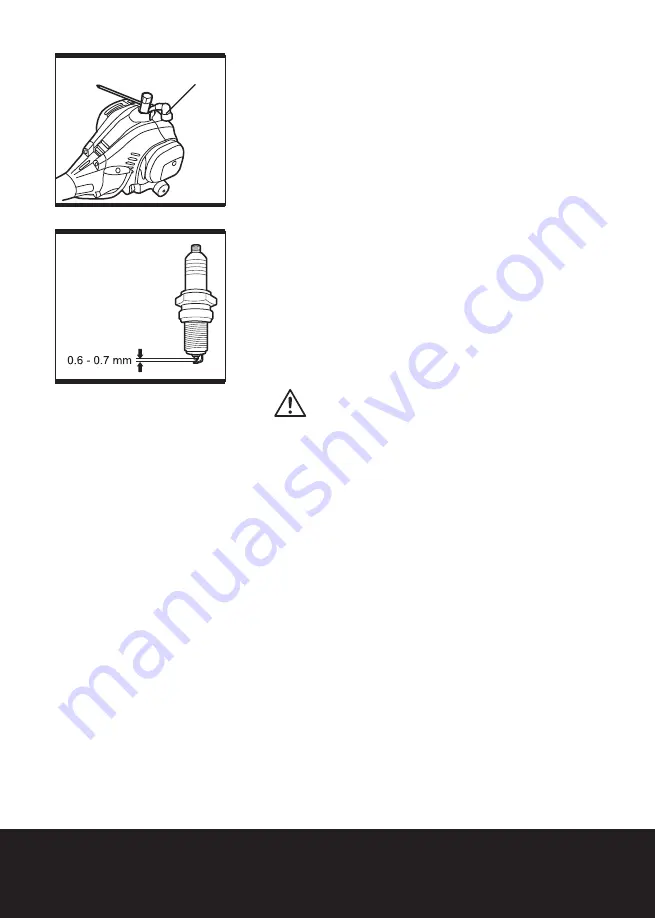
2. Unplug the spark plug connector (A2). Loosen the 
spark plug with the spark plug wrench (D2, D1) 
anticlockwise and carefully remove it. (See Fig. 20a)
3. Check the spark plug for damage and wear. The colour 
of the electrode should be light-brown coloured.
4. Remove debris from the electrode with a soft wired 
brush; avoid heavy cleaning of the electrode.
5. Dry the spark plug with a soft cloth if it is wet from fuel.
6. Check the spark plug gap; it should be 0.6 - 0.7 mm. 
(See Fig. 20b)
7. Replace with a new spark plug if either the electrode or 
the insulation is damaged.
8. When replacing the spark plug, first screw it in hand 
tight and then lightly tighten it with the spark plug wrench.

WARNING! 

Do not over-tighten the spark plug to 

avoid any damage!

BEVEL GEAR(HEDGE TRIMMER)

The bevel gear is filled with grease. Ask an authorised 
service centre or similar qualified person to check the 
quantity regularly and fill up using proper grease if 
necessary.

CARBURETTOR

The carburettor is pre-set by the manufacturer. Should it 
be necessary to make any changes please contact an 
authorised service centre or a similarly qualified person. 
Do not attempt to make any adjustments by yourself.

REPAIR

This product does not contain any parts that can be 
repaired by the consumer. Contact a qualified specialist 
to have it checked and repaired.

STORAGE

1. Clean the product as described above.
2. Store the product and its accessories in a dry, frost-
free, well-ventilated place.
3. Always store the product in a place that is inaccessible 
to children. The ideal storage temperature is between 10 
and 30°C.
4. We recommend using the original package for storage 
or covering the product with a proper cloth or enclosure 
to protect it against dust.

Fig. 20b

A2

Fig. 20a

Содержание TTK587GD0

Страница 1: ......

Страница 2: ...ver A14 Locking knob A4 Primer A15 Auxiliary handle A5 Air filter case A16 Control unit A6 Fuel tank cap A17 Handle grip A7 Recoil starter handle A18 Throttle trigger A8 Harness A19 Ignition switch ON OFF A9 Hip protection A20 Throttle interlock A10 Securing clip A21 Pole extension A11 Step guard A1 A2 A4 A Main Unit 17 25CC PETROL MULTI TOOL TTK587GDO ...

Страница 3: ...ocket D3 Locking nut D11 Tension pin D4 Spring washer D12 Tension screw D5 Pivot D13 Bolt D6 Saw chain D14 Oiling port D7 Guide bar D15 Guide bar cover D8 Locking lever D16 Pruner shaft D1 D2 D3 D4 D5 D6 D7 D8 D9 D10 D11 D12 D13 D14 D15 D16 19 25CC PETROL MULTI TOOL TTK587GDO ...

Страница 4: ...PC E1 E2 E3 E4 Multi tool I Cross head screw driver socket wrench rod used with Multi tool II Multi tool II Spark plug wrench socket wrench used with Multi tool I Multi tool III Torx screw driver spindle lock rod Hex key 5 mm 20 25CC PETROL MULTI TOOL TTK587GDO E5 Hex key 4 mm E6 Multi tool IV Socket wrench slotted screw driver E7 Bag ...

Страница 5: ...t handle a at idling h 6 954 m s Rear handle a at racing h 9 901 m s Uncertainty 1 5 m s The declared vibration value has been measured in accordance with a standard test method and may be used for comparing one tool with another The declared vibration value may also be used in a preliminary assessment of exposure WARNING The vibration emission value during actual use of the tool can differ from t...

Страница 6: ...side of domestic premises 3 Observe the technical data for the maximum cutting capacity according to the application see Technical Information Do not cut plants exceeding the stated maximum capacity 4 This product is intended for private domestic use only not for any commercial trade use It must not be used for any purposes other than those described Unpack 1 Unpack all parts and lay them on a fla...

Страница 7: ...iary handle A15 and adjust the position See Fig 2 2 Afterward tighten the bolts Fig 2 25 25CC PETROL MULTI TOOL TTK587GDO Attachments WARNING Read all the instructions carefully Do not start the product until it is completely assembled Always wear gloves during assembly Assemble the relevant attachment to suit the intended application NOTE This product can be used with different cutting heads for ...

Страница 8: ...ficient tension can cause chain derailing whereas a correctly tightened chain provides the best cutting characteristics and prolonged working life The chain life mainly depends upon sufficient lubrication and correct tensioning 1 Loosen the locking nut Lift the tip of the guide bar D7 and keep it there as you adjust the tension 2 Turn the tension screw D12 clockwise until the chain tie straps are ...

Страница 9: ...nd remove the tank cap D1 then add the lubricant into the tank We recommend using environmentally friendly chain oil specifically intended to be used with this product 3 Use a proper funnel with a filter to prevent debris entering the tank and to avoid spilling and overfilling the tank Do not overfill and leave approximately 5 mm of space to the lower edge to allow the lubricant to expand See Fig ...

Страница 10: ... 28 to attach the pole extension to the main unit NOTE Use the pole extension only together with pruner attachment D It may not be used with the brush cutter grass trimmer hedge trimmer accessories HARNESS The harness A8 helps the operator carry this product WARNING Always attach the product to the harness Do not carry it just by hand 1 To remove the harness from the loop open the securing clip A1...

Страница 11: ...oled 2 stroke engines in a suitable container 3 Use an anti oxidant added quality oil expressly labelled for air cooled 2 stroke engine use JASO FC GRADE OIL or ISO EGC GRADE Do not use BIA or TWC 2 stroke water cooling type mixed oil 4 The recommended mixing ratio for petrol oil is 40 1 See Fig 17 Fig 17 5 Unscrew and remove the fuel tank cap A6 6 Fill correctly mixed fuel oil into the tank using...

Страница 12: ... 30 days STARTING INSTRUCTIONS Cold Start 1 Place the product on a flat stable surface Ensure that the attachment in use does not touch the ground or any objects 2 Set the ignition switch A19 to its on position I See Fig 19 Fig 19 3 Press the primer A4 5 6 times until the fuel is visible Move the choke lever A3 to the position See Fig 20a 20b Fig 20a 4 Hold the product stable and pull the recoil s...

Страница 13: ...not move Contact a qualified technician if you find that the cutting blade is moving Warm start 1 Place the product on a flat stable surface Ensure that the attachment in use does not touch the ground or any objects 2 Set the ignition switch A19 to its on position I See Fig 21a Fig 21a 3 Move the choke lever A3 to the position do not press the primer See Fig 21b Fig 21b 4 Hold the product stable a...

Страница 14: ... starting the product GENERAL BEHAVIOUR 1 Check the product as well as accessories for damage before each use Do not use the product if it is damaged or shows wear 2 Double check that accessories safety guards and blades are properly fixed 3 Always hold the product the product by its handles Keep the handles dry to ensure safe support 4 Ensure that the air vents are always unobstructed and clean C...

Страница 15: ...ion See Fig 30a Fig 29d Fig 30a 2 Adjust the pruner head to required position and then release the locking lever D8 See Fig 30b WARNING Ensure the locking lever returns to its initial position To test if the unlock lever is properly engaged try to move the pruner head It may not be possible to adjust the angle Fig 30b 43 25CC PETROL MULTI TOOL TTK587GDO ...

Страница 16: ...Sudden surprise contributes to the majority of accidents 4 You should read all the safety warnings and user instructions carefully before attempting to operate this product To avoid kickback Never work with a loose overstretched or worn out chain Ensure chain is sharpened correctly Never work with the tip of the guide bar Always hold the tool firmly with both hands Always use a low kickback chain ...

Страница 17: ...es hazards See Fig 31e WARNING This product has not been designed to provide protection from electric shock in the event of contact with overhead electric lines Therefore do not use product near cable electric power or telephone lines Keep a minimum distance of 10 m to all electric lines See Fig 31f Fig 31d Fig 31c Fig 31e Fig 31f 7 Use the product only with secure footing Hold the product at the ...

Страница 18: ...e location where you intend to cut off the branch The cut should go one third to halfway through the branch See Fig 33a 2 Cut into the branch from the top outside from where the branch is to be sawn See Fig 33b 3 Last cut off the stump with one clean cut from top to bottom You might want to seal the cut with a suitable compound See Fig 33c Fig 33b Fig 33c Fig 33a 4 You might want to seal the cut w...

Страница 19: ...n and guide bar 1 Use only the guide bar D7 and saw chain D6 according to the technical data of the product WARNING Always use a saw chain designed as low kickback or a saw chain which meets the low kickback requirements A standard saw chain a chain which does not have the kickback reducing guard links should only be used by an experienced professional operator Nevertheless a low kickback saw chai...

Страница 20: ... the guide bar D7 Slide the chain into the groove around the guide bar Pay attention to the cutting direction 8 Align the saw chain around the drive sprocket D10 and place one corner of the guide bar into a gap of the sprocket See Fig 35f Fig 35d Fig 35e WARNING The direction of the saw chain cutters must be as indicated by the arrow on the pruner head Fig 35f 9 Make sure the tension pin D11 is in...

Страница 21: ...help minimise bar wear maintenance of the guide bar as well as the saw chain is recommended 1 Disassemble the guide bar and saw chain in reversed order from assembly 2 Check the oiling port D14 for clogging and clean if necessary to ensure proper lubrication of the guide bar and saw chain during operation Use a soft wire small enough to insert into the oil discharge hole See Fig 36a Fig 35h Fig 35...

Страница 22: ...ow 8 Refit the saw chain D6 and the guide bar D7 as described under Assembly SAW CHAIN SHARPING WARNING Only sharpen the saw chain yourself if you are trained and have experience Use proper tools to sharpen the saw chain NOTE Never saw with a blunt chain The saw chain is blunt if you have to push the product into the tree and the chips are very small 1 Have the saw chain D6 sharpened professionall...

Страница 23: ... to the bar and at an angle of 25 to the direction of travel See Fig 37b Fig 37b 7 File each tooth from the inside towards outside only File one side of the chain first than turn the saw around and repeat the process 8 Sharpen each tooth equally by using the same number of strokes 9 Keep all cutter lengths equal Check the safety depth gauge height every 5 sharpenings If the depth gauges are also t...

Страница 24: ... a proper fuel pump to empty the fuel into a suitable container FUEL FILTER The fuel tank of this product is fitted with a filter located at the free end of the fuel pipe Ask an authorised service centre or similar qualified person to check and where necessary replace it at regular intervals SPARK PLUG NOTE This engine uses a CHAMPION RCJ6Y spark plug with 0 6 0 7mm electrode gaps Use a suitable r...

Страница 25: ...ly tighten it with the spark plug wrench WARNING Do not over tighten the spark plug to avoid any damage BEVEL GEAR The bevel gear is filled with grease Ask an authorised service centre or similar qualified person to check the quantity regularly and fill up using proper grease if necessary CARBURETTOR The carburettor is pre set by the manufacturer Should it be necessary to make any changes please c...

Страница 26: ... product from any heavy impact or strong vibrations which may occur during transportation in vehicles 5 Secure the product to prevent it from slipping or falling over ENVIRONMENTAL PROTECTION 1 Waste products should not be disposed of with household waste Please recycle where facilities exist Check with your Local Authority or local store for recycling advice 2 Petrol oil old oil a mixture of oil ...

Страница 27: ...t pressed at cold start Press the primer and restart Primer has been pressed at warm start Dry spark plug Spark plug is wet Dry spark plug Spark plug is damaged Replace spark plug Spark plug connector lose Attach properly Engine stops Not enough fuel in fuel tank Add fuel Cutting device is blocked Remove blockage Unsatisfactory cutting performance Cutting blade is dull damaged Have a specialist to...

Страница 28: ...B 1 3 4 2 5 7 6 1 Shaft 2 Spindle 3 Trimming guard 4 Line cutter 5 Trimmer head 6 Trimming line 7 Bumper B Grass trimmer 25CC PETROL MULTI TOOL TTL488GDO ...

Страница 29: ...1 2 3 4 6 7 5 C C Hedge trimmer attachment 1 Hedging blade 2 Blade protection sheath 3 Bolts 4 Unlock levers 5 Locking pin 6 Hedge trimmer shaft 7 Gripping surface ...

Страница 30: ...s trimmer attachments 5 6 kg GRASS TRIMMER Engine type Sl33 air cooled 2 stroke Engine displacement 25cc Max engine power 0 8 kW Max engine speed 10500 min Engine idle speed 3000 min Clutch engagement speed 4500 min Fuel tank volume 500 ml Fuel type 95 unleaded in a 40 1 ratio mix with 2 stroke oil Fuel consumption at maximum engine power 0 38 kg h Specific fuel consumption at maximum engine power...

Страница 31: ...5 dB A Uncertainty 3 dB A Sound power level LWA ld 87 0 dB A Sound power level LWA R 109 4 dB A Sound power level LWA av 106 4 dB A Uncertainty 3 dB A Guaranteed sound power level LWA 112 dB A Net weight with hedge trimmer attachments 7 0 kg The sound intensity level for the operator may exceed 85dB A and ear protection measures are necessary ACCESSORIES HARNESS 1PC MULTI TOOL 1PC HEX KEY 4MM 1PC ...

Страница 32: ...uch as plastic stone metal or wood that contains foreign objects 3 Observe the technical data for the maximum cutting capacity according to the application see Technical data Do not cut plants exceeding the stated maximum capacity 4 This product is intended for private domestic use only not for any commercial trade use It must not be used for any purposes other than those described UNPACK 1 Unpack...

Страница 33: ...e product until it is completely assembled Always wear gloves during assembly This product can be used with different cutting heads for different applications Follow the assembly steps for respective application Grass trimmer With the grass trimmer head and its relative attachments correctly assembled the product can be used as a grass trimmer intended to cut smaller types of weed lawngrass or sim...

Страница 34: ...ft See Fig 4a c Insert and secure the guard by the bolt and screw nut Use a hex key to secure the bolt See Fig 4b 3 Grass trimmer head assembly a Make sure that the trimming guard B3 has been attached properly b Attach the trimmer head B5 onto the spindle B2 c Secure the trimmer head B5 with bumper B7 clockwise See Fig 5 Pole hedge trimmer With the hedge trimmer blade and its relative attachments ...

Страница 35: ...larly Stop the engine switch the ignition switch A18 to STOP and remove the spark plug connector A2 before checking 8 Trim longer grass in stages do not cut long grass in one cut For the best results cut longer grass in steps See Fig 15c 15d 9 The trimmer head is equipped with a bumper B7 helping to cut the trimming line B6 while operating Simply tap the bumper on a firm surface and the spool will...

Страница 36: ...esired angle is adjusted See Fig 16c d Release the unlock levers C4 when the desired angle is adjusted Ensure that the hook engages between two teeth of the tooth wheel See Fig 16d e Make sure the unlock pin C5 engages automatically and the joint is secured 2 Trimming a Prepare the product to required length attaching the hedge trimmer shaft b Cut and remove branches exceeding the cutting capacity...

Страница 37: ...ea out of sight See Fig 17c h Do not to rush and do not attempt to cut too much with one stroke of the cutting blade NOTE Try to keep the cutting blade angled at approximately 15 to the cutting surface i Cut in a number of stages if the area being cut is particularly long to achieve a better result smaller cuttings will allow for easy composting NOTE When shaping it is advisable to achieve a trape...

Страница 38: ... or other aggressive detergents or disinfectants to clean this product as they might be harmful to its surfaces 1 Clean the product with a slightly damp cloth and mild soap Use a brush for areas that are hard to reach 2 In particular clean the air vents after every use with a cloth and brush 3 Remove stubborn dirt with high pressure air max 3 bar 4 Check for worn or damaged parts Replace worn part...

Страница 39: ...n or damaged cutting blade with a new one of the same type 3 Lubricate the hedging blade C1 after each use to prolong the life span of cutting blade and product Apply light machine oil along the edge of the cutting blade AIR FILTER 1 Inspect the air filter regularly Replace it with a new one if necessary 2 Open the air filter case A5 with the cross head screwdriver D1 D2 and remove the filter See ...

Страница 40: ...the spark plug first screw it in hand tight and then lightly tighten it with the spark plug wrench WARNING Do not over tighten the spark plug to avoid any damage BEVEL GEAR HEDGE TRIMMER The bevel gear is filled with grease Ask an authorised service centre or similar qualified person to check the quantity regularly and fill up using proper grease if necessary CARBURETTOR The carburettor is pre set...

Страница 41: ...ts should not be disposed of with household waste Please recycle where facilities exist Check with your Local Authority or local store for recycling advice 2 Petrol oil old oil a mixture of oil and petrol and objects soiled with oil e g cleaning cloths do not belong in the household rubbish Dispose of oily items in accordance with local guidelines and hand them in at recycling centres 3 The produc...

Страница 42: ...rimer has been not pressed at cold start Press the primer and restart Primer has been pressed at warm start Dry spark plug Spark plug is wet Dry spark plug Spark plug is damaged Replace spark plug Spark plug connector lose Attach properly Engine stops Not enough fuel in fuel tank Add fuel Cutting device is blocked Remove blockage Unsatisfactory cutting performance Cutting blade is dull damaged Hav...

Отзывы: