background image

Hi-Performance Wash Systems Car Wash Equipment and Parts Supplier to the Rocky Mountain Region

REMOTE CONTROL OPERATION 

The remote control works best from close proximity - usually within three feet of the timer. Simply aim the remote at the TIMEMASTER and depress the appropriate 
buttons. After the security code has been properly entered, the timer's horn will beep once. This signal tells you that you have accessed the timer. You must press a 
function button within 7 seconds or access will automatically cancel. If you enter your security code and no beep is heard, depress "CNCL" and reenter your code. 

REMOTE CONTROL REPROGRAMMING OF THE TIMERMASTER 

The TIMEMASTER TM-5J can be reprogrammed with the RC-1 remote controller. All functions except the timer's security code can be changed with the remote controller. 
This makes the RC-1 a valuable tool in that the coin box need not be opened to modify your timer program. 

Reprogramming with the remote controller follows the same flow chart as initial programming. The only difference is the use of the remotes buttons versus the MODE and 
SET buttons on the back of the timer. 

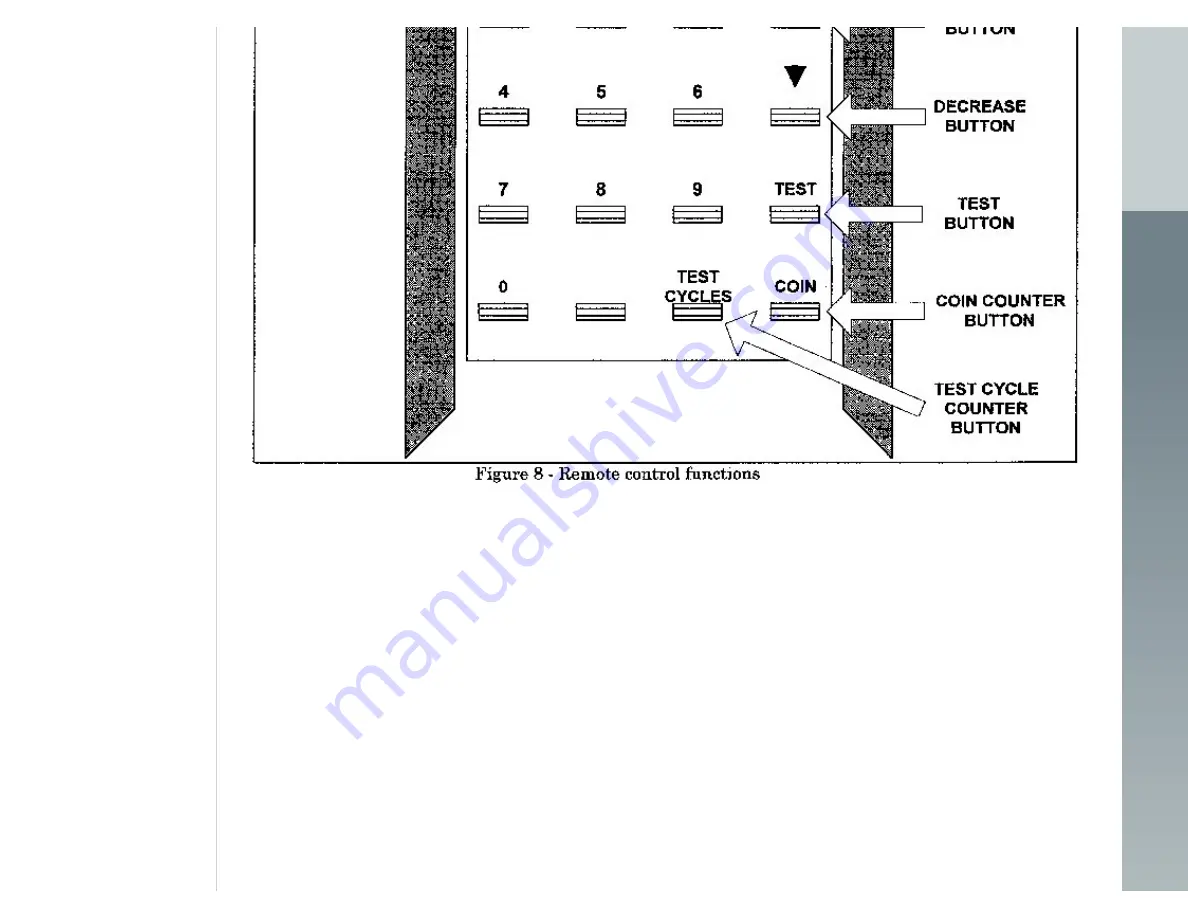
To access the timer enter your 4 digit security code. Listen for the horn to beep. Once the horn beeps, depress and release the MODE button (See Figure 8). 

Note: When entering function commands or your security code number on the remote control, press each button completely and release it completely before depressing 
the next button. The infrared communications system is designed to prevent improper use. Therefore, sending signals too quickly can cause the system to reject the 
signal. If you do not get a beep response from the timer after you have entered your security code, depress and release the "CNCL" button and reenter your security code 
slowly. Remember to keep the remote pointed toward the timer's display when entering your code or function commands 

Follow the programming flow charts described previously in this manual to change the desired program on your timer. 

Once you have selected the desired MODE, use the INCREASE button to advance to a higher number or the DECREASE button to return to a lower number. Note that 

http://www.hpws.com/tech/tmman.htm (14 of 15)3/29/2007 12:19:49 PM

Содержание TM-5J

Страница 1: ...timers Repairs of any type may be obtained by sending the timer to Hi Performance Wash Systems Inc GENERAL OPERATION The TIMEMASTER will time and control the functions associated with the operation o...

Страница 2: ...perator who wishes to pause the timer s countdown during the wash cycle Examples of the CHANGEOVER TIME uses are as follows Example 1 Low pressure products such as PRESOAK TIRE CLEANER and FOAM BRUSH...

Страница 3: ...ut as this will allow the timer to recoil to the real if the coin box is struck ELECTRICAL INSTALLATION Provided with the TIMEMASTER are two 2 pre wired connectors These wires are to be connected to t...

Страница 4: ...volts DC hot light green 5 safety ground blue black 6 timed output yellow 7 jumpered DO NOT USE yellow 8 jumpered DO NOT USE green 9 TIMEMASTER power 24 volts AC neutral orange 10 TIMEMASTER power 24...

Страница 5: ...itive terminal to this pin Note Hi Performance Wash Systems provides a 12Vdc 105dB water resistant alert horn for use with the TIMEMASTER timer Use only this horn or its equivalent Pin 5 SAFETY GROUND...

Страница 6: ...Pin 9 24 V AC Neutral AC voltage to power the TIMEMASTER is applied to pins 9 and 10 Pin 9 will be referred to as AC neutral and pin 10 referred to as AC hot Voltage ratings applied to these pins are...

Страница 7: ...AMMING for instructions The remaining 4 wires on the connector are not used and should be secured with tape or wire ties GRACE TIME ELECTIRCAL INSTALLATION The TIMERMASTER TM 5J requires no additional...

Страница 8: ...the use of its MODE and SET switches The switches are push button switches located on the back of the timer case The switches should only be depressed with light finger pressure NO TOOLS SHOULD BE US...

Страница 9: ...steps are shown in the following flow chart figure 7 After the MODE switch moves to the option step the SET switch causes the number displayed to increase by one unit value Holding the switch depress...

Страница 10: ...yed depress and release the MODE button This display will now read b 00 MENU B Seconds This menu sets the seconds your equipment will operate once the minimum amount to start has been deposited Most c...

Страница 11: ...urposes To set the test time depress and release the SET button until the desired number of minutes is displayed Experience has shown that 4 to 5 minutes is sufficient to test the equipment and wash d...

Страница 12: ...button until the desired seconds are displayed Once the correct number is displayed depress and release the MODE button If you want the CHANGEOVER TIME 4 to be the same as CHANGEOVER TIME 1 simply dep...

Страница 13: ...me that you programmed into the timer during Step 6 of the Initial Setup procedure If you wish to turn off the TEST time prior to it elapsing simply depress the button labeled CNCL to cancel the time...

Страница 14: ...ing The only difference is the use of the remotes buttons versus the MODE and SET buttons on the back of the timer To access the timer enter your 4 digit security code Listen for the horn to beep Once...

Страница 15: ...cky Mountain Region depressing and holding the buttons will advance or decrease the numbers rapidly If you wish to keep a menu function unchanged simply bypass the menu function by pressing the MODE b...

Отзывы: