background image

Thank you for purchasing this Thunder Tiger product.  This manual contains the steps and instructions required to assemble your car.  
Please  read  this  manual  completely  before  attempting  to  start  maintenance.    Follow  the  directions  in  this  manual  closely  to  reduce 
problems during operation.  We offer online help on our  thundertiger.com and  facebook.com/ThunderTigerFans and our product specialists 
are ready to answer any technical questions.  Have fun and enjoy the exciting world of R/C.

感謝您購買雷虎科技

 TOMAHAWK XL

  引擎動力四驅拉力越野車。雷虎科技以提供最高品質的產品及服務作為持續努力的目標。並藉由

參與競賽及重覆測試產品,不斷累積經驗,進而提昇設計及製造品質,期望能呈現給您最頂級之工藝產品。本使用說明書包含了操作本

產品前所需注意的重要事項,建議您在開始準備及操作本產品之前,能詳閱此說明書,並熟悉本產品之操控系統。若是您在產品的操作

及使用上有任何的疑問,歡迎多加利用我們所提供的

24

小時諮詢留言版或洽詢雷虎科技授權經銷商。

雷虎科技的全球英文網址為

thundertiger.com

社群網址為

www.facebook.com/ThunderTigerFans

,我們將竭誠為您服務!

INTRODUCTION 

前言

Thank you for purchasing a Thunder Tiger Product. 
Please read all instructions and familiarize yourself with the products and controls before operation.
1. This product is not a toy. It is a high performance model product. It is important to familiarize yourself with the model, its manual, 

and its construction before assembly or operation. A child operating under the supervision of the adults is necessary.

2. Always keep this instruction manual ready at your hand for your assembling and operating reference, even after completing the 

assembly.

3. Make sure all the screws are properly tightened and all the parts are checked after running the car for a long period of time. 
4. For the best performance, it is important to make sure all the moveable parts work free without binding.
5. Do not operate model products in rain, on public roads, near crowds, near airport, or near areas with restricted radio operation.
6. Always keep fuel away from heat and open flame. Only operate in open, well-ventilated area. Store fuel in cool, dry area. Keep the 

fuel bottle cap tightly closed. Clean up any leak or excess fuel before starting the engine.

7. This product, its parts, and its construction tools can be harmful to your health. Always exercise extreme caution when assembling 

and/or operating this product. Do not touch any part of the model that rotates.

感謝您購買雷虎科技產品,在您開始操作本產品前,請詳閱本產品說明書。

1. 

本產品為高性能模型產品非一般玩具,組裝與操作過程須由成人陪同。請詳讀此使用說明書,避免因組裝錯誤與操作不當造成損壞。

2. 

請妥善保管此說明書,對於後續維修、操控說明將可提供您協助。

3. 

請定時巡檢車輛上之所有螺絲是否鎖緊,零件是否鬆動。

4. 

請檢視所有活動部位零件是否不受干涉,可靈活作動,以達到車輛最佳性能。

5. 

請勿於雨天、公眾空間、道路、機場附近與其他限制遙控模型活動區域,操控本項產品。

6. 

遙控模型專用燃料,具相當高的揮發性與低燃點特性,請您於使用或儲存時遵照使用燃油之相關規定;使用時必須遠離火源,儲藏時

必須避免日曬並放置於乾燥陰涼處,以及兒童無法取得處。

7. 

此項產品具有相當之危險性,於組裝、調整、操控上的不熟悉都可能造成自身或他人的傷害,當發生這些傷害事件時製造商是可以免

除責任的,建議您於初次使用本產品前,先行請教具有相當程度經驗同好或是專業雷虎經銷商與模型專賣店。

CAUTION 

注意事項

INDEX 

索引

1

INTRODUCTION 

前言


1

CAUTION 

注意事項


1

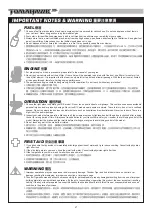
IMPORTANT NOTES & WARNING 

重要注意事項


2

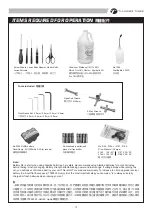
ITEMS REQUIRED FOR OPERATION 

周邊配件


3

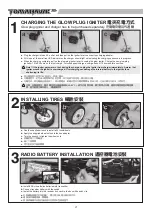
CHARGING THE GLOW PLUG IGNITER 

電夾充電方式


4

INSTALLING TIRES 

輪胎安裝


4

RADIO BATTERY INSTALLATION 

遙控器電池安裝


4

RADIO OPERATION 

遙控器操作


5

The ACE RC Cougar P2  

熟悉

2.4GHz

電控系統


5

TRANSMITTER CONTROLS 

發射機各部功能簡介


6

BINDING PROCESS 

安全校頻配對步驟


7

F/S-FAIL SAFE 

防暴衝設定


8

OPERATING RADIO STEERING FUNCTION 

遙控器設定-轉向


9

OPERATING RADIO THROTTLE/ BRAKE FUNCTION

遙控器設定-油門、中立、煞車


9

ADJUSTING THE THROTTLE LINKAGE 

油門及煞車連桿調整


10

ADJUSTING CARBURETOR 

化油器調整


10

FUELLING 

燃油的添加


11

PREPARING THE ENGINE FOR STARTING 

引擎整備工作


11

STARTING THE ENGINE


發動引擎


12

STOPPING ENGINE 

停止引擎


12

ENGINE BREAK-IN 

引擎磨合                                      

13 

ENGINE SETTING 

引擎設定


13

SHOCK ADJUSTMENT 

避震器懸吊調整


14

STORING AND MAINTENANCE 

儲存及保養


14

MAINTENANCE AFTER RUNNING 

車體保養


14

BEFORE OPERATING 

操控前準備


14

DRIVING TIPS 

駕駛的小技巧


15

TROUBLESHOOTING 

常見問題與解決方法


16

ASSEMBLY EXPLODED VIEW 

組裝爆炸圖檢索


17

TOMAHAWK XL CAR SPARE PARTS LIST 

零件表


22

TOMAHAWK XL CAR OPTIONAL PARTS LIST 

選購零件表


25

Содержание TOMAHAWK XL

Страница 1: ...he cost of the original kit purchased This warranty does not cover any components damaged by use or modification Part or parts missing from this kit must be reported within 60 days of purchase No part...

Страница 2: ...performance it is important to make sure all the moveable parts work free without binding 5 Do not operate model products in rain on public roads near crowds near airport or near areas with restricte...

Страница 3: ...do not run in confined spaces Do not run where loud noises can disturb others such as hospitals and residential areas Never run indoors There is a high risk of fire and or damage 2 Inspect your model...

Страница 4: ...Battery strength affects braking power and radio range If voltage drops while running the car you will loose control and destroy your car This is NOT covered under warranty To increase run time upgra...

Страница 5: ...hen the charging complete pull on the glow plug igniter lever to unplug the glow igniter Charge the new glow plug igniterfor 16 to 24 hours on the first charge For subsequent charges charge it about 1...

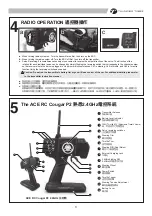
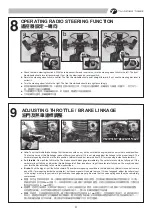
Страница 6: ...rcumstances Ch1 is steering Ch2 is throttle and Ch3 is for extra function Using the reversing switches as needed Caution Do not run the transmitter s battery flat or you will lose control of the car F...

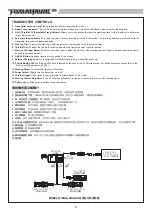
Страница 7: ...left or right to adjust the amount of the steering dual rate Right to increase dual rate amount and left to decrease amount 8 AUX Ch Button Additional function for controlling of the model 9 External...

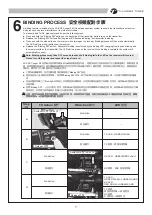
Страница 8: ...turn green red flash on the receiver d Release the Binding SW button Successful binding is confirmed by the binding LED changing from a quick blinking and then remain solid on the transmitter The LED...

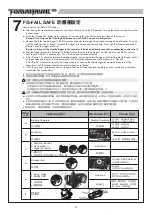
Страница 9: ...osition at Brake first push the trigger to the brake position and hold To set up F S with servo position at Neutral keep the trigger at neutral Caution Always set the throttle trigger to the neutral o...

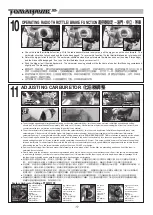
Страница 10: ...just the linkage to the proper length The carburetor opening should be in the idle position almost closed but remain about 0 5 1mm opening inside the carburetor b Full throttle Now pull the full throt...

Страница 11: ...l enters the engine at idle and low throttle This adjustment will smooth the idle and improve the acceleration to mid speed Make this adjustment with the throttle closed after setting the idle Turn th...

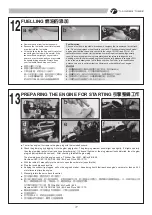
Страница 12: ...widely used fuel in these engines Fuel color is for identification purpose only and is not important to performance or durability of your engine c b a f d e a To start an engine first remove the glow...

Страница 13: ...he glow plug from engine flip the car upside down and pull on the starter to release excess fuel Then reinstall the glow plug and repeat the engine starting procedure a b c 20 35 35 a b c Not pull on...

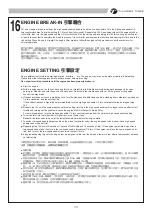
Страница 14: ...ak c If the exhaust does not reach a high pitch note turn the high speed needle long needle extending from carburetor pointing up 1 4 turn clockwise and repeat step 16b If the exhaust reaches a high p...

Страница 15: ...e chemicals or any solvents to clean the chassis as it may cause damage to the electronics components and plastic parts as well Use compressed air soft paintbrush or toothbrush to clean dust and dirt...

Страница 16: ...n for less steering response e D R b Squeeze the throttle trigger or pull the throttle stick gently and steer the car to left and right b c Squeeze the throttle trigger and release Repeat this action...

Страница 17: ...cool richen fuel mixture see Fuel Mixture section below Carburetor incorrectly adjusted Re adjust carburetor see Fuel Mixture or Factory Carburetor Settings section below Exhaust blocked Check exhaust...

Страница 18: ...A A B C PD8084 PD7855 PD8178 PD7995 PD1192 PD1192 PD1192 PD1192 B PD7991 PD1244 PD7974 PD7974 PD7383 PD7911 PD9065 PD9066 PD7712 PD9065 PD7999 C PD7991 PD7992 C PD7991 PD9092 PD7992 PD7974 PD9064 PD90...

Страница 19: ...726 PD7726 PD7726 PD1533 PD09 0058 PD9104 PD7994 PD7736 PD7977 PD1244 PD9104 PD9078 PD9078 PD9078 PD9104 PD05 0022 PD9129 PD9077 PD9078 PD9133 PD9104 PD7384 PD7384 PD1673 PD7391 PD9087 PD9087 PD9130 P...

Страница 20: ...535 PD1244 PD7916 PD1535 PD9133 PD1535 PD7736 PD7994 PD7978 PD7994 PD9133 PD7735 PD7978 PD7736 PD7726 PD9104 PD7502 PD05 0022 PD05 0024 PD7385 PD7385 PD7385 PD7385 PD1673 PD7385 PD7391 PD1533 PD1533 P...

Страница 21: ...1 PD7746 PD7746 PD7746 PD7901 PD7441 PD7905 PD0962 PD9124 PD7746 PD7948 PD0962 PD7929 PD7441 PD7929 PD7746 PD0962 PD7904 PD9051 PD7746 PD7905 PD9124 PD7746 PD1534 PD7902 PD0962 PD7746 PD9051 PD7929 PD...

Страница 22: ...SET BODY DECAL PD09 0044 BODY DECAL PD09 0057 BODY MOUNT 6198 PD09 0058 FORNT SHOCK TOWER SET TA B PD09 0059 REAR SHOCK TOWER SET TA B PD1880 SHOCK BLADDER PD1981 W MULT S WHEEL W 17mm 17mm PD2372 SH...

Страница 23: ...SIDE GUARDS PD7922 STEERING SERVO HORN SET PD7916 REAR TOE PLATE PD7915 FRONT TOE PLATE PD7929 OUTDRIVE CUPS PD7941 AIR CLEANER SET PD7970 SPUR GEAR 45T PD7971 SWING RACK SET PD7973 DRIVE PINION SET...

Страница 24: ...E PD0980 3mm 20 SPRING WASHER PD0982 HNJ 1 20 NYLON STRAP TOMAHAWK XL SPARE PARTS LIST 23 PD9133 M2x4B 20 PD7999 M3x20B 20 BHPS TAP SCREW W WASHER PD0667 M3x8 20 PD0669 M3x12 20 BHCS SCREW PD7942 M3x...

Страница 25: ...IP 20 SHOCK BLADDER MULT S WHEEL W 17mm SHOCK PISTON 4 ST 1 WASHER SET ST 1 FR SHOCK CAP 2 S3 FR SHOCK CAP 2 S3 FR SHOCK SHAFT 2 ER 1 O RINGS SPACER ER 1 SHCS SCREW 20 M3x6 FRONT BUMPER CENTER DRIVE S...

Страница 26: ...PARTS LIST TOMAHAWK XL OPTION PARTS LIST 1340 PD07 0048 PD07 0049 PD7719 PD7722 PD7723 PD7724 PD7730 PD7742 PD7965 1 PD7965 2 PD7968 PD7969 PD9150 PD9151 ROTATING CAR STAND SHOCK SPRING SHOCK SPRING...

Страница 27: ...JD7532...
Отзывы: