background image

8

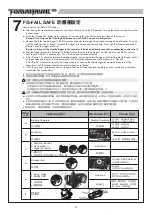
F/S-FAIL SAFE  

防暴衝設定

7

Release first 

先放開

OFF

2.

1. Steering: Neutral 
2. Keep brake or 
    trigger at neutral
1. 

轉向中立

2. 

保持煞車或油門扳機在中立點位置

完成對頻

Binding Complete

No Action

無須動作

Push for 10 

sceonds

先持續按

10

RX LED

GREEN FLASH

TX LED

GREEN SOLID

RX LED

GREEN SOLID

TX 

燈號:綠燈恆亮

RX 

燈號:綠燈恆亮

RX 

燈號:綠燈快速閃爍

RX LED

:

RED SOLID-2s-

>GREEN SOLID

RX

燈號:

紅燈恆亮

-2

->

綠燈恆亮

電車:轉向朝前,速控器煞
車油車:轉向朝前,


油門關

閉(怠速)煞車啟動

Release later

後放開

1. Keep  brake 
2. Swithch Off 

OK!

1. 

保持煞車

2. 

關發射機

Step

步驟

a

b

c

d

e

f

TX Action 

動作

完成對頻

Binding Complete

No Action

無須動作

No Action

無須動作

RX Action 

動作

Check 

確認

1.

1.

2.

or

_

_

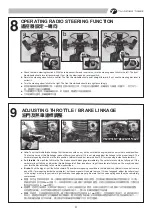
How to Set the Fail Safe (F/S) Position

a. 

After binding the transmitter and receiver, you can continually set up the F/S position. Turn on the transmitter power and then 
receiver power.

b. 

Press the “Binding SW” button on the receiver.  10 seconds later, the LED will turn green flash on the receiver.  

(Caution! Don't release the “Binding SW” button now until STEP c has been completed.)

c. 

Move and hold the throttle trigger to the F/S servo position where you want to set. Keep steering wheel at Neutral. To set up 
F/S with servo position at "Brake", first push the trigger to the brake position and hold. To set up F/S with servo position at 
"Neutral", keep the trigger at neutral.

(Caution: Always set the throttle trigger to the neutral or full brake position incase of any unexpected control error!)

d. 

After the Step3, release the “Binding SW” button first and then the throttle trigger. The LED turns to solid “RED” and then 

back to solid “GREEN” 2 seconds after. The F/S set up has now been activated.

e. 

F/S at "Neutral": To check the fail safe is working properly, by moving the throttle trigger to the full forward (full brake), hold it 
on this position and then turn off the transmitter. The F/S function should move the throttle servo to "Neutral". 
F/S at "Brake": To check the fail safe is working properly, by keeping the throttle trigger at neutral and then turn off the 
transmitter. The F/S function should move the throttle servo to "Brake".

f. 

If the F/S set up fail, try the steps from a) ~f) again. After the F/S has been fully complete, you can just start your operation. 

Transmitter first, receiver later.

a. 

設定此功能前請先完成系統發射與接收之對頻。確定後,先打開發射機再開接收機電源。

b. 

押著接收機對頻開關,約

10

秒鐘後

LED

會變為綠色快速閃爍

注意:步驟

3

完成前不要放開接收機對頻開關。

c. 

同時移動油門扳機至您想要設定

F/S

伺服機位置。轉向舵輪保持中立點位置。

【如想要設定

F/S

油門伺服機位置為煞車,需先移動油門扳機至煞車位置不要鬆開。】

【如想要設定

F/S

油門伺服機為至為中立

,

保持油門扳機在中立點位置

,

不要移動油門扳機。】

注意:防暴衝油門伺服機位置建議設定為煞車或中立點,請勿設定為油門開啟位置,以免發生危險。

d. 

此時你可以放開接收機對頻開關,再放開發射機油門板機。

LED

會變為恆亮紅燈,約

2

秒後又回到恆亮綠燈,此時表示

F/S

設定

成功。

e. 

F/S

油門伺服機位置為中立點

將油門扳機全煞車,關掉發射機電源,檢視

F/S

伺服機位置動作是否轉回中立點位置。

F/S

油門伺

服機位置為煞車

油門扳機保持中立點,關掉發射機電源,檢視

F/S

伺服機位置動作是否轉回煞車位置。

f. 

檢查無誤後,開發射機開關,然後接收機關開始操作。

Содержание TOMAHAWK XL

Страница 1: ...he cost of the original kit purchased This warranty does not cover any components damaged by use or modification Part or parts missing from this kit must be reported within 60 days of purchase No part...

Страница 2: ...performance it is important to make sure all the moveable parts work free without binding 5 Do not operate model products in rain on public roads near crowds near airport or near areas with restricte...

Страница 3: ...do not run in confined spaces Do not run where loud noises can disturb others such as hospitals and residential areas Never run indoors There is a high risk of fire and or damage 2 Inspect your model...

Страница 4: ...Battery strength affects braking power and radio range If voltage drops while running the car you will loose control and destroy your car This is NOT covered under warranty To increase run time upgra...

Страница 5: ...hen the charging complete pull on the glow plug igniter lever to unplug the glow igniter Charge the new glow plug igniterfor 16 to 24 hours on the first charge For subsequent charges charge it about 1...

Страница 6: ...rcumstances Ch1 is steering Ch2 is throttle and Ch3 is for extra function Using the reversing switches as needed Caution Do not run the transmitter s battery flat or you will lose control of the car F...

Страница 7: ...left or right to adjust the amount of the steering dual rate Right to increase dual rate amount and left to decrease amount 8 AUX Ch Button Additional function for controlling of the model 9 External...

Страница 8: ...turn green red flash on the receiver d Release the Binding SW button Successful binding is confirmed by the binding LED changing from a quick blinking and then remain solid on the transmitter The LED...

Страница 9: ...osition at Brake first push the trigger to the brake position and hold To set up F S with servo position at Neutral keep the trigger at neutral Caution Always set the throttle trigger to the neutral o...

Страница 10: ...just the linkage to the proper length The carburetor opening should be in the idle position almost closed but remain about 0 5 1mm opening inside the carburetor b Full throttle Now pull the full throt...

Страница 11: ...l enters the engine at idle and low throttle This adjustment will smooth the idle and improve the acceleration to mid speed Make this adjustment with the throttle closed after setting the idle Turn th...

Страница 12: ...widely used fuel in these engines Fuel color is for identification purpose only and is not important to performance or durability of your engine c b a f d e a To start an engine first remove the glow...

Страница 13: ...he glow plug from engine flip the car upside down and pull on the starter to release excess fuel Then reinstall the glow plug and repeat the engine starting procedure a b c 20 35 35 a b c Not pull on...

Страница 14: ...ak c If the exhaust does not reach a high pitch note turn the high speed needle long needle extending from carburetor pointing up 1 4 turn clockwise and repeat step 16b If the exhaust reaches a high p...

Страница 15: ...e chemicals or any solvents to clean the chassis as it may cause damage to the electronics components and plastic parts as well Use compressed air soft paintbrush or toothbrush to clean dust and dirt...

Страница 16: ...n for less steering response e D R b Squeeze the throttle trigger or pull the throttle stick gently and steer the car to left and right b c Squeeze the throttle trigger and release Repeat this action...

Страница 17: ...cool richen fuel mixture see Fuel Mixture section below Carburetor incorrectly adjusted Re adjust carburetor see Fuel Mixture or Factory Carburetor Settings section below Exhaust blocked Check exhaust...

Страница 18: ...A A B C PD8084 PD7855 PD8178 PD7995 PD1192 PD1192 PD1192 PD1192 B PD7991 PD1244 PD7974 PD7974 PD7383 PD7911 PD9065 PD9066 PD7712 PD9065 PD7999 C PD7991 PD7992 C PD7991 PD9092 PD7992 PD7974 PD9064 PD90...

Страница 19: ...726 PD7726 PD7726 PD1533 PD09 0058 PD9104 PD7994 PD7736 PD7977 PD1244 PD9104 PD9078 PD9078 PD9078 PD9104 PD05 0022 PD9129 PD9077 PD9078 PD9133 PD9104 PD7384 PD7384 PD1673 PD7391 PD9087 PD9087 PD9130 P...

Страница 20: ...535 PD1244 PD7916 PD1535 PD9133 PD1535 PD7736 PD7994 PD7978 PD7994 PD9133 PD7735 PD7978 PD7736 PD7726 PD9104 PD7502 PD05 0022 PD05 0024 PD7385 PD7385 PD7385 PD7385 PD1673 PD7385 PD7391 PD1533 PD1533 P...

Страница 21: ...1 PD7746 PD7746 PD7746 PD7901 PD7441 PD7905 PD0962 PD9124 PD7746 PD7948 PD0962 PD7929 PD7441 PD7929 PD7746 PD0962 PD7904 PD9051 PD7746 PD7905 PD9124 PD7746 PD1534 PD7902 PD0962 PD7746 PD9051 PD7929 PD...

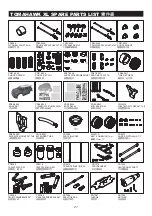
Страница 22: ...SET BODY DECAL PD09 0044 BODY DECAL PD09 0057 BODY MOUNT 6198 PD09 0058 FORNT SHOCK TOWER SET TA B PD09 0059 REAR SHOCK TOWER SET TA B PD1880 SHOCK BLADDER PD1981 W MULT S WHEEL W 17mm 17mm PD2372 SH...

Страница 23: ...SIDE GUARDS PD7922 STEERING SERVO HORN SET PD7916 REAR TOE PLATE PD7915 FRONT TOE PLATE PD7929 OUTDRIVE CUPS PD7941 AIR CLEANER SET PD7970 SPUR GEAR 45T PD7971 SWING RACK SET PD7973 DRIVE PINION SET...

Страница 24: ...E PD0980 3mm 20 SPRING WASHER PD0982 HNJ 1 20 NYLON STRAP TOMAHAWK XL SPARE PARTS LIST 23 PD9133 M2x4B 20 PD7999 M3x20B 20 BHPS TAP SCREW W WASHER PD0667 M3x8 20 PD0669 M3x12 20 BHCS SCREW PD7942 M3x...

Страница 25: ...IP 20 SHOCK BLADDER MULT S WHEEL W 17mm SHOCK PISTON 4 ST 1 WASHER SET ST 1 FR SHOCK CAP 2 S3 FR SHOCK CAP 2 S3 FR SHOCK SHAFT 2 ER 1 O RINGS SPACER ER 1 SHCS SCREW 20 M3x6 FRONT BUMPER CENTER DRIVE S...

Страница 26: ...PARTS LIST TOMAHAWK XL OPTION PARTS LIST 1340 PD07 0048 PD07 0049 PD7719 PD7722 PD7723 PD7724 PD7730 PD7742 PD7965 1 PD7965 2 PD7968 PD7969 PD9150 PD9151 ROTATING CAR STAND SHOCK SPRING SHOCK SPRING...

Страница 27: ...JD7532...
Отзывы: