Page 17
Installation, use and maintenance guide
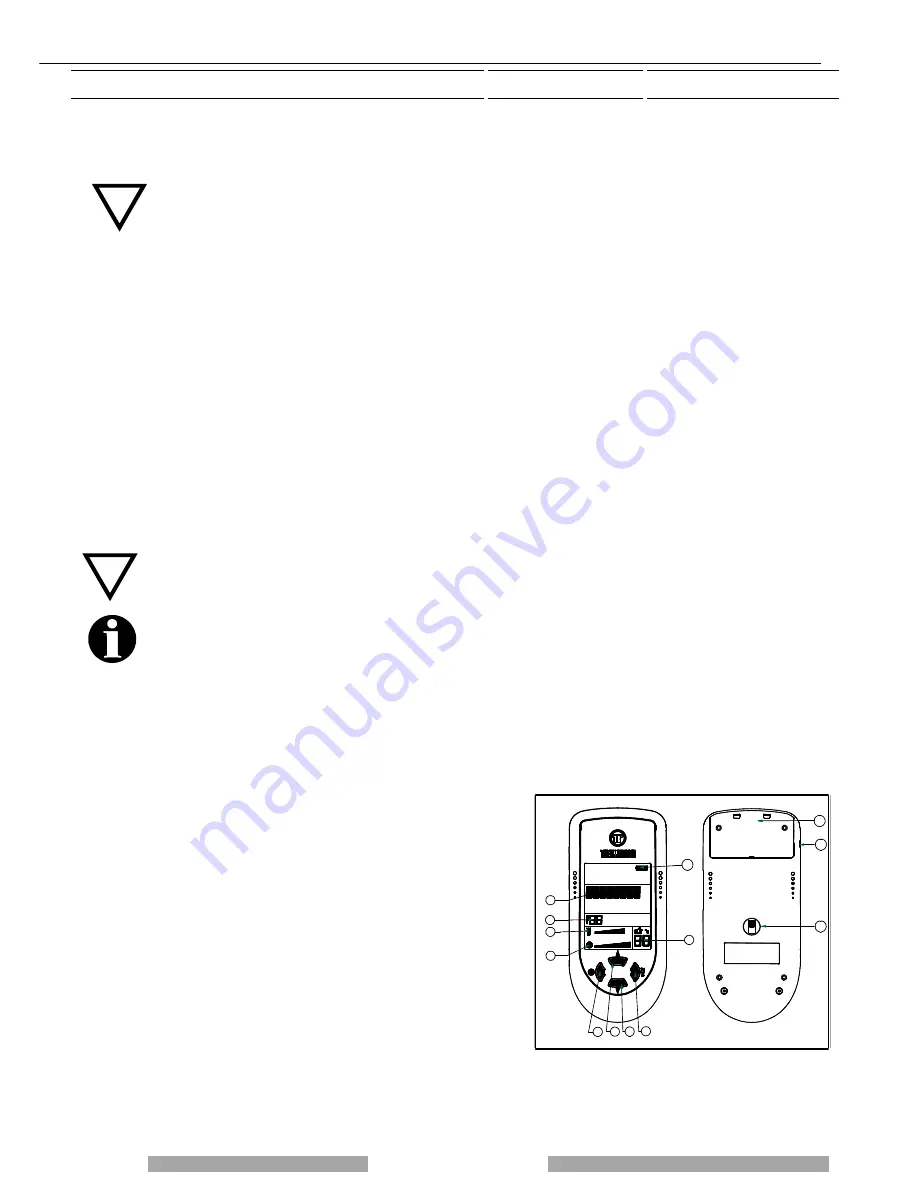
8 R
9 R
10 R
3 R
2 R
4 R
1 R
6 R
7 R
5 R
11 R
12 R
13 R
6.2 COMBUSTION AND VENTILATION ADJUSTMENTS
The heating capacity is adjusted by pressing key (1) or on the remote control provided. Act on this command to adjust the quantity
of pellets fed to the firebox. Maximum combustion power is achieved when all 5 leds are lit.
Caution: the room fan starts up as soon as the temperature of the combustion smoke reaches a suitable threshold. The
fan setting is expressed visually by means of 6 different positions represented by 6 bars: press button (2) repeatedly to
regulate it. A slight vibration of the appliance is quite normal when it is running. One bar is always present on the display
even in OFF status.
6.3 INFRARED REMOTE CONTROL
A practical infrared remote control is supplied with the heater: adjust the ventilation level by means of the left button, whereas use
the right button to start the appliance, to adjust the power and combustion level and to switch off the appliance. If the appliance is
supplied with a white radio control (optional) the infrared control only works when the MANUAL setting is set on the white handheld
radio control.
6.4 OPERATION OF THE WHITE HANDHELD RADIO CONTROL THERMOCOMFORT (OPTIONAL)
INTRODUCTION
The Thermocomfort handheld radio control is the instrument that allows you to optimise both consumption and
functions. Keep in mind that radio wave transmissions can be affected by the surrounding environment: the presence
of thick walls can reduce the transmission that normally extends to 6-7 metres.
CAUTION: to guarantee optimal data transmission it is advisable to always place the radio control in its support in
a vertical position.
The following operations must be carried out the first time the appliance is started up:
• Turn the switch (11R) to ON (see drawing below)
• Connect the radio control to the mains power supply by means of the supplied battery charger. The radio control
must be recharged for at least 5 days, as the rechargeable batteries could be partially or completely empty.
Repeat the same procedure every time the radio control batteries discharge.
The appliance must be energised and the rear switch turned to position "1".
CAUTION: the Thermocomfort function is disabled when the remote control is OFF. To enable it, in the START,
WORK, OFF phases, repeatedly press button (6) on the appliance's control panel until the word
"THERMOCOMFORT" appears on the display (7) followed by the words Thermocomfort Off". To activate the
Thermocomfort function simply press the button (3) on the appliance's control panel: " Thermocomfort On". To
return to the original operating function simply press the button (6) again on the appliance's control panel. At the
end of the winter season, in order to preserve the life of the batteries, it is mandatory to recharge the batteries
and switch off the radio control completely by means of the switch located on the back (11R). The batteries are
guaranteed for 6 months. When the batteries are exhausted dispose of them safely. It is normal for the
temperature sensor to detect temperatures which are slightly different to the real ones: variations caused by the
environment in which the radio control is positioned and by the tolerance of the thermostat.
6.4.1 INDICATORS OF THE HANDHELD RADIO CONTROL
(1R) Flame selection button
(2R) Ventilation selection button
(3R) (4R) Auxiliary buttons
(5R) “Room temperature detected by the radio control's sensor” indicator
(6R) "Ventilation" indicator
(7R) “Combustion” indicator
(8R) “Room temperature setting” indicator: this is the room temperature
that you wish to reach by means of buttons 3R and 4R.
(9R) Area of the display where the operating program is displayed
(10R) Battery charge level
(11R) Switch 0-1 radio control power
(12R) Battery charger connection
(13R) Code selector and batteries compartment cover
Содержание SlimQuadro 11
Страница 2: ...Page 2 Installation use and maintenance guide ...
Страница 5: ...Page 5 use and maintenance guide EC DECLARATION OF CONFORMITY ...
Страница 26: ...Page 25 and maintenance guide ...
Страница 42: ...Page 41 and maintenance guide NOTES ...
Страница 43: ...Page 42 lation use and maintenance guide NOTES ...


