


Communication Option
Software Installation
7-2
Thermo Scientific
2. Press and release the SET/ENT button to access the six parameters specific to
communication option.
Software Installation
1. Load the SpecView software onto the PC hard drive, using the disks provided.
2. Run the software. (If you have purchased the SpecView Plus Communication
Software with the copy protection key, Skip step 3.)
3. If you do not have a copy protection key. a “SpecView” window opens with the
message, "Problem with Dongle: 'Dongle' (Copy Protection Key) not detected
on parallel port." Click the OK button to acknowledge the message. Without the
copy protection key, this diagnostic/sampler software has a 20-minute time
limit on each run. If the message “demo version of SpecView has stopped
communicating - value are frozen” appears before the communication
diagnostics/sampler are finished, close the software and reopen it for another
20-minute segment.
4. When the “Configuration Founds..” windows opens, click on the "Test Comms
for New Config." Button.
5. The “Input Required..” window then opens. Enter a new Config. Name (up to 8
characters with no spaces) or accept the “DEFAULT” name. Click OK.
6. The “Port and Protocol” window opens next. On the “COM1:” line (if the COM1
port is the serial port used to connect to the port controller) select the pulldown
menu from protocol column. Highlight. "*Yokogawa 100" or "100 Series" Need
to identify the proper/accurate selection from the current Communications
Software for controller mode UT150.
7. Select the pulldown menu from the Baud Rate column. Highlight "9600".Click
on the “Start Scan” button.
8. The SpecView program scans all 99 possible controller addresses and places
a representative “instrument view” of the temperature controller on the PC
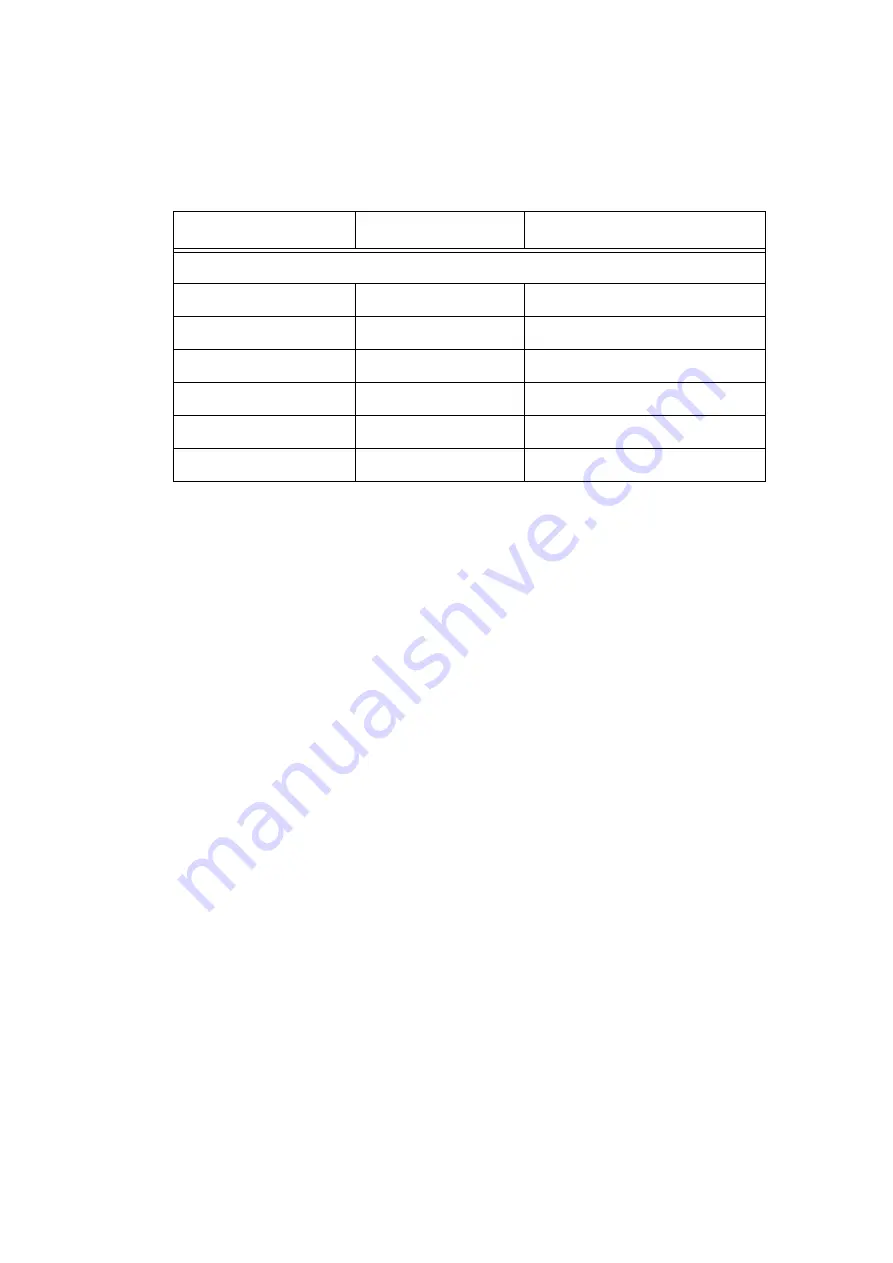
Table 3. UT150 Communications Parameters
Parameter Code
Factory Set Value
Description
Communications Setup Parameters
PSL
0
Protocol selection
Adr
1
Controller address
bPs
9600
Baud rate
Pr 1
EVN
Parity (even)
StP
1
Stop bit
DLn
8
Data length
Содержание CC58114PBC
Страница 1: ......
Страница 6: ...List of Figures ii Thermo Scientific ...
Страница 12: ...Introduction 2 2 Thermo Scientific ...
Страница 14: ...Unpacking 3 2 Thermo Scientific ...
Страница 20: ...Installation Thermocouple Wiring Installation 4 6 Thermo Scientific ...
Страница 22: ...Initial Start up 5 2 Heratherm Thermo Scientific ...
Страница 46: ...Communication Option Addresses for Multiple Controllers 7 6 Thermo Scientific ...
Страница 50: ...Excess Temperature Option Excess Temperature Controller Operation 8 4 Thermo Scientific ...
Страница 57: ...Replacement Parts Thermo Scientific Heratherm 11 3 Figure 5 Wiring Diagram ...
Страница 58: ...Replacement Parts 11 4 Heratherm Thermo Scientific ...
Страница 59: ...Thermo Scientific 12 1 12 Error Codes This chapter is not applicable ...
Страница 60: ...Error Codes 12 2 Thermo Scientific ...
Страница 62: ...WEEE Compliance 13 2 Thermo Scientific ...
Страница 63: ...Thermo Scientific 14 1 14 14 Spare Parts and Accessories This chapter is not applicable ...
Страница 64: ...Spare Parts and Accessories 14 2 Thermo Scientific ...
Страница 66: ...Device Log 15 2 Thermo Scientific ...


