


8
Getting started
Remove the protective film from the display.
Connect the attached power adapter to the alarm clock. Insert the power adapter pin into the device jack
(Fig.1-H) and connect the plug to a wall socket.
Important!
Make sure that your household voltage is no more than 240V!
Otherwise your device may be damaged.
The button cell battery will operate as a backup power source in the event of a power failure.
The device is ready for use.
Time setting
Press and hold the
SNOOZE/DIMMER
button (Fig.3-D) in normal mode to choose between the 12 - or 24-
hour system. In the 12-HR system AM (before noon) or PM (after noon) appears on the display (Fig.1-A).
Slide the switch (Fig.2-A) to the position
TIME SET
.
Press the
or
button (Fig.3-C,E) to set the time.
Press and hold the
or
button for fast mode.
After setting slide the switch to the position
LOCK
.
Press the
DST ON/OFF
button (Fig.1-G) to change the summer time in winter time and vice versa (+/- 1 hr).
In Daylight Saving Time
DST
(Fig.1-D) is shown on the display.
Note:
If the alarm clock is first set up during summer time, please set the clock to winter time and press the
DST ON/OFF
button when setting is complete.
Alarm function
Alarm time setting
Slide the switch (Fig.2-A) to the position
ALM SET
.
Press the
or
button (Fig.3-C,E) to set the desired alarm time.
Press and hold the
or
button for fast mode.
After setting slide the switch to the position
LOCK
.
Activate alarm
Slide the
ALARM
switch (Fig.2-B) to the position
(loud) or
(quiet).
The alarm is activated. The alarm symbol
(Fig.1-M) appears on the display.
Alarm clock function
When the set alarm time (Fig.1-K) is reached, the alarm clock will wake you up with the selected volume.
The alarm symbol
(Fig.1-M) flashes.
If the alarm is not stopped manually, the ascending alarm tone automatically turns off after three minutes and
the alarm will be reactivated at the same set time on the following day.
The alarm symbol remains on the display.
Press any button to turn off the alarm sound or press the
SNOOZE/DIMMER
button (Fig.3-D)to activate the
snooze function.
The snooze symbol (Fig.1-C) will be flashing and the alarm will be interrupted for 5 minutes.
You can activate the snooze function up to 7 times.
Press any button to stop the snooze function.
Deactivate alarm
Slide the
ALARM
switch (Fig.2-B) to the position
.
The alarm function is deactivated. The alarm symbol
(Fig.1-M) disappears.
9
Display light
Press the
SNOOZE/DIMMER
button (Fig.3-D) to adjust the brightness in 2 levels or to switch it off.
Briefly press the
or
button (Fig.3-C,E) several times to choose the desired colour.
Press and hold the
or
button to choose a continuous colour change.
Press the
or
button to stop the continuous colour change.
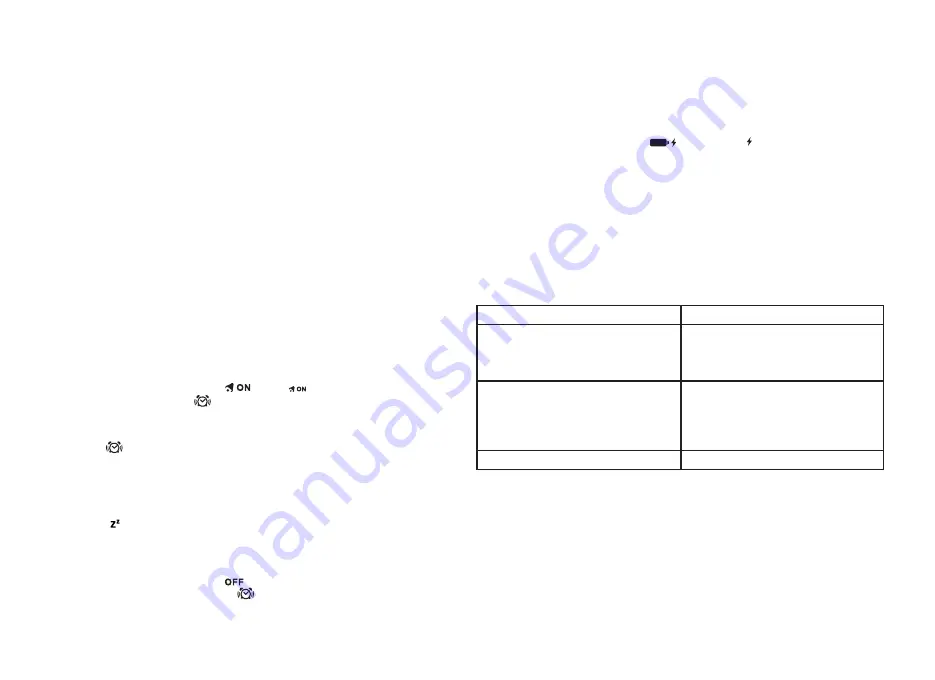
Charging function
Inductive charging of your mobile phone
Put your mobile phone on the platform. Your phone should sit centred on the charging pad.
The charging symbol appears and the
(Fig.1-F) and the symbol flashes when your phone is success-
fully charging.
The charging symbol does not appear or
ERROR
(Fig.1-E) flashes on the display if your device is not posi-
tioned properly or if your device is not compatible with the Qi standard. You may need to remove your phone
cover.
Compatibility may vary based on phone model. Please check your phone’s manual for details.
Charging via USB
This product also provides a USB charging port for devices that do not support wireless charging.
Plug the USB cable (not included) into the USB port (Fig.1-J) port on the alarm clock and connect the other
end to your mobile device. Make sure that the charging rate is suitable for your mobile device.
Troubleshooting
Problem:
Solution:
No display
Connect the device to the power adapter
Check the power adapter
Press the SNOOZE/DIMMER button to activate
the backlight
No charging function (wireless)
Display ERROR
Mobile device is not Qi compatible
Position the mobile device properly
Remove metallic objects
Remove the cover
Use USB port
No charging function (USB)
Check the USB port connection
If your device fails to work despite these measures, contact the retailer where you purchased the product.
Specifications
Power consumption:
Power supply (included)
Input:
100-240V AC 50/60Hz 1,3A Max
Output:
9,0 V DC 3A, 27W
Average active efficiency:
≥86,62%
No-load power consumption:
≤0,10 W
Back-up battery:
CR2032 (included)
Charging output:
USB port (2A)
Wireless charger power output:
10W
Housing dimension:
114 x 110 x 34 mm
Weight:
203 g (device only)
Содержание 60.2030.01
Страница 19: ......


