


Premier Elite Ricochet Kits Quick Guide
14
INS626
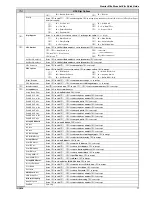
Global Options
1:
Chime Volume
5:
Adjust Clock
9:
Country Code & Defaults
2:
Number Of Re-Arms
6:
Quick Count
3:
Anti-code Resets
7:
Modem Level
Monitor
Hardware
Press
to edit
,
to select an option
,
to change the option
,
to accept
P
= Line Fault
B
= Bell Tamper
B
= Battery Faults
A
= AC Power Failure
A
= Aux Tamper
F
= Aux Fuse Blown
L
= Panel Lid Tamper
Control Timers
Use
to select an area
,
-
to enter the 1
st
On time
,
to accept
Use
-
to select the 1
st
On time days of operation
,
to accept
Use
-
to enter the 1
st
Off time
,
to accept
Use
-
to select the 1
st
Off time days of operation
,
to accept
System Text
Use
to select a message
,
-
to select characters
(press the required key the appropriate number of times),
to accept
Part Arm Text
Use
to select a Part Arm
,
to edit the Part Arm text
,
-
to select characters
(press the required key the
appropriate number of times),
to accept
Holiday Dates
Use
to select a holiday date
,
-
to enter the required date
(
),
to accept
Speaker Tones
Use
to select a tone type
,
to turn the tone on/off
,
to accept
PC Output Text
Use
to select an Output
,
to edit
,
-
to select characters
(press the required key the appropriate number of
times),
to accept
Custom O/P Text
Use
to select an Output
,
to edit
,
-
to select characters
(press the required key the appropriate number of
times),
to accept
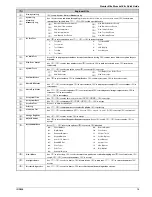
Keypad Setup
Areas12/ 24/48/88/168
Use
-
to select keypad
,
to select network
,
to edit
,
-
to select an area
, (
= all
areas,
= areas A – H and I –P),
to accept
Areas 640
Use
-
to select keypad
,
to select network
,
to edit
,
-
to select an area group (1-4)
, use
to select areas A – H and I –P),
to accept.
Zone Mapping
Press
to edit
,
-
to enter zone number
,
to accept,
Repeat for 2
nd
zone
Options
Press
to edit
,
to select an option
,
to change the option
,
to accept
P
= PA Enabled
A
= PA is Audible
F
= Fire Enabled
D
= PA is Delayed
F
= Medical Enabled
Q
= Quick Arm On
T
= Tamper Enabled
O
= Info.LED>Output
Volume
Press
to edit,
-
to enter a value,
to accept
Sounder Options
Press
to edit,
to select an option
,
to change the option
,
to accept
F
= Fire Tones Enabled
E
= Entry Tones Enabled
A
= Alarm Tones Enabled
X
= Exit Tones Enabled
F
= Fault Tones Enabled
C
= Chime Tones Enabled
S
= Service Tones Enabled
K
= Use Keypad Areas
Expander Setup
Areas 12/24/48/88/168
Use
-
to select expander,
to select network
,
to edit
,
-
to select an area
, (
= all
areas,
= areas A – H and I –P),
to accept
Areas 640
Use
-
to select expander,
to select network
,
to edit
,
-
to select an area group (1-4)
,
use
to select areas A – H and I –P),
to accept.
Text
Press
to edit text
,
-
to select characters
(press the required key the appropriate number of times),
to
accept
. , ? ! 1 @ “ -
M N O 6
Move Cursor
A B C 2
P Q R S 7
Copy Text to Memory
D E F 3
T U V 8
Paste Text from Memory
G H I 4
W X Y Z 9
Upper, Lower Case, Predictive Text &
Numerical
J K L 5
0 _
Auxiliary Input
Press
to edit,
-
to select an input type
,
to accept
Not Used
Silence Sounders
Auxiliary Tamper
Global Omit Key
Bell Tamper
Local Omit Key