


Premier Elite Ricochet Kits Quick Guide
INS626
11
Finishing the Installation
Install all of the covers to the devices and the external sounder if fitted. and the proceed as follows:-
1.
Remove the jumper link from Commission jumper on the panel PCB.
2.
Fit the panel lid
3.
Now test the system.
Testing the System
Now that all of the devices and SmartKeys have been learned to the system, the system should be checked to ensure everything
works as desired.
1.
Press the
/
key
2.
Press
and then
/
3.
Press
to do a Bell test and follow the instructions on the screen
4.
Press
/
key
5.
Press
and then
/
to walk test all of the devices
Once testing is complete Press
/
and exit and log off of the system.
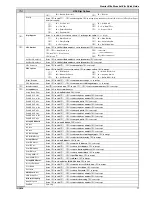
Further Programming Options
Quick Programming Guide
The tables below show all of the available programming options when in Engineering mode. Some examples of common changes
required for a new installation are shown. Further detailed instructions can be found in INS176-X Premier Elite Installation Manual
which is on the enclosed CD or available to download from our website.
Default Engineer Code (00)
1234
Default User Code (01)
5678
Log Off Engineer
Press
to log out of the Engineer Programming menu
Zone Setup
Zone Types
Use
-
to enter zone number
,
to edit,
-
or
to select a zone type,
to accept
Not Used
Medical
Conf PA audible
Entry/Exit 1
24Hr Gas
Conf PA silent
Entry/Exit 2
Auxiliary
Guard
Tamper
Guard Access
Exit Terminator
24Hr Audible
Moment Key
24Hr Silent
Latching Key
PA Audible
Security
PA Silent
Omit Key
Fire
Custom
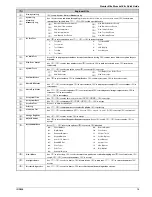
Zone Attributes 1
Press
to edit,
-
to select an attribute,
to accept
O
= Omittable
3
= Part 3 Omit
F
= Force Omit
A
= Access
1
= Part 1 Omit
E
= Entry/Exit 2
2
= Part 2 Omit
G
= Guard
Zone Attributes 2
Press
to edit,
-
to select an attribute,
to accept
D
= Double Knock
R
= Reset
B
= Beam Pair
A
= Auto Re-arm
S
= Soak Test
Q
= Quick Resp.
F
= Activity
E
= Eng. Alarm
Key Attributes
(only applicable for
keyswitch zone types)
Press
to edit,
-
to select an attribute,
to accept
I
= Instant Arming
S
= Silent Arming
P
= Part Arming
T
= Time Arm Disable
F
= Full Disable
K
= Key Tube (Monitor Only)
D
= Disarm Only
Custom Attributes
Press
to edit,
-
to select an attribute,
to accept