background image

Service and Repair Manual


October 2021


Repair Procedures 


12 

Z

®

-34/22 Bi-Energy


Part No. 1268515GT 


Secti on 3  

Repair P roce dur es  


Observe and Obey: 


Repair procedures shall be completed by a 

person trained and qualified on the repair of 

this machine. 


Immediately tag and remove from service a 

damaged or malfunctioning machine. 


Repair any machine damage or malfunction 

before operating the machine. 

Before Repairs Start: 


Read, understand and obey the safety rules 

and operating instructions in the appropriate 

operator's manual on your machine. 


Be sure that all necessary tools and parts are 

available and ready for use. 


Use only Genie approved replacement parts. 


Read each procedure completely and adhere 

to the instructions. Attempting shortcuts may 

produce hazardous conditions. 


Machine Configuration: 


Unless otherwise specified, perform each 

repair procedure with the machine in the 

following configuration: 

  Machine parked on a firm, level surface 

  Key switch in the off position with the key 

removed 

  The red Emergency Stop button in the off 

position at both the ground and platform 

controls 

  Wheels chocked 

  All external AC power supply disconnected 

from the machine 

  Boom in the stowed position 

  Turntable secured with the turntable rotation 

lock 

Содержание Genie Z-34/22

Страница 1: ...6 to Z3416F 11999 from Z34F 12000 This manual includes Repair procedures Fault Codes Electrical and Hydraulic Schematics For detailed maintenance procedures refer to the appropriate Maintenance Manual for your machine Bi Energy Power Part No 1268515GT Rev B October 2021 ...

Страница 2: ...SO 16368 Machine Design Life Unrestricted with proper operation inspection and scheduled maintenance Technical Publications Genie has endeavored to deliver the highest degree of accuracy possible However continuous improvement of our products is a Genie policy Therefore product specifications are subject to change without notice Readers are encouraged to notify Genie of errors and send in suggesti...

Страница 3: ...e A1 5 2016 Schematics Update added Charger interlock option A2 9 2016 Introduction Serial Number Legend B 10 2021 Schematics Electrical Hydraulic Schematics Reference Examples Electronic Version Click on any content or procedure in the Table of Contents to view the update Section Repair Procedure 4 2 Section Fault Codes All charts Section Schematics Legends and schematics ...

Страница 4: ...rial Number Legend To August 31 2016 1 Model 2 Model year 3 Facility code 4 Sequence number 5 Serial number stamped on chassis 6 Serial label located under cover From September 1 2016 1 Model 2 Facility code 3 Sequence number 4 Serial number stamped on chassis 5 Serial lable located under cover ...

Страница 5: ...he operator s manual are also safety hazards when maintenance and repair procedures are performed Do not modify or alter a MEWP without prior written permission from the manufacturer Do Not Perform Maintenance Unless You are trained and qualified to perform maintenance on this machine You read understand and obey manufacturer s instructions and safety rules employer s safety rules and worksite reg...

Страница 6: ...al crushing hazards such as moving parts free swinging or unsecured components when lifting or placing loads Always wear approved steel toed shoes Workplace Safety Any person working on or around a machine must be aware of all known safety hazards Personal safety and the continued safe operation of the machine should be your top priority Be sure to keep sparks flames and lighted tobacco away from ...

Страница 7: ...fety Rules v General Safety Rules v Section 2 Specifications 1 Machine Specifications 1 Machine Component Weights 1 Performance Specifications 2 Hydraulic Oil Specifications 2 Hydraulic Component Specifications 5 Manifold Component Specifications 6 Machine Torque Specifications 6 Kubota Z482 E Engine Specifications 7 Generator Specifications 8 Hydraulic Hose and Fitting Torque Specifications 9 Tor...

Страница 8: ... Leveling Slave Cylinder 18 How to Remove the Platform Leveling Slave Cylinder 18 How to Bleed the Leveling Slave Cylinder 18 2 2 Platform Rotator 19 How to Remove the Platform Rotator 19 How to Bleed the Platform Rotator 20 2 3 Platform Overload System 21 How to Calibrate the Platform Overload System if equipped 21 Jib Boom Components 22 3 1 Jib Boom 22 How to Remove the Jib Boom 22 3 2 Jib Boom ...

Страница 9: ...ry Boom Extension Cylinder 30 How to Remove the Primary Boom Extension Cylinder 30 4 5 Platform Leveling Master Cylinder 31 How to Remove the Platform Leveling Master Cylinder 31 Secondary Boom Components 33 5 1 Secondary Boom 34 How to Disassemble the Secondary Boom 34 5 2 Secondary Boom Lift Cylinders 37 How to Remove the Secondary Boom Lift Cylinders 37 Engines 39 6 1 Timing Adjustment 39 6 2 R...

Страница 10: ...xiliary Pump 47 How to Remove the Auxiliary Pump 47 8 2 Function Pump 48 How to Test the Function Pump 48 How to Removet the Function Pump 48 Manifolds 50 9 1 Function Manifold Components 50 9 2 Valve Adjustments Function Manifold 52 How to Adjust the System Relief Valve 52 How to Adjust the Primary Boom Down Relief Valve 52 How to Adjust the Secondary Boom Down Relief Valve 53 How to Adjust the T...

Страница 11: ...nts 59 11 1 Rotation Hydraulic Motor 59 How to Remove the Turntable Rotation Motor 59 Axle Components 60 12 1 Yoke and Hub 60 How to Remove the Yoke and Hub 60 How to Remove the Hub and Bearings 60 How to Install the Hub and Bearings 61 12 2 Steer Cylinder 61 Non steer Axle Components 62 13 1 Drive Motor 62 13 2 Drive Hubs 62 Motor Controller 64 14 1 Motor Controller 64 Section 4 Fault Codes 65 In...

Страница 12: ...CSA 86 Electrical Schematic from SN Z3414 9686 to Z34F 12065 CE AS 88 Electrical Schematic from SN Z3414 9686 to Z34F 12065 CE AS 89 Electrical Schematic from SN Z34F 12066 CE AS 92 Electrical Schematic from SN Z34F 12066 CE AS 93 Ground Control Box Switch Panel Wiring Diagram CE AS 96 Ground Control Box Terminal Strip WiringDiagram CE AS 97 Platform Control Box Wiring Diagram from serial number 9...

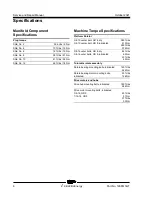
Страница 13: ...k 9 3 gallons 35 2 liters Hydraulic tank 4 gallons 15 1 liters Hydraulic system including tank 6 gallons 22 7 liters Drive hubs 17 fl oz 503 cc Drive hub oil type SAE 90 multipurpose hypoid gear oil API service classification GL5 Machine Component Weights Z 34 22DC and Z 34 22N Drive motor 64 lbs 29 kg Torque hub 113 lbs 51 kg Primary boom assembly including extension boom 647 lbs 293 kg Primary b...

Страница 14: ...lic oils which are designed to give maximum protection to hydraulic systems have the ability to perform over a wide temperature range and the viscosity index should exceed 140 They should provide excellent antiwear oxidation prevention corrosion inhibition seal conditioning and foam and aeration suppression properties Cleanliness level minimum ISO 15 13 Water content maximum 250 ppm Recommended Hy...

Страница 15: ... 120 F 49 C Hydraulic Fluid Temperature Range Ambient air temperature 1 Chevron hydraulic oil 5606A 2 Petro Canada Environ MV 46 3 UCON Hydrolube HP 5046D 4 Chevron Rando HD premium oil MV Chevron Rando HD Premium Oil MV Fluid Properties ISO Grade 32 Viscosity index 200 Kinematic Viscosity cSt 200 F 100 C cSt 104 F 40 C 7 5 33 5 Brookfield Viscosity cP 4 F 20 C cP 22 F 30 C 1040 3310 Flash point 3...

Страница 16: ... system is used Continued use of Chevron 5606A hydraulic fluid or equivalent when ambient temperatures are consistently above 32 F 0 C may result in component damage Petro Canada Environ MV 46 Fluid Properties ISO Grade 46 Viscosity index 154 Kinematic Viscosity cSt 200 F 100 C cSt 104 F 40 C 8 0 44 4 Flash point 482 F 250 C Pour point 49 F 45 C Maximum continuous operating temperature 180 F 82 C ...

Страница 17: ...g temperature 189 F 87 C Hydraulic Component Specifications Function Pump Type fixed displacement gear pump Displacement per revolution 0 183 cu in 3 cc Auxiliary Pump Type fixed displacement gear pump Displacement 0 75 gpm 2 8 L min Function manifold Function relief valve pressure 3200 psi 220 6 bar Primary boom down relief function relief 1600 psi 110 3 bar Secondary boom down relief valve press...

Страница 18: ...form Rotator 3 4 10 center bolt GR 8 dry 3 4 10 center bolt GR 8 lubricated 380 ft lbs 515 Nm 280 ft lbs 379 Nm 3 8 16 outer bolts GR 8 dry 3 8 16 outer bolts GR 8 lubricated 44 ft lbs 60 Nm 33 ft lbs 45 Nm Turntable rotate assembly Rotate bearing mounting bolts lubricated 180 ft lbs 244 Nm Rotate bearing motor mounting bolts lubricated 93 ft lbs 126 Nm Drive motors and hubs Drive hub mounting bol...

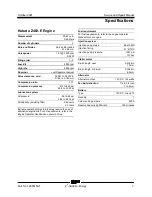
Страница 19: ...4 psi 2 48 to 4 41 bar Oil capacity including filter 2 6 quarts 2 5 liters Extreme operating temperatures may require the use of alternative engine oils For oil requirements refer to the Engine Operator Handbook on your machine Fuel requirement For fuel requirements refer to the engine Operator Manual for your engine Injection system Injection pump make Bosch MD Injection timing 21 BTDC Injection ...

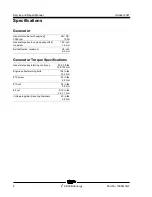
Страница 20: ...ey to engine pulley offset maximum 1 16 inch 1 6 mm Belt deflection maximum 1 4 inch 6 5 mm Generator Torque Specifications Generator pulley retaining nut torque 80 90 ft lbs 108 122 Nm Engine pulley retaining bolts 108 in lbs 12 2 Nm 10 screw 25 in lbs 2 8 Nm 10 nut 25 in lbs 2 8 Nm 4 nut 8 10 in lbs 0 9 1 1 Nm Voltage regulator mounting fasteners 25 in lbs 2 8 Nm ...

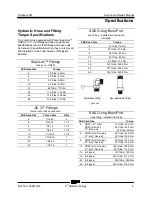
Страница 21: ... 8 3 4 16 1 1 2 10 7 8 14 1 1 2 12 1 1 16 12 1 1 4 16 1 5 16 12 1 20 1 5 8 12 1 24 1 7 8 12 1 SAE O ring Boss Port tube fitting installed into Aluminum all types SAE Dash Size Torque 4 14 ft lbs 19 Nm 6 23 ft lbs 31 2 Nm 8 36 ft lbs 49 Nm 10 62 ft lbs 84 Nm 12 84 ft lbs 114 Nm 16 125 ft lbs 169 5 Nm 20 151 ft lbs 204 7 Nm 24 184 ft lbs 249 5 Nm Adjustable Fitting Non adjustable fitting 1 jam nut S...

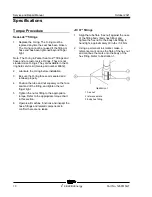
Страница 22: ...eated and retained properly 4 Position the tube and nut squarely on the face seal end of the fitting and tighten the nut finger tight 5 Tighten the nut or fitting to the appropriate torque Refer to the appropriate torque chart in this section 6 Operate all machine functions and inspect the hose fittings and related components to confirm there are no leaks JIC 37 fittings 1 Align the tube flare hex...

Страница 23: ...rect number of flats for the proper tightening position Note The marks indicate the correct tightening positions have been determined Use the second mark on the body hex fitting to properly tighten the joint after it has been loosened Illustration 2 1 body hex fitting 2 reference mark 3 second mark 4 Tighten the hex nut until the mark on the hex nut is aligned with the second mark on the body hex ...

Страница 24: ...nual on your machine Be sure that all necessary tools and parts are available and ready for use Use only Genie approved replacement parts Read each procedure completely and adhere to the instructions Attempting shortcuts may produce hazardous conditions Machine Configuration Unless otherwise specified perform each repair procedure with the machine in the following configuration Machine parked on a...

Страница 25: ... alert personnel to potential personal injury hazards Obey all safety messages that follow this symbol to avoid possible injury or death Indicates a imminently hazardous situation which if not avoided will result in death or serious injury Indicates a potentially hazardous situation which if not avoided could result in death or serious injury Indicates a potentially hazardous situation which if no...

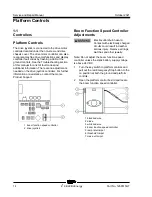
Страница 26: ...ontact the Genie Product Support 1 boom function speed controller 2 drive joystick Boom Functi on Sp eed C ont roller Adjust ment s Boom Function Speed Controller Adjustments Electrocution burn hazard Contact with electrically charged circuits could result in death or serious injury Remove all rings watches and other jewelry Note Do not adjust the boom function speed controller unless the static b...

Страница 27: ...terclockwise to decrease the amperage 7 Turn the boom function speed controller to the 9 position 8 Set the max out Press down the foot switch and move the primary boom toggle switch to the down position Adjust the amperage to 0 65A Turn the max out trimpot adjustment screw clockwise to increase the amperage or counterclockwise to decrease the amperage 9 Start a timer and simultaneously press down...

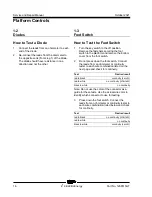
Страница 28: ...ver from the foot switch 2 Do not press down the foot switch Connect the leads from an ohmmeter or continuity tester to each wire combination listed on the next page and check for continuity Test Desired result red to black continuity zero Ω red to white no continuity infinite Ω black to white no continuity Note Do not use the color of the connector as a guide for these tests Use the actual wire c...

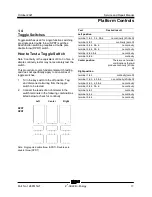
Страница 29: ...rom the toggle switch to be tested 2 Connect the leads of an ohmmeter to the switch terminals in the following combinations listed below to check for continuity Left Center Right SPDT DPDT Note Single pole double throw SPDT Double pole double throw DPDT Test Desired result Left position terminal 1 to 2 3 4 5 6 no continuity infinite Ω terminal 2 to 3 continuity zero Ω terminal 2 to 4 5 6 no contin...

Страница 30: ...lic Hose and Fitting Torque Specifications 1 Extend the boom until the slave cylinder barrel end pivot pin is accessible 2 Raise the boom slightly and place blocks under the platform for support Lower the boom until the platform is resting on the blocks 3 Remove the pin retainer fastener from the rod end pivot pin 4 Remove the external snap ring from the barrel end pivot pin 5 Use a soft metal dri...

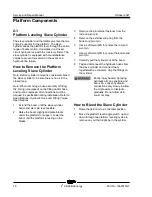
Страница 31: ...le lifting device Do not apply any lifting pressure 4 Remove the six mounting bolts from the platform mounting weldment Remove the center bolt and slide the platform mounting weldment off of the platform rotator 5 Support the platform rotator with a suitable lifting device Do not apply any lifting pressure 6 Remove the pin retaining fasteners from the jib boom and leveling links to platform rotato...

Страница 32: ...ggle switch to either side and hold the platform rotate toggle switch to the left position until the platform is fully rotated to the left Continue holding the toggle switch until air stops coming out of the bleed screw Close the bleed screw Crushing hazard Keep clear of the platform during rotation 5 Open the bottom bleed screw on the rotator but do not remove it Bodily injury hazard Spraying hyd...

Страница 33: ...s on and the alarm sounds Result The overload indicator light and alarm is off Slowly loosen the load spring adjustment nut by turning it counterclockwise just until the overload indicator light and alarm turn on Note There may be an approximate 2 second delay before the overload indicator light turns on and the alarm sounds Note The platform will need to be moved up and down and allowed to settle...

Страница 34: ...anifold Cap the fittings on the manifold Bodily injury hazard Spraying hydraulic oil can penetrate and burn skin Loosen hydraulic connections very slowly to allow the oil pressure to dissipate gradually Do not allow oil to squirt or spray 6 Tag and disconnect the electrical wiring from the jib boom manifold 7 Attach a lifting strap from an suitable lifting device to the jib boom 8 Remove the pin r...

Страница 35: ... pin 7 Remove the jib boom bell crank from the extension boom Crushing hazard The jib boom bellcrank may become unbalanced and fall if it is not properly supported when it is removed from the machine 3 3 Jib Boom Lift Cylinder How to Re mov e th e Jib Bo om Lift Cylin der How to Remove the Jib Boom Lift Cylinder Note Perform this procedure with the boom in the stowed position Note When removing a ...

Страница 36: ...p from an suitable lifting device to the rod end of the jib boom lift cylinder 6 Remove the pin retaining fasteners from the jib boom lift cylinder barrel end pivot pin Use a soft metal drift to remove the barrel end pivot pin 7 Use a soft metal drift to remove the jib boom lift cylinder rod end pivot pin Remove the jib boom lift cylinder from the machine Crushing hazard The jib boom lift cylinder...

Страница 37: ...to Shi m th e Prim ary Bo om How to Shim the Primary Boom 1 Extend the boom until the wear pads are accessible 2 Loosen the wear pad mounting fasteners 3 Install the new shims under the wear pad to obtain zero clearance and zero drag 4 Tighten the mounting fasteners 5 Extend and retract the boom through an entire cycle Check for tight spots that could cause scraping or binding Note Always maintain...

Страница 38: ... oil pressure to dissipate gradually Do not allow oil to squirt or spray 9 Tag disconnect and plug the hydraulic hoses from the jib rotate manifold Bodily injury hazard Spraying hydraulic oil can penetrate and burn skin Loosen hydraulic connections very slowly to allow the oil pressure to dissipate gradually Do not allow oil to squirt or spray 10 Remove the upper cable track mounting fasteners fro...

Страница 39: ...ly remove the boom from the machine Crushing hazard If the overhead crane is not properly attached the boom could become unbalanced and fall when it is removed from the machine How to Disa ssem ble t he Pri mary Boom How to Disassemble the Primary Boom Note Complete disassembly of the boom is only necessary if the outer or inner boom tubes must be replaced The extension cylinder can be removed wit...

Страница 40: ...ift cylinder raises and lowers the primary boom The primary boom lift cylinder is equipped with a counterbalance valve to prevent movement in the event of a hydraulic line failure How to Re mov e th e Prim ary Bo om Lift Cylin der How to Remove the Primary Boom Lift Cylinder Bodily injury hazard This procedure requires specific repair skills lifting equipment and a suitable workshop Attempting thi...

Страница 41: ...through the compression arm pivot pin and twist to remove the pin 12 Swing the compression arm up out of the way and secure it from moving 13 Tag disconnect and plug the primary boom lift cylinder hydraulic hoses Cap the fittings on the cylinder Bodily injury hazard Spraying hydraulic oil can penetrate and burn skin Loosen hydraulic connections very slowly to allow the oil pressure to dissipate gr...

Страница 42: ...ications 1 Raise the primary boom to a horizontal position Then extend the boom approximately 3 to 4 feet 1 m until the extension cylinder rod end pivot pins are accessible 2 Remove the external snap rings from the extension cylinder rod end pivot pins Use a soft metal drift to remove the pins 3 Remove the rear turntable cover 4 Raise the secondary boom until the master cylinder rod end pivot pin ...

Страница 43: ...ng master cylinder acts as a pump for the slave cylinder It is part of the closed loop hydraulic circuit that keeps the platform level through the entire range of primary boom motion The platform leveling master cylinder is located inside the upper mid pivot at the pivot end of the primary boom How to Re mov e th e Platfo rm Leveli ng Maste r Cylin der How to Remove the Platform Leveling Master Cy...

Страница 44: ...azard Spraying hydraulic oil can penetrate and burn skin Loosen hydraulic connections very slowly to allow the oil pressure to dissipate gradually Do not allow oil to squirt or spray 7 Tie a strap around the lug on the rod end of the master cylinder and secure the strap to the primary boom Note The strap will be used to lower the cylinder out of the upper pivot 8 Remove the pin retaining fasteners...

Страница 45: ...ondary Boom Components Part No 1268515GT Z 34 22 Bi Energy 33 Secondary Boom components 1 upper pivot 2 upper compression arm 3 mid pivot 4 compression link 5 lower secondary boom 6 turntable pivot 7 lower compression arm 8 upper secondary boom ...

Страница 46: ... the wire loom from the cables at the platform control box 6 Locate the four cables from the primary boom cable track to the platform control box Number each cable and its entry location at the platform control box 7 Open the platform control box 8 Label and disconnect each wire of the four cables in the platform control box Electrocution burn hazard Contact with electrically charged circuits coul...

Страница 47: ...m the upper pivot to upper secondary boom pivot pin Use a soft metal drift to remove the pin 25 Carefully remove the entire primary boom assembly from the machine primary boom assembly jib boom assembly platform master cylinder primary lift cylinder and upper pivot Crushing hazard If the overhead crane is not properly attached the primary boom assembly could become unbalanced and fall when it is r...

Страница 48: ...rom the secondary boom lift cylinder Cap the fittings on the cylinder Bodily injury hazard Spraying hydraulic oil can penetrate and burn skin Loosen hydraulic connections very slowly to allow the oil pressure to dissipate gradually Do not allow oil to squirt or spray 39 Use a slide hammer to remove the barrel end pins access the pins from the access holes in the bulkheads one on each side Then rem...

Страница 49: ...condary boom lift cylinder raises and lowers the secondary boom The secondary boom lift cylinder is equipped with counterbalance valves to prevent movement in the event of a hydraulic line failure How to Re mov e th e Seco nda ry Boo m Lift Cylinde rs How to Remove the Secondary Boom Lift Cylinder Bodily injury hazard This procedure requires specific repair skills lifting equipment and a suitable ...

Страница 50: ...h the secondary boom enough to access the hydraulic hoses Do not pinch the hoses Component damage hazard Hoses can be damaged if they are kinked or pinched 8 Tag disconnect and plug the hydraulic hoses from the secondary boom lift cylinder Cap the fittings on the cylinder Bodily injury hazard Spraying hydraulic oil can penetrate and burn skin Loosen hydraulic connections very slowly to allow the o...

Страница 51: ... 6 3 Engine Drive Pulley How to Re mov e th e Engin e Driv e Pulley How to Remove the Engine Drive Pulley 1 Remove the engine pivot plate latch retainer 2 Open the engine pivot plate latch and swing the engine out away from the machine to access the engine drive pulley 3 Loosen the tension adjustment bolt on the generator 4 Pull the generator away from the machine and remove the belts from the gen...

Страница 52: ...y bolt 6 shaft bushing 7 woodruff key How to I nstall t he En gine D rive Pulley How to Install the Engine Drive Pulley Note The generator pulley must already be installed before performing this procedure Refer to Repair Procedure How to Install the Generator Pulley 1 Align the woodruff key on the engine shaft with the slot in the pulley bushing and slide the pulley bushing onto the engine shaft D...

Страница 53: ...6 Refer to Repair Procedure How to Remove the Engine Drive Pulley Coolant Temperature and Oil Pressure Switches The engine coolant temperature switch is a normally open switch The switch contacts close at approximately 225 F 107 C If the coolant temperature rises above the switch point the switch contacts close and the engine will shut off to prevent damage The engine will not start until the temp...

Страница 54: ...pulley bushing off of the generator shaft 1 gap 2 shaft 3 set screw 4 engine drive pulley 5 engine drive pulley bolt 6 shaft bushing 7 woodruff key How to I nstall t he G ene rato r Pulley How to Install the Generator Pulley Note The pulley on the generator must be installed before installing the engine drive pulley 1 Align the woodruff key on the generator shaft with the slot in the pulley and sl...

Страница 55: ... the engine pivot plate latch retainer 3 Open the engine pivot plate latch and swing the engine out away from the machine to access the generator belts 4 Loosen the tension adjustment bolt on the generator 5 Pull the generator away from the machine and tighten the adjustment bolt 6 Check the generator belts for proper tension If the belt deflection is not within specification perform steps 4 and 5...

Страница 56: ...ld result in death or serious injury Remove all rings watches and other jewelry 4 Start the engine from the ground controls and move the rpm select toggle switch to the maintained high idle position Check the voltage on the generator Result The voltage should be 54V DC 5 If the voltage reading is not 54V DC insert a small flat blade screwdriver into the potentiometer located inside of the generato...

Страница 57: ...the generator 6 Pull the generator away from the machine and remove the belts from the generator pulley 7 Remove the generator mounting fasteners then remove the generator from the machine 8 Remove the 3 nuts from the battery cable terminal posts 9 Remove the 3 screws that hold the plastic cover onto the generator Carefully remove the cover 10 Locate the 3 white wires that lead from the voltage re...

Страница 58: ...nstall the new voltage regulator by following the previous steps in reverse order 18 Apply Loctite removable thread sealant onto the voltage regulator mounting fasteners and torque to specification Refer to Specifications Machine Torque Specifications 19 Torque all other fasteners to specification Refer to Specifications Machine Torque Specifications 20 Install the plastic cover onto the generator...

Страница 59: ...nd pull out the red Emergency Stop button to the on position at both the ground and platform controls 4 Activate any function using auxiliary power Result The pressure gauge reads 2800 psi 193 bar immediately stop The pump is good Result The pressure fails to reach 2800 psi 193 bar the pump is faulty and will need to be serviced or replaced 5 Remove the pressure gauge and install the hydraulic hos...

Страница 60: ... to allow the oil pressure to dissipate gradually Do not allow oil to squirt or spray 2 Connect a 0 to 5000 psi 0 to 350 bar pressure gauge to the high pressure port on the pump 3 Turn the key switch to ground control and pull out the red Emergency Stop button to the on position at both the ground and platform controls 4 Hold the function enable switch to either side and activate any boom function...

Страница 61: ...ections must be torqued to specification during installation Refer to Specifications Hydraulic Hose and Fitting Torque Specifications 1 Tag disconnect and plug the hydraulic hoses from the pump Bodily injury hazard Spraying hydraulic oil can penetrate and burn skin Loosen hydraulic connections very slowly to allow the oil pressure to dissipate gradually Do not allow oil to squirt or spray Remove t...

Страница 62: ...Nm 9 Solenoid valve 3 position 4 way I Steer left right 10 12 ft lbs 14 16 Nm 10 3 position 4 way spool valve J Primary boom extend retract 10 12 ft lbs 14 16 Nm 11 Pressure switch K Brake circuit 12 Solenoid valve N C poppet L Brake circuit 25 30 ft lbs 34 41 Nm 13 Orifice 0 045 in 1 02 mm M Steer circuit 14 Orifice 0 045 in 1 02 mm N Brake circuit 15 Solenoid valve N O poppet O Brake circuit 25 ...

Страница 63: ...October 2021 Service and Repair Manual Manifolds Part No 1268515GT Z 34 22 Bi Energy 51 ...

Страница 64: ...fied 6 Repeat steps 2 and 3 to verify the relief valve pressure 7 Remove the pressure gauge How to Adju st th e Prim ary Bo om D own Reli ef Valve How to Adjust the Primary Boom Down Relief Valve Note Perform this procedure with the boom in the stowed position Note Refer to Function Manifold Component list to locate the primary boom down relief valve 1 Connect a 0 to 3000 psi 0 to 200 bar pressure...

Страница 65: ...6 Repeat steps 2 through 4 and recheck relief valve pressure 7 Remove the pressure gauge How to Adju st th e Turn table Rota te Relie f Valve How to Adjust the Turntable Rotate Relief Valve Note Perform this procedure with the boom in the stowed position Note Refer to Function Manifold Component list to locate the turntable rotate relief valve 1 Connect a 0 to 3000 psi 0 to 200 bar pressure gauge ...

Страница 66: ...om platform rotate manifold is mounted to the jib boom Index No Description Schematic Item Function Torque 1 Solenoid valve 2 position 3 way CA Jib boom circuit 25 30 ft lbs 34 41 Nm 2 Solenoid valve 2 position 3 way CB Platform rotate circuit 25 30 ft lbs 34 41 Nm 3 Flow regulator 0 3 gpm 1 2 L min CC Platform rotate circuit 25 30 ft lbs 34 41 Nm ...

Страница 67: ...nect the wiring from the coil to be tested 2 Test the coil resistance Coils with 2 terminals Connect the leads from the ohmmeter to the valve coil terminals Coils with 1 terminal Connect the positive lead from the ohmmeter to the valve coil terminal then connect the negative lead from the ohmmeter to the internal ring of the valve coil Result The resistance should be within specification plus or m...

Страница 68: ...r to a terminal on the coil Resistor 10Ω Genie part number 27287 Note The battery should read 9V DC or more when measured across the terminals 1 multimeter 2 9V DC battery 3 10Ω resistor 4 coil Note Dotted lines in illustration indicate a reversed connection as specified in step 6 3 Set a multimeter to read DC current Note The multimeter when set to read DC current should be capable of reading up ...

Страница 69: ...teners Note Clean the fuel tank and inspect for cracks and other damage before installing 10 2 Hydraulic Tank The primary functions of the hydraulic tank are to cool clean and deaereate the hydraulic fluid during operation It utilizes internal suction strainers for the pump supply suction lines and has an external return line filter How to Re mov e th e Hyd raulic Tan k How to Remove the Hydraulic...

Страница 70: ...nd drain the oil into a suitable container Bodily injury hazard Beware of hot oil Contact with hot oil may cause severe burns 5 Tag disconnect and plug the hydraulic hoses from the hydraulic tank filter Cap the fittings on the filter Bodily injury hazard Spraying hydraulic oil can penetrate and burn skin Loosen hydraulic connections very slowly to allow the oil pressure to dissipate gradually Do n...

Страница 71: ... specification during installation Refer to Specifications Hydraulic Hose and Fitting Torque Specifications Note Do not allow the turntable to rotate until the hydraulic motor is installed 1 Tag disconnect and plug the hydraulic hoses from the turntable rotation motor Cap the fittings on the motor Bodily injury hazard Spraying hydraulic oil can penetrate and burn skin Loosen hydraulic connections ...

Страница 72: ...vice 8 Place a rod through the yoke pivot pins and twist to remove the pins Crushing hazard The yoke hub assembly may become unbalanced and fall when the yoke pivot pins are removed if it is not properly supported and secured to the lifting device How to Re mov e th e Hub and Beari ngs How to Remove the Hub and Bearings 2WD Models 1 Loosen the wheel lug nuts Do not remove them 2 Block the non stee...

Страница 73: ...rquing the castle nut to make sure the bearings seat properly 9 Loosen the castle nut one full turn and then torque to 35 ft lbs 47 Nm 10 Install a new cotter pin Bend the cotter pin to secure the castle nut Note Always use a new cotter pin when installing a castle nut 11 Install the dust cap then the tire and wheel assembly Torque the wheel lug nuts to specification Refer to Specifications Machin...

Страница 74: ...he battery packs 2 Tag and disconnect the power cables and relay wiring from the drive motor Electrocution burn hazard Contact with electrically charged circuits could result in death or serious injury Remove all rings watches and other jewelry 3 Remove the drive motor mounting fasteners 4 Guide the drive motor shaft out of the brake and then remove the drive motor ...

Страница 75: ...ly injury hazard Spraying hydraulic oil can penetrate and burn skin Loosen hydraulic connections very slowly to allow the oil pressure to dissipate gradually Do not allow oil to squirt or spray 3 Chock the steer wheels 4 Loosen the wheel lug nuts Do not remove them 5 Center a lifting jack under the non steer axle Raise the machine and place blocks under the chassis for support 6 Remove the wheel l...

Страница 76: ...position and disconnect the battery packs from the machine 2 Tag and disconnect all power cables from the motor controller Electrocution burn hazard Contact with electrically charged circuits could result in death or serious injury Remove all rings watches and other jewelry 3 Press the release tab on the motor controller harness connector and remove the motor controller harness connector from the ...

Страница 77: ... chocked All external AC power supply disconnected from the machine Boom in the stowed position Turntable secured with the turntable rotation lock Welder disconnected from the machine if equipped with the weld cable to platform option Before Troubleshooting Read understand and obey the safety rules and operating instructions in the appropriate operator s manual on your machine Be sure that all nec...

Страница 78: ...d When adjusting the raised drive speed settings the maximum raised drive speed must not exceed 0 6 mph 1Km h or 40 feet 45 seconds 12 2 meters 45 seconds If the machine is allowed to drive faster than specification the machine could become unstable and will tip over The controller status indicator light will flash a fault code to aid in troubleshooting This indicator light is located on the front...

Страница 79: ...osition If problem persists replace the motor controller 1 Normal operation 12 HW FAILSAFE 1 2 3 Machine will not drive The motor controller failed self test Replace the motor controller 13 M SHORTED Machine will not drive The motor controller has an internal short between M and B terminals Test the motor controller See Repair Section FIELD OPEN Machine will not drive Motor wiring is loose OR moto...

Страница 80: ...drive joystick is defective Consult Genie Product Support 31 CONT DRVR OC Machine will not drive Main contactor PR1 coil defective OR brake release relay CR5 defective Replace main contactor PR1 or brake release relay CR5 OR replace the motor controller 32 MAIN CONT WELDED Machine will not drive Main contactor PR1 contacts stuck closed OR grn wire at pin 17 on motor controller shorted to ground OR...

Страница 81: ...han 32V DC Completely charge batteries OR check battery cable condition OR check for corrosion or loose connections at battery terminals and motor controller 42 OVERVOLTAGE Machine will not drive Battery supply voltage to motor controller more than 55V DC OR machine is being operated with the battery charger plugged in Be sure the battery charger is disconnected OR check for loose battery cables o...

Страница 82: ... the safety rules and operating instructions in the appropriate operator s manual on your machine Be sure that all necessary tools and test equipment are available and ready for use About This Section There are two groups of schematics in this section Electrical Schematics Electrocution burn hazard Contact with electrically charged circuits could result in death or serious injury Remove all rings ...

Страница 83: ... terminal T circuits connect at terminal Circuits crossing no connection Quick disconnect terminal Circuit breaker with amperage Key switch Toggle Switch DPDT Toggle Switch SPDT Pump or Motor Tilt sensor Horn button normally open Emergency Stop button normally closed Resistor with ohm value Battery separator Gauge sending unit Oil temperature switch normally open Coolant temperature switch normall...

Страница 84: ...osition 3 way Differential sensing valve Filter with bypass relief valve Relief valve with pressure setting Priority flow regulator valve Solenoid operated proportional valve Directional valve mechanically activated Flow divider combiner valve Pilot operated 3 position 3 way shuttle valve Solenoid operated 2 position 3 way directional valve Counterbalance valve with pressure and pilot ratio Soleno...

Страница 85: ...October 2021 Service and Repair Manual 73 Electrical Schematic ANSI CSA from SN Z3414 9686 to Z34F 12065 ...

Страница 86: ...Service and Repair Manual October 2021 74 Z 34 22 Bi Energy Part No 1268515GT Electrical Schematic ANSI CSA from SN Z3414 9686 to Z34F 12065 ...

Страница 87: ...October 2021 Service and Repair Manual Part No 1268515GT Z 34 22 Bi Energy 75 Electrical Schematic ANSI CSA from SN Z3414 9686 to Z34F 12065 ...

Страница 88: ...Service and Repair Manual October 2021 76 Electrical Schematic ANSI CSA from SN Z3414 9686 to Z34F 12065 ...

Страница 89: ...October 2021 Service and Repair Manual 77 Electrical Schematic ANSI CSA from SN Z34F 12066 ...

Страница 90: ...EASE RELAY CR5 MOTOR MAIN CONTACTOR RELAY PR1 AP1 LIFT PUMP AUXILIARY LIFT PUMP PRIMARY PR3 PR2 100 A WH BK AC POWER F2 F1 A2 A1 A2 A1 PUMP PUMP CHARGER LEFT MOTOR BOX RIGHT GROUND 24 V F2 F2 F1 B M AP1 B C27AUX RD TS1 D69 TS1 AUXILIARY PUMP C30FWD WH C31REV WH BK REVERSE FORWARD 10 11 WH BK WH C49 4 C49 5 C1B 5 C1B 4 C30FWD WH C31REV WH BK C1P 5 C1P 4 48V TO 24V DC DC CONV 3 4 2 1 P181BAT OR C48 ...

Страница 91: ...4P 2 C4P 5 C4P 6 PLATFORM LEVEL UP RIGHT LEFT TS7 ROTATE C47 4 C44JD WH C47 3 C43JU BK C47 1 C17PRL OR C43JU GR C44JD GR BK RIGHT LEFT TS57 C2B 6 GR BK C2B 5 GR JIB MANIFOLD DOWN TS58 UP JIB C2P 5 C2P 6 DOWN TS8 UP JIB C7P 3 BATGND BRN C8 4 C8 3 C16DE OR RD PS1 GR WH CONTROL COIL FLOW RELAY COIL CR3 AUXILIARY CONTROL TB6 WH RD GR WH CR3 TB19 86 85 C19LPE RD BRAKE RELEASE N C COIL STEER RIGHT STEER...

Страница 92: ...Service and Repair Manual October 2021 80 Electrical Schematic ANSI CSA from SN Z34F 12066 ...

Страница 93: ...October 2021 Service and Repair Manual 81 GBOX Switch Panel Wiring Diagram ANSI CSA from SN Z3414 9686 ...

Страница 94: ...Service and Repair Manual October 2021 82 Z 34 22 Bi Energy Part No 1268515GT GBOX Switch Panel Wiring Diagram ANSI CSA from SN Z3414 9686 ...

Страница 95: ...October 2021 Service and Repair Manual Part No 1268515GT Z 34 22 Bi Energy 83 GBOX Terminal Strip Wiring Diagram ANSI CSA from SN Z3414 9686 ...

Страница 96: ...Service and Repair Manual October 2021 84 GBOX Terminal Strip Wiring Diagram ANSI CSA from SN Z3414 9686 ...

Страница 97: ...October 2021 Service and Repair Manual 85 PBOX Wiring Diagram ANSI CSA from SN Z3414 9686 ...

Страница 98: ...Service and Repair Manual October 2021 86 Z 34 22 Bi Energy Part No 1268515GT PBOX Wiring Diagram ANSI CSA from SN Z3414 9686 ...

Страница 99: ...October 2021 Service and Repair Manual 87 Electrical Schematic CE AS from SN Z3414 9686 to Z34F 12065 ...

Страница 100: ...Service and Repair Manual October 2021 88 Z 34 22 Bi Energy Part No 1268515GT Electrical Schematic CE AS from SN Z3414 9686 to Z34F 12065 ...

Страница 101: ...October 2021 Service and Repair Manual Part No 1268515GT Z 34 22 Bi Energy 89 Electrical Schematic CE AS from SN Z3414 9686 to Z34F 12065 ...

Страница 102: ...Service and Repair Manual October 2021 90 Electrical Schematic CE AS from SN Z3414 9686 to Z34F 12065 ...

Страница 103: ...October 2021 Service and Repair Manual 91 Electrical Schematic CE AS from SN Z34F 12066 ...

Страница 104: ...TOR MAIN CONTACTOR RELAY PR1 AP1 LIFT PUMP AUXILIARY LIFT PUMP PRIMARY PR3 PR2 100 A WH BK AC POWER F2 F1 A2 A1 A2 A1 PUMP PUMP CHARGER LEFT MOTOR BOX RIGHT GROUND 24 V F2 F2 F1 B M AP1 B 18 RELAY HORN C106PLP GR BK 87 30 CR24 86 85 OR RD TB3 D79 D12 D13 P26BAT RD C27AUX RD RD AUX PUMP AUXILIARY TS1 D69 TS1 48V TO 24V DC DC CONV 3 4 2 1 C48 1 P182BAT RD 01GND BR P181BAT OR 15 A F8 TB12 TB52 TB52 C...

Страница 105: ...44JD GR BK RIGHT LEFT TS57 C2B 6 GR BK C2B 5 GR JIB MANIFOLD DOWN TS58 UP JIB C2P 5 C2P 6 DOWN TS8 UP JIB C7P 3 BATGND BRN C8 4 C8 3 C16DE OR RD PS1 GR WH CONTROL COIL FLOW RELAY COIL CR3 AUXILIARY CONTROL TB6 WH RD GR WH CR3 TB19 86 85 C19LPE RD BRAKE RELEASE N C COIL STEER RIGHT STEER LEFT BRAKE RELEASE PRESSURE SWITCH PS1 COIL COIL H3 TB19 GR WH BL BL BK R48BRK RD WH TB48 C8 1 C7B 3 BATGND BRN ...

Страница 106: ...Service and Repair Manual October 2021 94 Electrical Schematic CE AS from SN Z34F 12066 ...

Страница 107: ...October 2021 Service and Repair Manual 95 GBOX Switch Panel Wiring Diagram CE AS from SN Z3414 9686 ...

Страница 108: ...Service and Repair Manual October 2021 96 Z 34 22 Bi Energy Part No 1268515GT GBOX Switch Panel Wiring Diagram CE AS from SN Z3414 9686 ...

Страница 109: ...October 2021 Service and Repair Manual Part No 1268515GT Z 34 22 Bi Energy 97 GBOX Terminal Strip Wiring Diagram CE AS from SN Z3414 9686 ...

Страница 110: ...Service and Repair Manual October 2021 98 GBOX Terminal Strip Wiring Diagram CE AS from SN Z3414 9686 ...

Страница 111: ...October 2021 Service and Repair Manual 99 Platform Control Box Wiring Diagram CE AS from SN Z3414 9686 ...

Страница 112: ...Service and Repair Manual October 2021 100 Z 34 22 Bi Energy Part No 1268515GT Platform Control Box Wiring Diagram CE AS from SN Z3414 9686 ...

Страница 113: ...October 2021 Service and Repair Manual Part No 1268515GT Z 34 22 Bi Energy 101 Power Cable Wiring Diagram from SN Z3414 9686 ...

Страница 114: ...Service and Repair Manual October 2021 102 Power Cable Wiring Diagram from SN Z3414 9686 ...

Страница 115: ...October 2021 Service and Repair Manual 103 Drive Contactor Panel Wiring Diagram ...

Страница 116: ...Service and Repair Manual October 2021 104 Z 34 22 Bi Energy Part No 1268515GT Drive Contactor Panel Wiring Diagram ...

Страница 117: ...October 2021 Service and Repair Manual Part No 1268515GT Z 34 22 Bi Energy 105 Manifold and Limit Switch Wiring Diagram ...

Страница 118: ...Service and Repair Manual October 2021 106 Manifold and Limit Switch Wiring Diagram ...

Страница 119: ...October 2021 Service and Repair Manual 107 LVI BCI Option Wiring Diagram ...

Страница 120: ...Service and Repair Manual October 2021 108 Z 34 22 Bi Energy Part No 1268515GT LVI BCI Option Wiring Diagram ...

Страница 121: ...October 2021 Service and Repair Manual Part No 1268515GT Z 34 22 Bi Energy 109 Charger Interlock Option ...

Страница 122: ...Service and Repair Manual October 2021 110 Charger Interlock Option ...

Страница 123: ...October 2021 Service and Repair Manual 111 Engine Wiring Diagram ...

Страница 124: ...Service and Repair Manual October 2021 112 Z 34 22 Bi Energy Part No 1268515GT Engine Wiring Diagram ...

Страница 125: ... WH RD WH GR BRN BK RD OR BK OR BK BRN C110 4 C110 2 C110 1 C110 3 J110 1 GROUND 2 P26BAT 3 4 5 P24FS 6 7 8 9 10 CR INPUT 11 HORN 12 CR CTRL U34 BN WH BK PNP POWER GND BRN CR81 R24BAT BK RD C9A 1 BK BK BK WH BK WH C9A 2 BK POWER FS INPUT R26FTS C46HRN CR81PWR SW30 L18A L18B C111A 3 C111A 2 C111B 3 C111A 1 YL C111B 2 C111B 1 BR R24BAT BK RD BL GND SW01OPA OR SWNC SW02OPA OR BK SWNO 87a 87 30 86 85 ...

Страница 126: ...Service and Repair Manual October 2021 114 Contact Alarm Option from SN Z34F 12066 ...

Страница 127: ...October 2021 Service and Repair Manual 115 Fuel Level Sensor Option from SN Z34F 12066 ...

Страница 128: ...GT Fuel Level Sensor Option from SN Z34F 12066 C55 C C55 A C55 B GND BR C134PWR RD C65SEN 4 CAN 3 CAN 1 POWER 6 GROUND 2 SENSOR INPUT C53 4 C53 3 C53 2 C53 1 GND BR C134PWR RD D82CAN YL D81CAN GN C54 B YL WH C BK WH A RD WH FUEL LEVEL CAN COMM MODULE FUEL LEVEL SENSOR ES34BE AL ...

Страница 129: ...October 2021 Service and Repair Manual 117 Hydraulic Schematic ...

Страница 130: ...S RATIO M 2 1 0 5 0 3 GPM Ø0 025 Ø0 035 0 8 GPM M M Ø0 045 Ø0 045 M 3200 PSI Z34N Z34DC BE 2800 PSI Z30N Z30NRJ 1800 PSI 032 090 1100 PSI 1600 PSI 1600 PSI 3000 PSI 1100 PSI Z30NRJ JIB ROTATE MANIFOLD FUNCTION MANIFOLD MASTER PLATFORM LEVEL EXTENSION CYL PBE PBR Z30NRJ JIB MANIFOLD PR2 PR1 PLATFORM ROTATE PR2 T PR1 J2 PRIMARY CYL JR2 JR1 JIB ROTATOR J1 JR2 JR1 P SECONDARY CYL JIB BOOM Z30N Z34 T2 ...

Страница 131: ......
Отзывы: