background image

5

4

Installation of your new telephone

Read and follow all instructions and warnings

Do not use this product during an electrical storm, as it is
possible to get a shock.

Do not use the product near water, or when wet.

Keep the product away from heaters and direct sunlight.

Slots and openings in the cabinet are provide for ventilation.
Ensure these are not blocked or covered.

Do not open the unit. There are no user serviceable parts inside.
Warranty conditions will not apply if the unit has been opened.

Unplug the unit before cleaning. Do not use detergents or
sprays. To clean the outside plastic parts use only a damp cloth.

Do not push objects into ventilation openings. This could cause
an electrical shock.

Do not use this telephone near flammable gases or liquids.

Before plugging your Telstra A248 into
the telephone line you need to assemble
the unit.

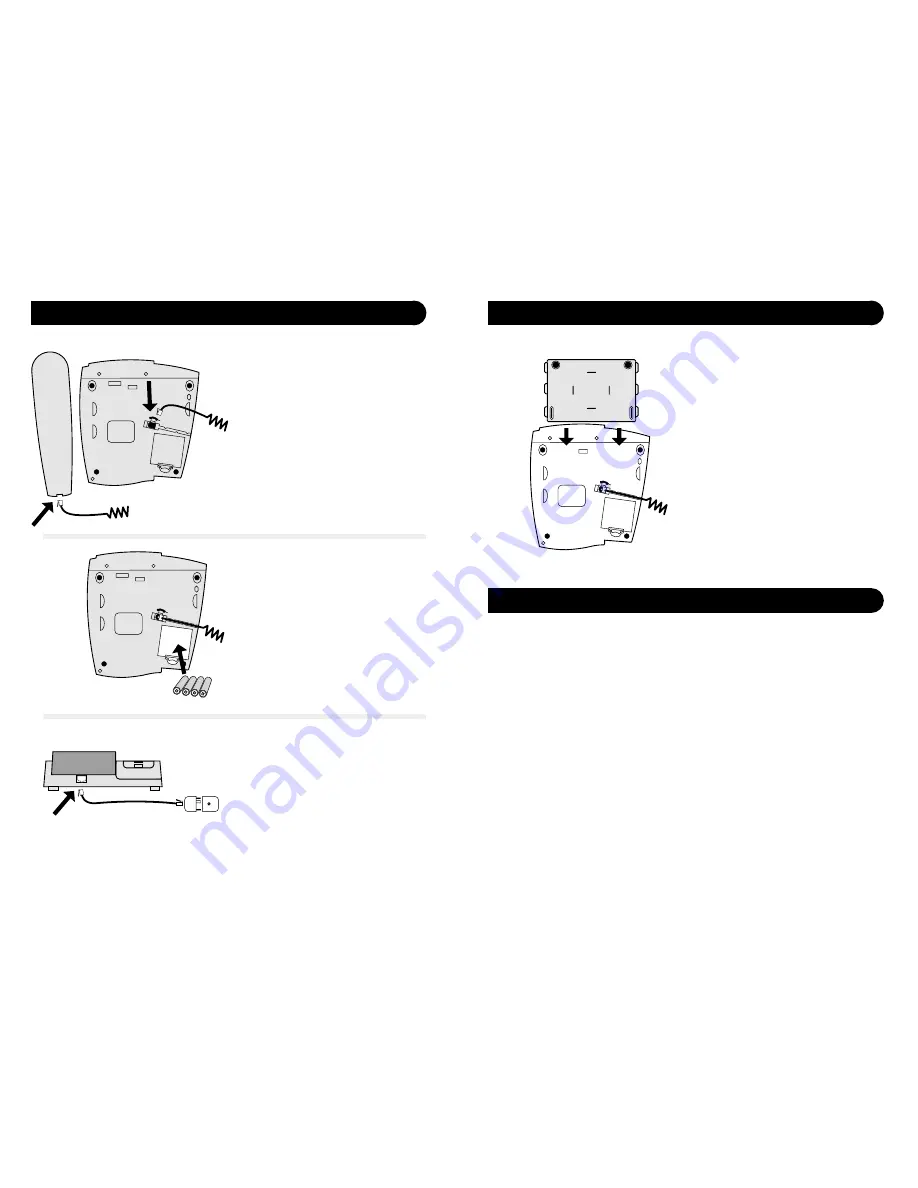
Step 1

Connect the handset cord to the socket on
the underneath of the telephone base
labelled with the handset icon. Connect
the other end of the handset cord into the
socket at the bottom end of the handset.

Step 2

Remove the Battery Cover on the
underneath of the telephone base. Install
the batteries provided, paying attention to
the polarity indicators in the battery
compartment. Replace the Battery Cover.

Step 3 (optional)

Fit stand if required.
See page 5 for instructions.

Step 4

Plug the telephone line cord into the
socket at the rear of the telephone base
marked 

LINE

. Plug the free end into the

telephone wall socket, using the adaptor
plug if required.

Your A248 is now ready to use.

After Step 2 (installing the batteries), slide
the desk stand in from the top end of the
telephone base until all the lugs on the
side of the desk stand are slotted into the
brackets of the telephone base.

handset cord

handset cord

Battery Cover

Line

Phone socket

Line cord

Safety Instructions

Fitting the optional desk stand

Содержание A248

Страница 1: ...ty if A Proof of date of purchase cannot be provided B The goods are not branded Telstra C The goods have been rented to another person D The defect was caused by an accident misuse abuse improper installation or operation lack of reasonable care unauthorised modification loss of parts tampering or attempted repair by a person not authorised by Telstra E The product has been damaged by lightning o...

Страница 2: ...ne Operation 6 Adjusting the Ringer Volume 6 Receiving a call using the handset 6 Making a call using the handset 6 Receiving a call using Hands Free 7 Making a call using Hands Free 7 To switch between handset and Hands Free operation 7 Caller List 7 To view Caller List 7 Using Redial 8 Adjusting Hands Free volume 8 Changing the Ring melody 8 Programming One Touch memory keys 8 Storing numbers in...

Страница 3: ... call 13 2200 for Residential or 13 2000 for business services or contact your service provider Calling number Display Call Waiting If you have Call Waiting enabled during a call if a second call comes in the number of the second caller will be displayed allowing you to manage the second call Call Filtering If you do not want to be disturbed by certain callers you can choose RING OFF in the phone ...

Страница 4: ... to assemble the unit Step 1 Connect the handset cord to the socket on the underneath of the telephone base labelled with the handset icon Connect the other end of the handset cord into the socket at the bottom end of the handset Step 2 Remove the Battery Cover on the underneath of the telephone base Install the batteries provided paying attention to the polarity indicators in the battery compartm...

Страница 5: ... memory keys 1 Lift the handset 2 Listen for a dial tone 3 Enter the number you wish to dial using the keypad or press the desired M1 to M6 key the number will be dialled After 5 seconds the call timer will appear on the display To switch between handset and Hands Free Caller List To view the Caller List HandsFree HandsFree HandsFree R OK Dial Delete M D Store M3 M4 M5 M6 Ring Delete Melody M D OK...

Страница 6: ...the OK Dial key 4 Enter the desired telephone number 5 Press the desired One Touch memory key M1 to M6 NOTE One Touch memory keys cannot be stored as NO RING Store KEYPAD KEYPAD M1 M1toM6 buttons Changing the Ring melody 1 Press the Ring Melody key 2 Using the up icon down icon select from melody 1 2 3 4 or OFF 3 Press OK Dial to confirm Ring Melody HandsFree Redial Pause OK Dial OK Dial Using Red...

Страница 7: ...stored numbers 2 Press the Call Forwarding Key the phone will go into hands free mode dials the Call forward number sequence then returns on hook mode The Call Forwarding LED will now flash indicating that Call Forward is switched on HandsFree HandsFree CallWaiting CallWaiting Recall Edit KEYPAD KEYPAD CallForwarding 10 How to set up your Network keys You may need to contact Telstra to activate th...

Страница 8: ...o hands free mode dial the cancel call forward number sequence then return to on hook mode The Call Forward LED will stop flashing MessageBank MessageBank is like having an answering machine built into your telephone Please set up the MessageBank key see page 8 before using this feature If you have messages waiting on MessageBank the MessageBank Indicator will flash To access MessageBank 1 Lift th...

Отзывы: