


GRID
w
w
w
.gridb
ot
.net
k
e
y
w
w
w
.gridb
ot
.net
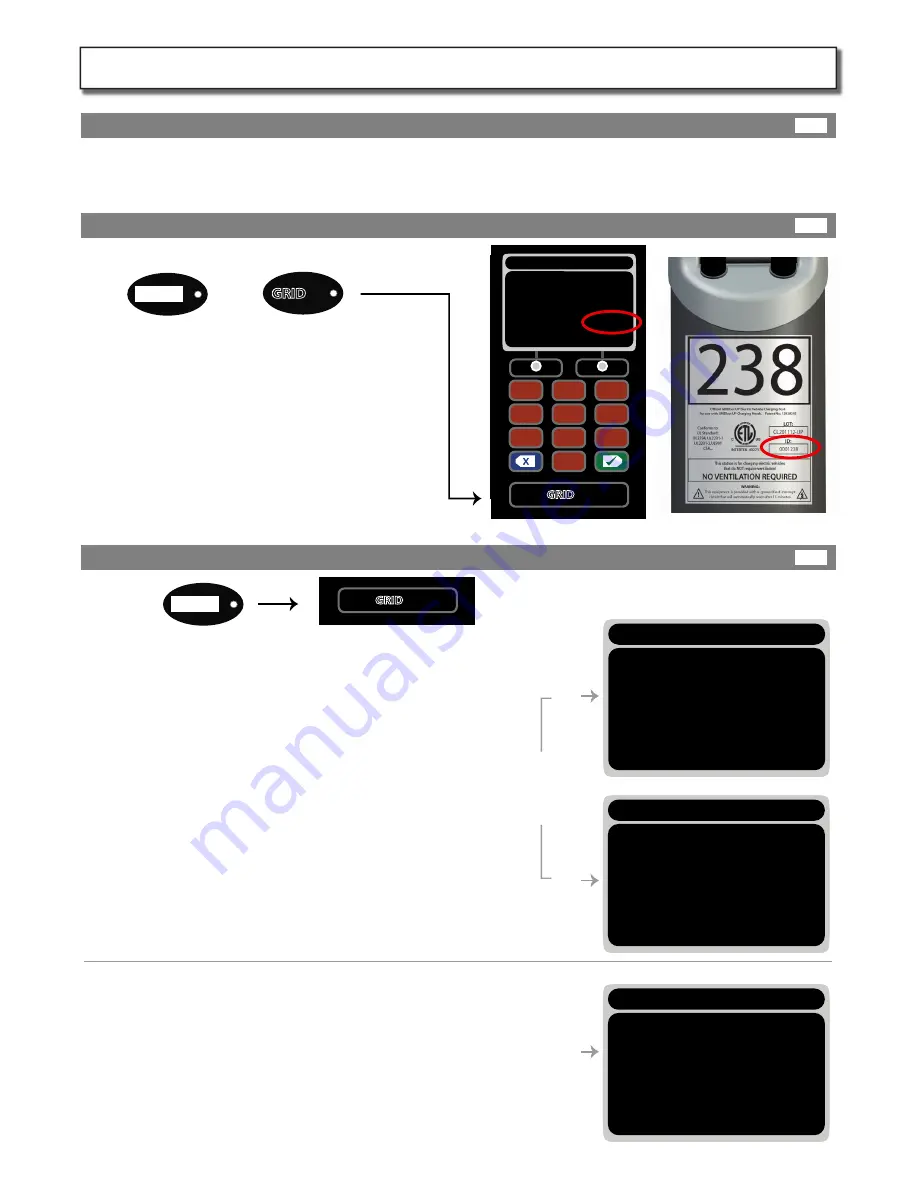
Station ID
Front
Back
w
w
w
.grid
b
o
t.net
Net Detect
GRIDkey
Back
“M
ASTER
” S
ta
tion
“CLIENT
”
S
ta
tion
s
Opt
ion
1
Opt
ion
2
an
d
3
“NE
T
WO
RKED
” S
ta
tions
+
1
2
3
4
5
6
7
8
9
0
+
1
2
3
4
5
6
7
8
9
0
[ [
GRID
key
] ]
[ [
GRID
key
] ]
Enter New Station ID
MAC: 00:00:00:00:00:00
Current Station ID
New Station ID
000000
000???
NETWORK AUTO DETECT
NETWORK AUTO DETECT
Detecting MODEM........Found
IP ADDR: XXX.XXX.XX.X
MEID: XXXXXXXXXXXXXXXXX
Modem registered with cellular
network.
Contacting Server ......... Success
Signal Strength (max=10): 8
AGAIN ACCEPT
Detecting MODEM ........ Not Found
Detecting Network ........ Done
Setting station as CLIENT
Resolving IP ADDR ......Done
IP ADDR: XXX.XXX.XX.X
Contacting Server ......... Success
AGAIN ACCEPT
NETWORK AUTO DETECT
Detecting MODEM ........ Not Found
Detecting Network ........ Done
Setting station as NETWORKED
Resolving IP ADDR ......Done
IP ADDR: XXX.XXX.XX.X
Contacting Server ......... Success
AGAIN ACCEPT
Close station head and secure it using the top security bolt , then close the breakers feeding this station only. The
station will boot up. The main screen will come on and each port indicator LED light should turn blue.
Locate your installer GRIDkey tag labeled “Station ID” .
Place this tag over the “GRIDkey”logo on the front of
the station and move it around slowly until you hear a
beep.
A provisioning screen will appear. Use the key pad to
enter the full “ID Number ” located on the housing
label. Press enter. Use the Station ID GRIDkey again
to confirm the number on the screen matches the ID
on the station housing. Write the Station ID for each
station at the site on the from provided on page 13.
Then push the blue back button.
If you have chosen Option 1 (Onboard Master Verizon Modem)
then start with your master station.
Hold your Net Detect tag over the “GRIDkey”logo on the front of
the master station and move it around slowly until you hear a
beep. Then press the Yes button. It will detect the Master
Modem, pressent you with IP, MEID and try to register the modem
with the cellular network. This may take some time. If it fails,
wait 5 min and try again.
If it never registers, says “failure” , “Weak signal” , or a signal below
4. You may have to install an external high gain antena, or remove
the modem and resort to option 2 or 3.
After the Master is successful, record the MEID, then use your Net
Detect tag on each of the remaining stations. They should set
themselves as “CLIENT” and contact the server succesfuly.
If you have chosen Option 2 or 3 it does not mater which station
you start with, but you must first make sure the router is working
as a DHCP server and has Internet access.
Hold your Net Detect tag over the “GRIDkey”logo on the front of
each station and move it around slowly until you hear a beep.
Then press the Yes button. It will detect the DHCP router get
asigned an IP adress and contact the server.
On failure check the router, firewall, then your data cable.
Close Station and Power-on:
Enter Station ID:
Network Auto Detect :
Page 12
Network Setup: (NOTE: stations will not work until networked)
12A
12B
12C
KIT301-IM-20140501


