background image

elmeg DECT200 Multicell System / en / elmegDECT200M_en / web-conf.fm / 18.10.2013

V

e

rsion 1, 01.0

7

.2012

87

elmeg DECT200 Multicell System

bintec elmeg

Configuring the system on the DECT Manager

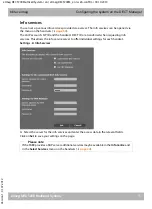
Info services

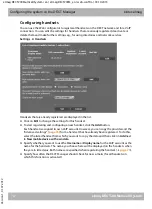
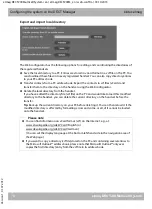
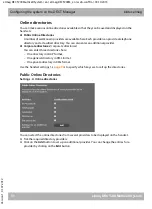
You can set up various info services provided via a server. The info services can be opened via 
the menu on the handsets (

£

page 50

). 

The VoIP account's SIP ID and the handset's DECT ID are transferred when requesting info 
services. This allows the info service server to offer individual settings for each handset.

Settings 

¢

Info Services

¤

Select the server for the info services and enter the access data in the relevant fields.

Click on 

Set

 to save your settings on the page.

Please note

If the PABX provides a RAP server, additional services may be available in the 

Info Centre

 and 

in the 

Select Services

 menu on the handsets (

£

page 24

). 

Содержание BinTec Elmeg DECT200

Страница 1: ...ll System en elmegDECT200M_en Cover_front fm 18 10 2013 Version 1 01 07 2012 1 elmeg DECT200 Multicell System bintec elmeg User Guide User Guide elmeg DECT200 Multicell System Copyright Version 1 1 20...

Страница 2: ...ldat com bintec elmeg devices make WAN connections as a possible function of the system configuration You must monitor the product in order to avoid unwanted charges bintec elmeg GmbH accepts no respo...

Страница 3: ......

Страница 4: ...your PC s Web browser Save your telephone system s configuration on your PC after you have set it up Organise and synchronise your base stations Register the base stations belonging to your DECT netw...

Страница 5: ...ng diodes LED 20 Resetting the device settings 22 Menu tree handsets 24 Understanding the operating steps 25 Making calls 27 Calling 27 Ending a call 28 Accepting a call 29 Calling Line Identification...

Страница 6: ...e Web configurator 56 Web configurator menu 61 Connecting the DECT Manager to the local network LAN router 62 Configuring and synchronising base stations 65 Security settings 69 Configuring VoIP provi...

Страница 7: ...he DECT Manager Manages up to 20 DECT base stations Manages up to 100 handsets on multicell systems Enables division into subnets Cluster formation Represents the interface to an IP PABX e g elmeg IP1...

Страница 8: ...ndset Detailed information about this handset and other approved elmeg handsets can be found in the relevant user guide These are provided on the product CD or on the Internet at www bintec elmeg com...

Страница 9: ...overage as well as many ambient conditions must be taken into consideration The Gigaset N720 DECT IP Multicell System Site Planning and Measurement Guide provided on the enclosed product CD will make...

Страница 10: ...he susceptibility of the device to external sources of high frequency energy Please refer to the Appendix chapter for the specifications of this elmeg product For this reason do not install them in a...

Страница 11: ...nect to the mains power supply you can order this as an accessory Firmware updates Whenever there are new or improved functions for your telephone firmware updates are made available for you to downlo...

Страница 12: ...base station are connected to the local network page 13 u At least one base station is registered page 15 u At least one handset is registered to the telephone system page 16 Perform the following ste...

Страница 13: ...cable of the power adapter into the connection socket at the rear of the device 2 Insert the cable into the cable recess provided 3 Insert the power adapter into the mains socket Please note This con...

Страница 14: ...telephone network Otherwise it will only be possible to make calls within the LAN You also need a PC connected to the local network so that you can configure your telephone system via the Web configu...

Страница 15: ...devices on the wall elmeg DECT200 base stations and elmeg DECT200M DECT Manager are intended for wall mounting You can fix the device to the wall with two or four screws Drill holes with the following...

Страница 16: ...at combine to form a DECT wireless network must synchronise with one another to ensure a smooth transition of the handsets from cell to cell handover As a base station in a multicell DECT network ofte...

Страница 17: ...manage one cluster assign all the base stations to the same cluster number Assign the planned synchronisation level to each base station Be aware that synchronisation level one can only be assigned o...

Страница 18: ...a from a handset that has already been set up Select the VoIP provider from the list and enter the login data for the account the handset is to use to make calls Start registering the handset for this...

Страница 19: ...the connection quality to the base station with the best reception is displayed u Battery charge status y y Empty to full y Flashes red batteries almost empty xy x x Charging u Name of the handset Pl...

Страница 20: ...ng your phone please read the tips on troubleshooting page 99 or contact our Customer Care team page 99 Information on is located here Making and accepting calls page 27 Using the network directories...

Страница 21: ...is OK the LED indicates the LAN connection status VoIP connections status activation and registration Active call display Reset button page 22 Power LAN VoIP DECT CALL Description Off Off Off Off No...

Страница 22: ...2 Reset button page 22 Power LAN 1 2 DECT 1 2 Description Off Off No power supply No supply voltage Flashes once a second Off The base station is looking for the DECT Manager On Off Connection establ...

Страница 23: ...escribed below reset the DECT Manager s IP configuration settings and the password for registering on the DECT Manager You will need to use this function if you can no longer access the system e g bec...

Страница 24: ...an IP address from a DHCP server in the local network Press the reset button and hold it for four seconds Release the reset button Press the reset button for one second Release it again Press the res...

Страница 25: ...Menu options that are only available in expert mode are marked with the icon To open the main menu press v when the handset is in idle status Select Services Next Call Anon page 34 Call Divert page 3...

Страница 26: ...v Select Services Do Not Disturb on means Press right on the control key v to open the main menu Press right left down and up on the control key p to navigate to the Select Services submenu Press the...

Страница 27: ...em bintec elmeg Operating information The change is effective immediately and does not need to be confirmed Press the key below Back to skip back to the previous menu level Or Press and hold the end c...

Страница 28: ...mber The elmeg DECT200 Multicell System uses a VoIP PABX or the services of a VoIP provider for Internet telephony The availability of some phone functions depends on whether they are supported by the...

Страница 29: ...try in the directory for this phone number the corresponding name is displayed Ending a call a Press the end call key Please note u You can cancel the dialling process with the end call key a u You ca...

Страница 30: ...reject a call Calling Line Identification When you receive a call the caller s number or name is displayed if the following prerequisites are met u Your PABX provider supports CLIP CLI and CNIP CLI C...

Страница 31: ...function if necessary In the user manual for the device search for the term CLIP or an alternative term such as calling line identification phone number identification caller ID etc If necessary conta...

Страница 32: ...ll hear the busy tone Accepting the call putting the first party on hold Accept Press the display key You are connected to the caller The first call is placed on hold Use q to switch between the parti...

Страница 33: ...turn to the first participant Ending a consultation call Options End active call You are reconnected to the first call participant You can also end a consultation call by pressing the end call key a T...

Страница 34: ...cting a call Set up a consultation call page 32 When the participant answers Announce the call if necessary a Press the end call key The call on hold is transferred to the other participant s number P...

Страница 35: ...n use it to make calls with brilliant sound quality High Definition Sound Performance The following are prerequisites for wideband connections on your telephone You make the call from a wideband capab...

Страница 36: ...System function or as a service offered by the VoIP PABX provider v Select Services Call Divert You can enter data as follows Status Select On Off to activate deactivate Call Divert Phone Number Enter...

Страница 37: ...ons Do not disturb You can activate the Do Not Disturb DND function if you do not want to receive any calls and you do not want the phone to ring if your PABX provider supports this function You can s...

Страница 38: ...to a specific online directory In this case open the local directory by pressing and holding the directory key The description below assumes the default assignment Opening the corporate directory usi...

Страница 39: ...the DECT Manager for your handset page 76 Or v Contacts Network Directory All available online directories are displayed q Select a directory and press OK Searching for and displaying an entry q Scro...

Страница 40: ...for an entry Prerequisite You have opened the online directory Yellow Pages You can enter data in the following fields Surname Online directory or Category Name Yellow Pages Enter the name part of a n...

Страница 41: ...the display key New to start a new search Or Press the display key Change to change the search criteria The name and city location are copied over and you can change them No hits are displayed if the...

Страница 42: ...entry and press the talk key c If the entry only contains one phone number this is the one that is dialled A list of numbers appears if there is more than one number Using q select a number and press...

Страница 43: ...yed is determined by the information transferred by the caller and whether or not the caller appears in the directory All Calls All outgoing accepted and missed calls Outgoing calls The last 20 number...

Страница 44: ...owing options for dialling a phone number from a list q Scroll through the list to the required name c Press the talk key The number is dialled Or View Press the display key to show the entry c Press...

Страница 45: ...ox Your VoIP PABX provider offers answering machines on the network known as network mailboxes Each network mailbox accepts incoming calls made via the corresponding line VoIP phone number To record a...

Страница 46: ...elect the network mailbox entry and press OK You are connected directly to the network mailbox and can hear its announcement Messages can generally be played back using your handset keypad digit codes...

Страница 47: ...ge 46 Opening the incoming e mail list Prerequisites u You have set up an e mail account with a provider u The incoming e mail server uses the POP3 protocol u The name of the incoming e mail server an...

Страница 48: ...connecting to the incoming e mail server The messages are displayed in the display for a few seconds Server not accessible The connection to the incoming e mail server could not be established This m...

Страница 49: ...moments later Mailbox settings incomplete Incomplete entries for name of incoming e mail server user name and or password Check add to settings Web configurator Viewing the message header and text of...

Страница 50: ...s is displayed over several lines if necessary maximum 60 lines Back Press the display key to return to the incoming message list Example display on the elmeg DECT130 handset Deleting e mail messages...

Страница 51: ...fo services section on page 51 Messages when loading requested information The information is loaded from the Internet Wait a few seconds until the information is displayed The display shows Please wa...

Страница 52: ...nding on the type of info service requested you can perform the following operations Scrolling within an info service You can use s to scroll downwards within an info service and t to scroll up back S...

Страница 53: ...splayed again with the hyperlink The number will not be dialled Entering text If necessary use q to navigate to the line containing the field into which you want to enter text The cursor flashes in th...

Страница 54: ...ettings such as language colour backlight etc u Settings relating to ringtones volume speaker profiles etc Information about this can be found in the user guide for the relevant handset Date and time...

Страница 55: ...all Lists Withhold Number Restrict Calling Line Identification for the next call page 34 Call Divert Assign the menu for setting and activating deactivating call forwarding to a key page 35 v Select S...

Страница 56: ...System settings and settings on the handset Starting a function The function is displayed in the bottom display line above the display key abbreviated if necessary To start the function you then simp...

Страница 57: ...dates for the DECT Manager u Manage the directories on registered handsets save to PC compare them with one another or against a directory on your PC Using the Web configurator Connecting the PC to th...

Страница 58: ...Reloading may take some time Enter the password in the bottom field of the Web page default setting admin to access the Web configurator functions Click OK Please note The IP address is assigned dyna...

Страница 59: ...y period approx 10 minutes you are automatically logged off The next time you try to make an entry or open a Web page the login screen is displayed again Enter the password again to log back in u Any...

Страница 60: ...g Off You will find the Log Off function at the top right of each Web page above the menu bar Navigation area Caution Always use the Log Off function to end the connection to the Web configurator If f...

Страница 61: ...ng Alternative options radio buttons Theactiveoptionin thelistisindicatedby andthe non active by You can activate an option by clicking The previously activated option is deactivated You can only deac...

Страница 62: ...function in the navigation area The Telephony subfunctions are displayed in the navigation tree Select the Dialling Plans subfunction Settings Network and connectors IP Configuration page 62 Base sta...

Страница 63: ...ult setting Select Static if your device receives a fixed IP address If the Obtained automatically setting is selected all further settings are automatically configured They are displayed and cannot b...

Страница 64: ...n Name System allows you to assign public IP addresses to symbolic names The DNS server is required to convert the DNS name into the IP address when a connection is being established to a server You c...

Страница 65: ...VLAN In this case you enter the VLAN identifiers VLAN tags for your VLAN Your network operator will supply you with this data Select Yes if you do not want to use a VLAN default setting No Enter the...

Страница 66: ...d activated and synchronised To do this you will need a list of all base stations each with the MAC address of a DECT module and the location in the building or a unique name for the cell You will fin...

Страница 67: ...CT Cluster and Synchronisation level can be specified later on the Synchronising base stations page The base station status is displayed Offline The base station is not connected to the telephone syst...

Страница 68: ...stration window now opens again to allow you to register and configure the remaining base stations When you have registered and configured all the required base stations the window shows that there ar...

Страница 69: ...the radio connection between base stations and mobile phones and the handover To carry out the synchronisation you will need the plan of the clusters with the synchronisation level for each base stati...

Страница 70: ...n OK to delete all displayed events Security settings The DECT Manager supports the establishment of secure data connections on the Internet with the TLS security protocol Transport Layer Security Wit...

Страница 71: ...ins the certificate used to make the connection You can display information on the certificate by highlighting it and clicking on the Details button This information includes who issued the certificat...

Страница 72: ...oIP connection A page opens for you to establish a new connection or change the data for an existing connection You enter the details for a PABX manually When configuring a VoIP provider you can use a...

Страница 73: ...n the required provider from the list The data for the selected profile is then loaded and displayed in the window If necessary you can modify the general provider data in the General data for your se...

Страница 74: ...CT Manager with its public IP address in the sent data packets If you operate your DECT Manager behind a router with symmetric NAT STUN cannot be used If you are sometimes unavailable for incoming cal...

Страница 75: ...e the settings for this handset To start registering and configuring a new handset click the Add button Each handset is assigned its own VoIP account However you can copy the provider and the Advanced...

Страница 76: ...overwritten Check that the handset you wish to register is within the wireless range of your DECT network Choose a configured VoIP PABX provider from the Select VoIP provider list Enter the access dat...

Страница 77: ...call up various directories using the handset control key Choose which directory is called up with the directory key bottom of the control key You can select the local directory or one of the online d...

Страница 78: ...ies involved in a phone connection caller sender and recipient must use the same voice codec The voice codec is negotiated between the sender and the recipient when establishing a connection You can s...

Страница 79: ...directory from the handset If you have edited the directory file vcf file on the PC and would like to load this modified directory to the handset you can delete the current directory on the handset be...

Страница 80: ...rred from a vcf file into the handset directory u Name u First name u Number u Number office u Number mobile u E mail address u Birthday YYYY MM DD and time of the reminder call HH MM separated by a T...

Страница 81: ...ring and deleting handsets If the handset for which you are currently editing the settings is registered with the DECT Manager you can Saving settings Click on Set to save your settings on the page De...

Страница 82: ...onal VoIP settings page 87 Audio setting Configuring call transfer R key hook flash Setting up local communication ports Dialling plans Settings Telephony Dialling Plans Call Barring On this page you...

Страница 83: ...0 Save an access code and specify when the phone numbers should be automatically prefixed with the digits You can choose between All Never and from Call Lists only when dialling from the call list or...

Страница 84: ...waiting tone vary from one country or region to another You can choose from various tone groups for your phone system From the Tone Selection list select the country or region whose ring tones are to...

Страница 85: ...ec The voice codec is negotiated between the sender and the recipient when establishing a connection TheG 722codec wideband connection enableshigh voice quality butonly a maximumof four simultaneous c...

Страница 86: ...the first call is to continue while the second participant is being called when a call is forwarded There are two ways of doing this For attended transfer This procedure ensures that the call actuall...

Страница 87: ...values between 5060 and 6000 If several VoIP phones are operated on the same router with NAT it makes sense to use randomly selected ports The phones must then use different ports so that the router s...

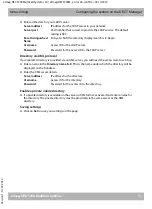
Страница 88: ...andsets page 50 The VoIP account s SIP ID and the handset s DECT ID are transferred when requesting info services This allows the info service server to offer individual settings for each handset Sett...

Страница 89: ...assified directory You can also enter an additional provider u Corporate directories corporate directories You can enter three directories here One directory in LDAP format One general directory in XM...

Страница 90: ...m on the DECT Manager Enter the provider s details and a name for the provider and the directories You can choose between the White and Yellow Pages Click on Set to save your settings on the page The...

Страница 91: ...r the registered handsets available on a server in LDAP or XML format Settings Online directories Directory via Lightweight Directory Access Protocol LDAP If your corporate network provides a director...

Страница 92: ...rectory If a private directory is available on the server in XML format activate it and enter a name for the directory The private directory must be provided via the same server as the XML directory S...

Страница 93: ...u Enter another time server u Deactivate the time server and enter the date and time manually u Select the time zone for your location u Activate deactivate automatic adjustment of the clock to summer...

Страница 94: ...an specify on this page whether the device should check for an updated profile regularly and load it onto your system Saving and restoring settings You can save and restore the system settings via the...

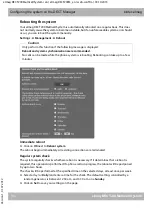
Страница 95: ...ons are terminated Regular system check The system regularly checks whether a reboot is necessary If it determines that a reboot is required this operation is performed If a phone call is in progress...

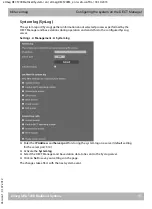
Страница 96: ...cesses performed by the DECT Manager and base stations during operation and sends this to the configured SysLog server Settings Management System log Enter the IP Address and Server port for storing t...

Страница 97: ...these updates onto the DECT Manager or base stations as required Settings Management Firmware Update Updating the DECT Manager firmware automatically initiates a base station update Enter the address...

Страница 98: ...version that was loaded before the last update on the DECT Manager u You can reload the firmware version that was loaded by default onto the DECT Manager The selected firmware is reloaded and the curr...

Страница 99: ...vice Name in the Network u Operating days since the system was started u Version of the firmware currently loaded for the DECT Manager u Version of the firmware available for the DECT Manager u Prefer...

Страница 100: ...hout power Check the power supply to the base stations and the DECT Manager page 12 If the base is powered by PoE check the switch s power supply 5 No resources available from the nearest base station...

Страница 101: ...a connection to the DECT Manager with your PC s Web browser When establishing a connection check the DECT Manager s local IP address that has been entered You can check this via the Service menu on a...

Страница 102: ...port forwarding on the router 1 Changing the port numbers for SIP and RTP on your VoIP phone On your VoIP phone system define different local port numbers for the SIP and RTP ports between 1024 and 49...

Страница 103: ...u can set an RTP base port for the elmeg DECT200 Multicell System base stations from which the system automatically determines the ports required 32 per DECT module page 86 You must then also define c...

Страница 104: ...Scan Thisfunctioncan beusedduringorafter installationand enablesyoutoidentify the DECT base stations elmeg DECT200 from which a handset receives radio waves at a particular location Authorisation elm...

Страница 105: ...aluation of necessary measures for permanent improvement of the organisation An optimal quality management system covers all organisational measures to ensure perma nent quality and thus customer sati...

Страница 106: ...he power adapter 2 Allow the liquid to drain from the device 3 Pat all parts dry Then leave the device in a warm dry location for at least 72 hours not in a microwave oven or similar 4 Do not switch o...

Страница 107: ...RJ45 Ethernet 10 100 Mbps Protection class IP20 Ambient conditions for operation 5 C to 45 C 20 to 75 relative humidity Protocols IPv4 SNTP DHCP DNS TCP UDP VLAN HTTP TLS SIP STUN RTP MWI SDP Base st...

Страница 108: ...to log in Automatic ringback See Ringback when the number is busy B Block dialling Enter the complete phone number and correct it if necessary Then pick up the earpiece or press the talk speaker key...

Страница 109: ...the sender and the recipient when establishing a connection The choice of codec is a compromise between voice quality transmission speed and the necessary bandwidth A high level of compression for exa...

Страница 110: ...stead of your phone number DMZ Demilitarised Zone DMZ describes a part of a network that is outside the firewall A DMZ is set up as it were between a network you want to protect e g a LAN and a non se...

Страница 111: ...cit Call Transfer Participant A calls participant B The participant puts the connection on hold and calls participant C Rather than connect everyone in a three party conference A now transfers partici...

Страница 112: ...connection and integrated speech pause recognition and comfort noise generation silence suppression G 722 delivers very good voice quality A higher sampling rate provides clearer and better voice qua...

Страница 113: ...bscriber is identifiable via their IP address DNS assigns a Domain name to the IP address Important services on the Internet include the World Wide Web WWW e mail file transfer and discussion forums I...

Страница 114: ...0 65 44 00 3A The MAC address is assigned by the manufacturer and cannot be changed Mbps Million bits per second Unit of the transmission speed in a network MRU Maximum Receive Unit Defines the maximu...

Страница 115: ...start to ring PIN Personal Identification Number Protects against unauthorised use When the PIN is activated a number combination has to be entered to access a protected area You can protect your base...

Страница 116: ...ys less echoing less crackling R Registrar The registrar manages the current IP addresses of the Network subscriber When you register with your VoIP provider your current IP address is saved on the re...

Страница 117: ...s of a common protocol RPN Radio Fixed Part Number Number for the base station in a multicell DECT network RTP Real Time Transport Protocol Global standard for transferring audio and video data Often...

Страница 118: ...t part is the subscriber number Symmetric NAT A symmetric NAT assigns different external IP addresses and port numbers to the same internal IP addresses and port numbers depending on the external targ...

Страница 119: ...a resource by its location on the Internet For historical reasons the term is often used as a synonym for URI User ID See User name User name Name number combination for access e g to your VoIP accoun...

Страница 120: ...107 Broadband voice codec 111 Busy 28 Buttons Web configurator 60 C Call accepted 42 accepting 29 display on LED 20 ending 28 Call in call list 42 missed 42 outgoing 42 transferring connecting 33 Cal...

Страница 121: ...necting to LAN 56 device name 63 installing 11 LAN configuration 62 LEDs 20 resetting 22 status 98 status of connection to base stations LED display 20 Deleting base station 68 Deletion handset 80 Dem...

Страница 122: ...r LED display 20 Flat rate 110 Fragmentation of data packets 111 Full duplex 111 G G 711 77 G 722 34 77 enabling 84 G 726 77 Gateway 111 Gateway provider 111 Gigaset N720 SPK PRO Site Planning Kit 8 G...

Страница 123: ...pdate 20 Light emitting diodes see LED List e mail notifications 46 network mailbox 45 Listen port see Communication port Lists Web configurator 60 Local Area Network 113 Local IP address 113 Local SI...

Страница 124: ...afety 9 Power consumption 105 Prepare dialling 114 Priority of voice data 65 Private IP address 114 Protocol 114 Proxy 115 Proxy Server 115 Public IP address 115 Q Quality management 104 Quality of Se...

Страница 125: ...17 Transport Layer Security 117 Transport protocol 117 Troubleshooting 99 e mail 47 general 99 U UDP 117 Uniform Resource Identifier 118 Universal Resource Locator 118 Update firmware 96 URI 118 URL 1...

Отзывы: