Section 2: Using the front-panel interface
Model 2450 Interactive SourceMeter® Instrument User's Manual
2-2
2450-900-01 Rev. A / June 2013
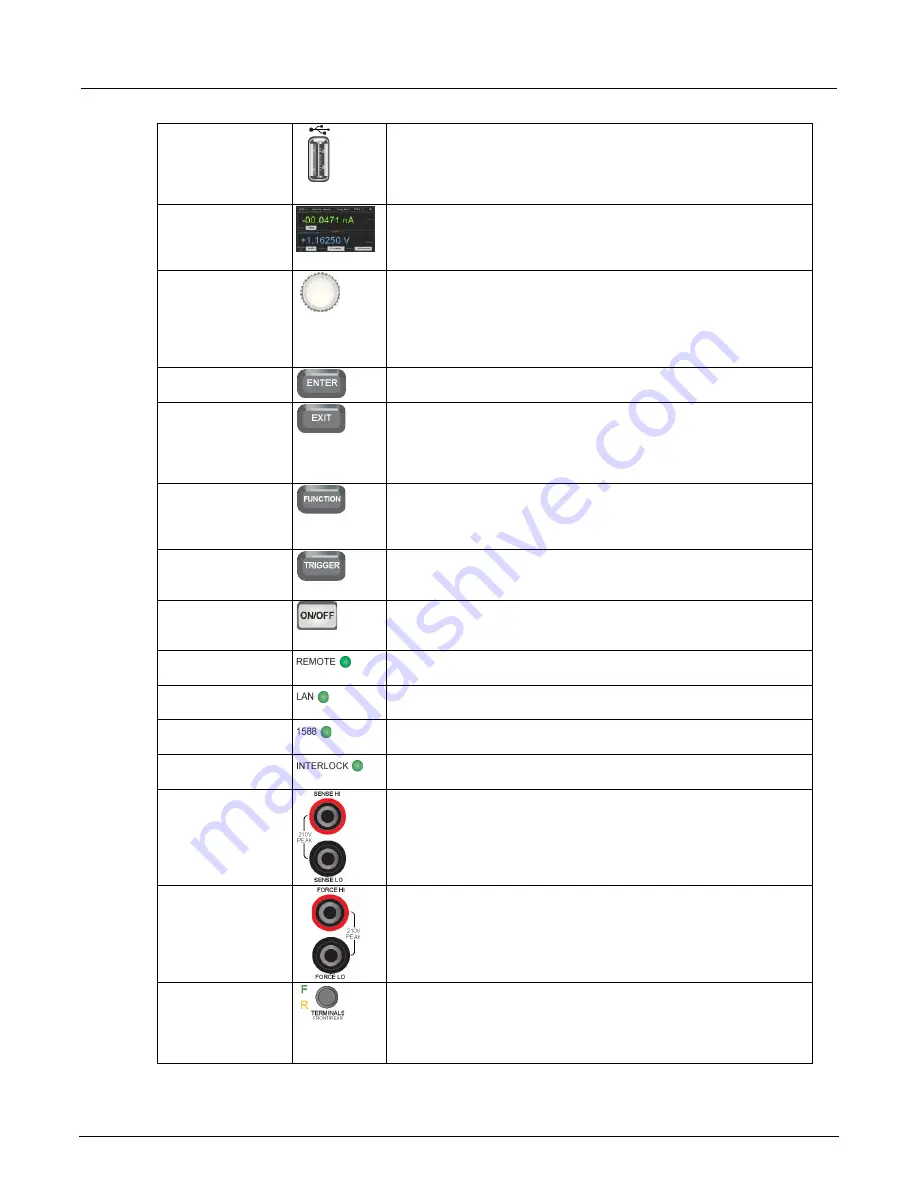
USB port
Supports flash drives that comply with USB 2.0 standards and USB
1.0 and 1.1 standards. You can save data to the USB flash drive from
the front panel, or you can create a script to save data to the USB
flash drive from a remote interface. The flash drive must be formatted
as a FAT drive.
Touch screen
The Model 2450 has a high-resolution, five-inch color touch-screen
display with additional swipe screens. You can access additional
interactive screens by pressing the front-panel
MENU
,
QUICKSET
,
and
FUNCTION
keys.
Navigation control
Turning the navigation control:
Moves the cursor to the left or the
right to highlight a listed value or menu item so that you can select it.
Turning the control when the cursor is in a value entry field increases
or decreases the value in the field.
Pressing the navigation control:
Opens menus and submenus and
selects an entered value.
ENTER key
Press the
ENTER
key to select the highlighted choice or to edit the
field that presently has focus.
EXIT key
Press the
EXIT
key to return to the previous screen or close a dialog
box. For example, press the
EXIT
key when the main menu page is
displayed to return to the home screen. When you are viewing a
subscreen (for example, the Event Log screen), press the
EXIT
key
to return to the main menu screen.
FUNCTION key
Press the
FUNCTION
key to display instrument functions. To select
one of the functions, press the function on the touch screen.
Alternatively, turn the navigation control to highlight a function, and
then press the control to select the function.
TRIGGER key
The TRIGGER key provides access to trigger-related settings and
operations. Pressing the TRIGGER key results in different actions,
depending on the instrument state.
OUTPUT ON/OFF
switch
Press the
OUTPUT ON/OFF
switch to turn on the source output; the
key illuminates when the source output is on. Press the
OUTPUT
ON/OFF
switch again to turn off the source output.
REMOTE LED
indicator
Illuminates when the instrument is controlled through a remote
interface.
LAN LED indicator
Illuminates when the instrument is connected to a local area network
(LAN).
1588 LED indicator
Illuminates when the instrument is connected to an IEEE-1588
compliant device.
INTERLOCK LED
indicator
Illuminates when the interlock is enabled.
SENSE terminals
Use SENSE HI and SENSE LO terminal connections to measure
voltage at the device under test (DUT). Using sense leads gives you
more accurate voltage sourcing and measurement at the DUT,
because measurement of the voltage drop across the force leads is
eliminated.
FORCE terminals
Use FORCE HI and FORCE LO terminal connections to source or
sink voltage or current to or from a device under test (DUT).
FRONT/REAR
TERMINALS switch
Press the
FRONT/REAR TERMINALS
switch to activate terminals on
the front or rear panel. When the front-panel terminals are active, a
green "F" is visible to the left of the FRONT/REAR switch. When the
rear-panel terminals are active, a yellow "R" is visible to the left of the
switch.


