TECHVIEW QV-3049 Скачать руководство пользователя страница 20


Section 5.2.4.3. 

3

 Save the parameters and exit Main Menu;

4

 System auto restart; 

5

 User name and password of mobile is consistent 

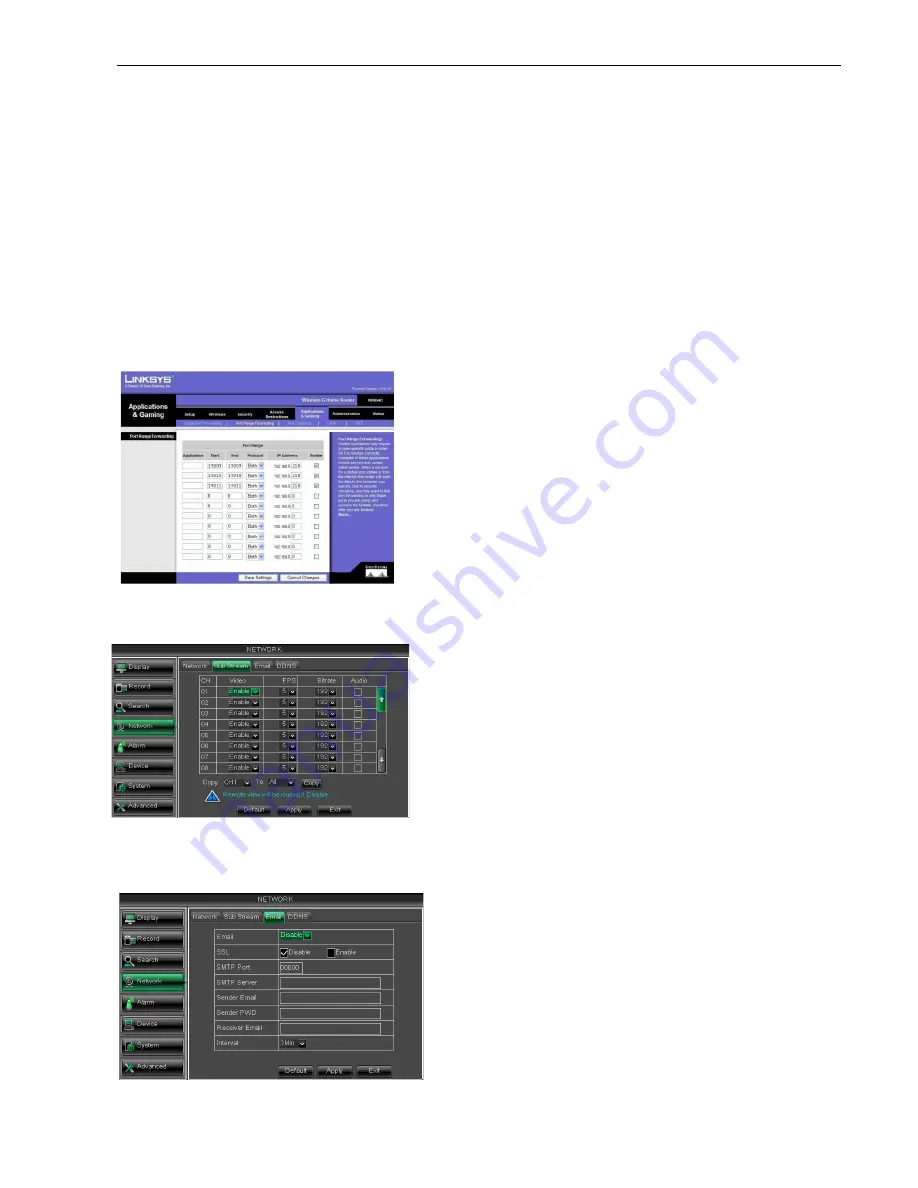
5.2.4.3Router’s Port Forwarding

Port forwarding is required when you want to access the DVR connected to the 

router’s network. If PPPoE is selected, port forwarding is not required.

1.  Input router’s IP address from IE

Picture 5-35; 

2.  Click [Transmittal rule] option to take yo
3.  The  DVR  IP  address  for  the  intranet  should  be  <192.168.1.101>,  you  should  forward 

(19009) and HTTP port (19010

4.  Now user can visit the DVR remotely.


5.2.4.4 Sub stream 

Go to [Main menu

Network


5.2.4.5 Email set 

Click [Main Menu

Network


Picture 5-36 

Picture 5-37 

Picture 5-35 

16


Save the parameters and exit Main Menu; 

User name and password of mobile is consistent with DVR 

Router’s Port Forwarding


Port forwarding is required when you want to access the DVR connected to the 

router’s network. If PPPoE is selected, port forwarding is not required. 

Input router’s IP address from IE-based browser to open the Router configuration

Click [Transmittal rule] option to take you to the port forwarding instructions for your router;
The  DVR  IP  address  for  the  intranet  should  be  <192.168.1.101>,  you  should  forward 

19010) to this IP address respectively. 

Now user can visit the DVR remotely. 

Network

Sub Stream] to enter into the interface shown 

Email] option to enter into the email set interface shown as Picture 5


SSL:  is  a  security  link  transport  protocol.  You  can 
encrypt your communication info (including your email) 
using  SSL  to  prevent  hackers  from 
email or communication info and even your password.
Please set SSL to “On” via Gmail.com server, and set 
to “Off” via other mail server. 


Video: 

allow you open or close the sub stream output. If 

you select “Enable” system will select sub
and guarantee image quality once network is unstable.   


Frame rate: 

allow you set net transmittal frame rate. User 

could select the relative value b


Bit rate: 

allow you set net transmittal bit rate. User could 

select the relative value by pull


Audio: 

When tick-selecting the option, system will record 

video and audio simultaneously.


Friendly  Reminder: 

The  router’s  port  forwarding 

interface may be different, however, when entering into 
virtual server, user will always need forward port 
1025~65535) of router to IP address of DVR allocated 
or  automatically  captured,  and  select  [All]  or  [Both]  in 
corresponding  protocol  column  and  save  the  above 
setting. 
Above  steps  may  differ  from  the  router  device 
depending on the manufacturer.

User  Manual 

Port forwarding is required when you want to access the DVR connected to the router from outside of the 

based browser to open the Router configuration interface shown as 

u to the port forwarding instructions for your router; 

The  DVR  IP  address  for  the  intranet  should  be  <192.168.1.101>,  you  should  forward  Media  port 

Sub Stream] to enter into the interface shown as Picture 5-36


interface shown as Picture 5-37 

SSL:  is  a  security  link  transport  protocol.  You  can 
encrypt your communication info (including your email) 
using  SSL  to  prevent  hackers  from  monitoring  your 
email or communication info and even your password. 
Please set SSL to “On” via Gmail.com server, and set 


allow you open or close the sub stream output. If 

you select “Enable” system will select sub-stream preview 
and guarantee image quality once network is unstable.     

allow you set net transmittal frame rate. User 

could select the relative value by pull-down menu.


allow you set net transmittal bit rate. User could 

select the relative value by pull-down menu.


selecting the option, system will record 

video and audio simultaneously.


The  router’s  port  forwarding 

interface may be different, however, when entering into 

need forward port (range: 

of router to IP address of DVR allocated 

or  automatically  captured,  and  select  [All]  or  [Both]  in 
corresponding  protocol  column  and  save  the  above 

Above  steps  may  differ  from  the  router  device 
depending on the manufacturer.


Содержание QV-3049

Страница 1: ...User Manual...

Страница 2: ...4 2 LIVE INTERFACE 6 CHAPTER 5 DVR MENU 6 5 1MAIN MENU GUIDE 7 5 2MAIN MENU 8 5 2 1 Display 8 5 2 1 1 Live mode 8 5 2 1 2 Output mode 8 5 2 1 3 Privacy Zone 10 5 2 2 Record set 10 5 2 2 1 Record param...

Страница 3: ...MANAGER 23 6 1ACTIVEX CONTROL DOWNLOAD AND INSTALLATION 23 6 2 WEB APPLICATION MANAGER LOG IN 24 6 3 LIVE INTERFACE 24 6 3 1 Menu Bar 24 6 3 1 1 Live Display 24 6 3 1 2 Video control 25 6 3 2 Playbac...

Страница 4: ...ug this equipment during lightning storm or when unused for long periods of time 9 Accessories Do not place this equipment on an unstable cart stand or table When a cart is used use caution when movin...

Страница 5: ...tion Brief and Description Real time monitoring Double video output with monitor VGA virtual output port or HDMI Output Support net viewer and MP live surveillance and also support zoom in out auto se...

Страница 6: ...onitor output BNC interface 5 VGA Port Connect to VGA monitor such as PC monitor Optional 6 HDMI Port Connect to HDMI monitor 7 USB Port Connect USB device Flash Drive Hard Drive and Recorder etc 8 Po...

Страница 7: ...isplay mode 4 Menu Enter into Main menu Exit 5 Up arrow key Volume adjust 6 Down arrow key Volume adjust 7 Left Down key Decrease increase parameter value of control bar 8 SEL Select key Edit key sele...

Страница 8: ...stop dwell time display when dwell time display is activated By clicking left key you can adjust Color control bar and volume control bar Clicking combo box to access pull down menu By clicking left k...

Страница 9: ...h screws Note If user requires higher performance HDD strongly recommend you use special hard driver for security and protection 3 2 Camera and Monitor Connection Connect camera cable to video input o...

Страница 10: ...first the live screen and accompany buzzer alarm If you want to close the buzzer alarm please enter Alarm to set HDD loss HDD space not enough and alarm output to off Chapter 5 DVR Menu After finishi...

Страница 11: ...Backup Log search Display Output Set Main Menu Live set Privacy Zone Clip Set Record Parameters Schedule Main Stream Record Sub stream Network Set Email Set Mobile Set DDNS Set Network Maintain Advanc...

Страница 12: ...t up to eight characters or four characters Position allow you setup the display position of each channel Color Click Setup option to enter into the Color setup interface shown as Picture 5 4 Covert a...

Страница 13: ...display window will include Single Quad 9 split and 16 Spot output display window will include Single Quad and 9 split mode allow you adjust menu s transparency and its range is 1 128 allow you adjust...

Страница 14: ...nt this method to apply to You can use the Copy To pull down menus and Copy button to copy sett from one day to another day or all days Click Main menu Record into the interface shown as Channel allow...

Страница 15: ...trol bar to operate the Fast Forward X2 X4 and X8 Slow play 1 2 1 4 and 1 8 speed Play Pause Frame Rewind X2 X4 and X8 When ending playback DVR will return back to previous menu shown as Picture 5 20...

Страница 16: ...shown as 19A Up to 4 CH is available Click icon beside the processing bar to pop up the interface shown as Time Axis defaulted to 24hours and allow user select 2hours 1hour 30minutes or Detailed oper...

Страница 17: ...w based on date time and channel go to the last page Clicking the last button will make you enter into last page quickly Allows you to select all the events on the current page Allows you to select ot...

Страница 18: ...ve searched And click Backup to export all the log information which is listed For other button functions please refer to previous section 5 3 4 3 Event Search Picture 5 When selecting DHCP from will...

Страница 19: ...Iphone and Black berry Configure network parameters details please refer to section 5 2 4 1 uch as 19011 and the port need forward to router Details please re When selecting PPPoE from can input user...

Страница 20: ...ittal frame rate User could select the relative value b Bit rate allow you set net transmittal bit rate User could select the relative value by pull Audio When tick selecting the option system will re...

Страница 21: ...ame Input a user name registered before applying for a domain name Password Input a password you set when registering a user name Channel allow you enable disable the motion function for any channel A...

Страница 22: ...meters to any other channel or all channels HDD to enter into the interface shown as Picture 5 a HDD the system will automatically detect if HDD is HDD is loosen or HDD is abnormal HDD status will be...

Страница 23: ...an important first step when configuring your DVR to make sure that the hard drive HDD options are correctly set So strongly suggest that you do format the HDD before start the first record General t...

Страница 24: ...ct the option and the user is allowed to playback the record you selected Picture 5 Log Search allow you check all the system logs Parameter allow you set all the parameters Maintain allow you update...

Страница 25: ...enter into the Event interface shown as Picture 5 Now user can check the current Device Device ID Device type Device S N MAC address IE version Software version Panel version etc Auto Reboot You can...

Страница 26: ...ord Search menu from Pop up menu conveniently and quickly and search playback the record histories We introduced Record search details previously in Section 5 3 3 1 5 7Mute Click the icon or press Mut...

Страница 27: ...Vista System Vista Win 7 system Reminder If the ActiveX control is not downloaded successfully please check if your browser s safety level or firewall setting is too advanced Please run IE Tools Inter...

Страница 28: ...lose live images and enter into on split or 16 split mode by operating the control bar on the bottom of screen Record icon record will be saved to a specified position after starting record Snapshot f...

Страница 29: ...ent bit rate Allow you open all the live channels Allow you close all the live channels Display previous group of channels Display next group of channels Click the icon to enlarge current window to fu...

Страница 30: ...ayback interface shown Picture 6 7 Firstly select one day you want to check and tick select synchronous Playback and the desire to playback shown as Picture 6 8 Secondly select record type Normal reco...

Страница 31: ...on is shown as below list Description Key Description Play Open close audio Pause Volume adjust Stop Playback control bar x1 2 1 4 1 8 normal x2 x4 x8 By frame Stop all the play Clip Single channel mo...

Страница 32: ...ecord time If show time is set to disable not appear on the screen on Live mode and if record time is set to off system time can t be found in the record file 2 Privacy zone Each channel could set up...

Страница 33: ...rding for DVR according to different router When set UPNP to On user no needs to perform port forwarding Once you modify the network parameters successfully DVR will automatically restart DVR For deta...

Страница 34: ...istent with DVR local setting After user applies for DDNS service shown as Picture 6 24 you could enable DDNS function under any one network type mode Static DHCP and PPPoE Now you remotely visit the...

Страница 35: ...out HDD status and overwritten time shown as Picture 6 unfold its sub options General Users and information User could check DVR s language and video system and also set system time date format 29 Det...

Страница 36: ...version IE re version shown as Picture 6 31 Click Advance to unfold its sub options System update Load default Events and system maintain etc allow you upgrade DVR system remotely shown as Picture 6 P...

Страница 37: ...setting should be consistent with DVR local setting Allow you configure abnormal type buzzer output time and alarm email and sh Details setting should be consistent with DVR local setting Allow you se...

Страница 38: ...the Record function 7 Q Why the Remote Controller can t work normally A Check if the battery is power off or check if the Remote Controller is broken 8 Q Can we records whilst playing back A Yeah you...

Страница 39: ...7 3Accessories 1 4 8 CH Accessories Power Adapter Remote Controller 35 User Manual USB Mouse Software CDSoftware CD User Manual USB Mouse...

Страница 40: ...arantee is given as to the correctness of its contents We do not undertake any responsibility for the harms cause by using our product The model of the products in the user s manual only for recogniti...

Отзывы: