RECLINE EXCITE: Service & Maintenance Manual - rev. 2.4
Page 4.8
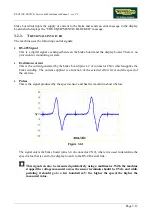
Figure 4.5-6
16. Turn the machine over on the left side.
17. Back off the 4 screws
d
using a Phillips
screwdriver.
18. Remove the cover
e
.
Figure 4.5-7
19.
onnector plate f from the front
21.
arrow until it comes out on the display
side.
Remove c
platform.
20. Unplug CSafe connector g, if present.
Insert cable 8 (CB-18) into the hole indicated
by the
Because the display column is
interrupted, as can be seen in Figure
4.5-10, it will be difficult for the cable to
reach the display. Therefore, route it
along at least the first section of column.
Figure 4.5-8
22. Assemble union connector
7
on connector
plate
6
, securing it with its own lock-nut after
inserting the washer, as shown in the figure.
Continued on following page
→
Содержание Recline 500
Страница 1: ...SERVICE MAINTENANCE MANUAL REV 2 4...
Страница 2: ......
Страница 4: ......
Страница 10: ...RECLINE EXCITE Service Maintenance Manual rev 2 4 Page vi Page intentionally left blank...
Страница 46: ...RECLINE EXCITE Service Maintenance Manual rev 2 4 Page 3 14 Page intentionally left blank...
Страница 58: ...RECLINE EXCITE Service Maintenance Manual rev 2 4 Page 4 12 Page intentionally left blank...
Страница 94: ...RECLINE EXCITE Service Maintenance Manual rev 2 4 Page 6 34 Page intentionally left blank...
Страница 134: ...RECLINE EXCITE Service Maintenance Manual rev 2 4 Page 7 40 Page intentionally left blank...
Страница 140: ...RECLINE EXCITE Service Maintenance Manual rev 2 4 Page 8 6 Page intentionally left blank...
Страница 172: ...RECLINE EXCITE Service Maintenance Manual rev 2 4 Page 9 32 Page intentionally left blank...
Страница 181: ......


