Techno CNC Systems HD II Скачать руководство пользователя страница 7

12

Call: 1-631-648-7481 or Visit: support.technocnc.com

13

HD II Tabletop Manual

NK105G2

Call: 1-631-648-7481 or Visit: support.technocnc.com

HD II Tabletop Manual

NK105G2

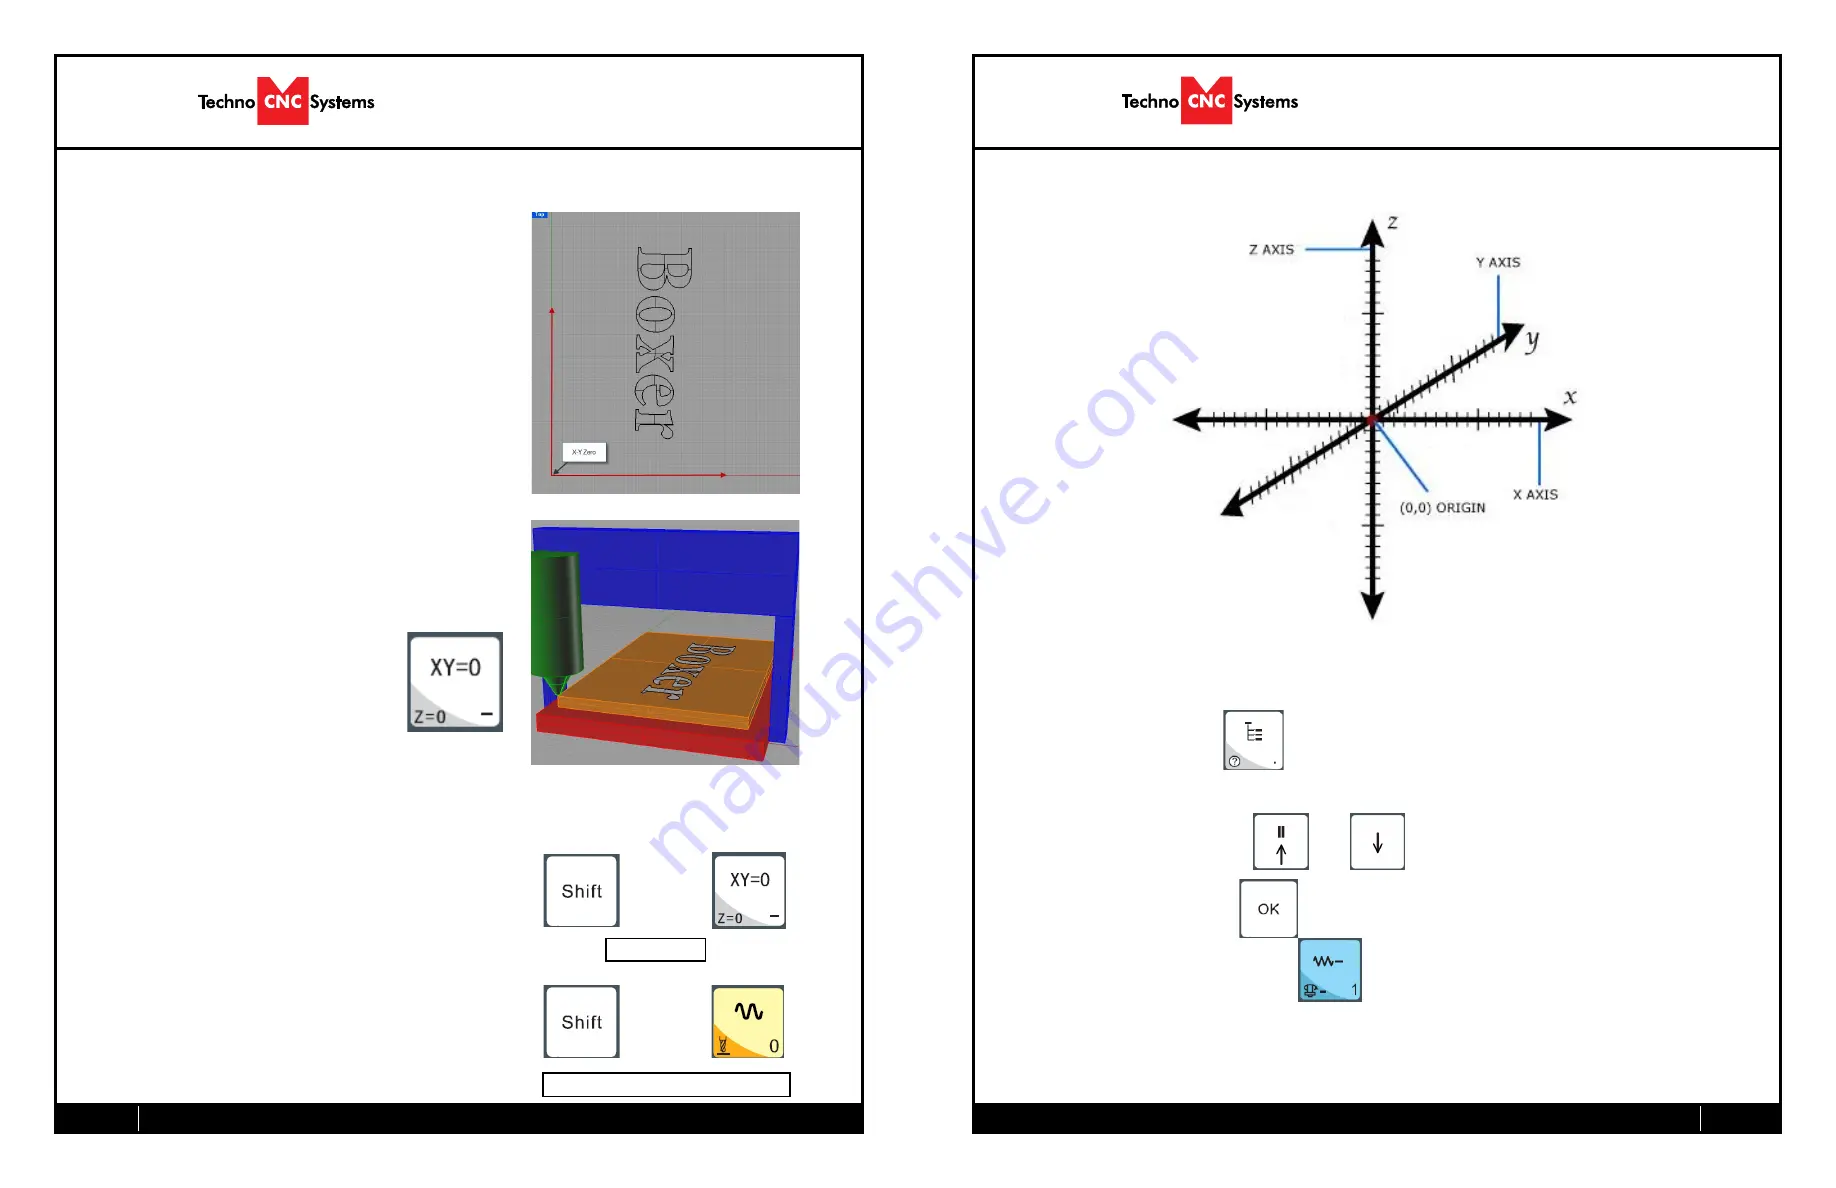
3.5- Adjusting the XYZ Zero position/WCS/User Origin. 

XYZ zero position, Working Coordinate System (WCS), and 
User Origin are all the same thing.  

Different CAM systems and users just name the concept 
differently. For convenience XYZ zero position will be used in 
the rest of this manual.

XYZ zero position is the location point on a drawing in a 

CAD/CAM package where X,Y and Z all equal zero. 


Generally, XY zero is on the bottom left corner and Z zero 

is the top of the part. In fig 3.3a the letters are located 

away from the XY zero, all points representing positive 
integers.

In Fig 3.3b the object represents the material the letters will 
be cut from. The machine should be jogged to the corner of 
the material by using the directional arrows on the keypad. 
Once the machine is in location press to set XY zero. The 
coordinates on the controller will change to 0,0.XY zero is 
now set.

Fig.3.3b

Fig. 3.3a

There are two methods for setting the Z-axis zero position:

1. Manual Method: Use the Z-axis directional arrows on the 
keypad to move the router to the top of the material. Switch 
to Step Mode to slowly move the machine into position. 
When the router bit is in position press shift/aux and the 
Z=0 button as shown. 

2. Tool Calibration Block: Place the touch off block on top 
of the material and under the cutter. Press shift/aux and 0 
simultaneously. The spindle will slowly move down until it 
touches the touchpad. The Z axis will now be set to the top 
of the material. 

The Z coordinate will now read ‘Z 0.000’

+

Zero Z-axis

Activate Z-Touch off procedure.

+

3.6- Loading a G-code 

File.

Press the Menu button. 


Select “2.USB files” to access the flash drive.


Only a G-code file with an “nc” extension with show.


Scroll through the files with 


 and


Select file by pressing OK.


Then load the file by pressing 1.


Note: 
Files can be copied from this USB to the controller using the “2” button 
Local disk space is limited! 
 

Once a file is copied locally, it can also be selected from the jog speed /step size screen

Содержание HD II

Страница 1: ...7 This document will provide a quick guide to the set up and operation of the Techno HD II Tabletop CNC Router equipped with the NCstudio controller The HD II Tabletop CNC Router is powered by high pr...

Страница 2: ...ands to secure work 9 Do not attempt to exceed limits of machine 10 Do not attempt to use machine for purposes other than what is intended 11 Use machine only in clean well lit areas free from flammab...

Страница 3: ...hine requires 220V single phase power in order to operate Plug the power cable into the rear of the machine as shown in figure 1 2 Fig 1 1 Fig 1 2 Fig 1 3 Fig 1 4 The customer is responsible to hardwi...

Страница 4: ...c This is also known as homing the machine It refers to the process of the machine find ing its mechanical home position From this point the user has two options Home the machine or cancel the homing...

Страница 5: ...op Cancel Escape Up Directional Key Pause Start key Spindle On Off Input the number 5 Negative Feedrate Override Input the number 1 Y Movement Input the number 8 Y Movement Input the number 2 OK Selec...

Страница 6: ...press it again 3 2 Stepping the machine To move the machine in increments press down one of the Yellow directional keys on the keypad while in Stepping mode The keypad has X X Y Y Z Z printed on the...

Страница 7: ...ro The coordinates on the controller will change to 0 0 XY zero is now set Fig 3 3b Fig 3 3a There are two methods for setting the Z axis zero position 1 Manual Method Use the Z axis directional arrow...

Страница 8: ...part during a pause it will lose its position and when the file is resumed it will start from the new position When using multiple tools it is best to create separate files for each tool The last file...

Страница 9: ...s in 4 oper param 5 MFR param 4 3 Setting the Table Size From the main screen press Menu to access the Menu screen Use the arrow keys to move the cursor and highlight Press OK to select The MFR parame...

Страница 10: ...chine or insuring that the Tool number does not exceed 10 G92 is the Axis presetting command when this command is encountered in the G code file the XYZ zero position is set at the position the machin...

Страница 11: ...Params Setting Engr Depth Each Depth Tool Dia Nose Gap Height Width X Init Y Init Mode Horiz Mill EXECUTE 2 Load the Last 3 Select Line No Total ____ StartLine ____ EndLine _____ EXECUTE NOW 4 Machin...

Страница 12: ...Times 1 4 Deep Hole Mode 0 5 Retract Amount 0 25 6 Select Tool No YES 14 Tool Change 1 ATC Capacity HD II Tabletop Settings Website support technocnc com Call 631 648 7481 P a g e 4 10 2 Current Tool...

Страница 13: ...lay 5000 ms 3 Initial Gear 6 4 Max Spdl Speed 24000 7 Y Rotary Axis 1 Y as Rotary Axis NO 2 Rotary Y Pulse 0 006 deg pulse 3 MM as Unit NO 4 Rev Work Radius 0 394 5 Rotary Takeoff HD II Tabletop Setti...

Страница 14: ...will be allowed nor credit given for products returned without such authorization Proper packaging and insurance for transportation is solely the customer s responsibility After approval from Techno C...

Отзывы: