background image

Deutsch   

- 21 -

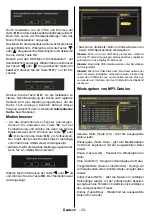
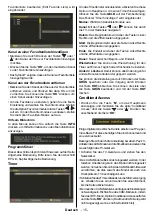
 Ansehen von JPEG-Dateien 


  Springen (Zifferntasten): springt zur Datei, die über 
die Zifferntasten ausgewählt wird.

OK: zeigt das ausgewählte Bild im Vollbildmodus 
an.

Wiedergabe / Diaschau (Taste Grün) : startet die 
Slideshow mit allen Dateien im Ordner.

 Optionen für Slideshow 


 Pause (Taste Gelb) : Pausiert die Slideshow.

Fortsetzen (Taste Grün) : Slideshow fortsetzen.

Vorige/Nächste (Tasten Links/Rechts) : Springt 
zur vorhergehenden oder nächsten Datei der 
Slideshow.

Drehen (Tasten Auf/Ab) : Drehen des Bilds mit den 
Tasten Auf/Ab.

Return/Back : Zurück zur Dateiliste.

Zufall (Taste Rot) : zeigt die Dateien im aktuellen 
Ordner in zufälliger Reihenfolge an. Das Symbol 

 dreht das markierte Symbol. Wird während der 

Slideshow der Zufallsmodus aktiviert, werden die 
folgenden Bilder zufällig angewählt (ist die Endlos-
Wiedergabe nicht aktiviert, stoppt die Slideshow am 
Ende. Ist die Endlos-Wiedergabe aktiviert, beginnt die 
Diaschau am Ende von Neuem).

E n d l o s   ( Ta s t e   B l a u ) :   D i e   D i a s c h a u   w i r d 
ständig fortgesetzt, und das Symbol  

 wird 

hervorgehoben.

Info : Aktiviert die Funktionsleiste. 

Videowiedergabe

W i e d e r g a b e   ( Ta s t e   R o t )   :   S t a r t e t   d i e 
Videowiedergabe.

Stop (Taste Blau) : Stoppt die Videowiedergabe.

Pause (Taste OK) : Pausiert die Videowiedergabe.

Rücklauf (Cursor nach links) : Startet den Rücklauf.

Vorlauf (Cursor nach rechts) : Startet den Vorlauf.

Menü (Taste M) : Stellt Untertitel/Audio ein.

• Sie können die Untertitel mit der Taste “

OK

” 

einstellen, bevor Sie die Wiedergabe starten, bzw. 
mit der Taste 

M

, während die Wiedergabe läuft.

Hinweis: 

-In einigen Fällen werden die gewählten Untertitel u. U. nicht 
richtig angezeigt. 

-Um DivX-Untertitel richtig anzeigen zu lassen, sollten Sie 
eine “Film-Untertitel”-Sprache festlegen. Siehe dazu den 

Abschnitt “Film-Untertitel” in “Spracheinstellungen”.

Drücken Sie “

STOP

”, um zum vorhergehenden Menü 

zurückzukehren.  

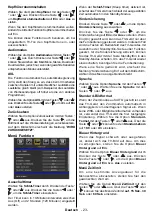
  Menüsystem Analog-TV 

  Menü Bild 


 Modus 

 Je nach Ihren Wünschen können Sie die entsprechende 
Option Modus einstellen.

Wählen Sie die Option  

Modus

  mit den Tasten “

” 

oder “ ”. Drücken Sie die Taste “ ” oder “ ”, um eine 
der folgenden Optionen auszuwählen:  


Natürlich,Ki

no

 ,

Benutzerdefi niert

 und    

Dynamisch

    .  

Wenn Sie die Option Benutzerdefiniert wählen, 
können Sie die Einstellungen nach Ihren Vorlieben 
durchführen.

Содержание TL-22LC883

Страница 1: ...BEDIENUNGSANLEITUNG MODE D EMPLOI OPERATING INSTRUCTIONS TL 22LC883 LCD FARBFERNSEHGERÄT LCD COLOR TELEVISION LCD TELEVISEUR EN COULEUR ...

Страница 2: ...tze und offenes Feuer 3 Gewitter 3 Ersatzteile 3 Servicearbeiten 3 Entsorgung 3 Informationen über die Entsorgung von Altgeräten und Batterien 4 Trennen des Geräts vom Netz 4 Kopfhörer Lautstärke 4 Installation 4 LCD Bildschirm 4 Warnhinweis 4 Anschluss an ein TV Verteilersystem Kabel TV etc vom Tuner aus 4 Sicherheitshinweise zum Betrieb des Gerätes 4 Übersicht über die Fernbedienung 5 LCD TV und...

Страница 3: ...itte lesen Sie dieses Handbuch sorgfältig durch bevor Sie das TV Gerät in Betrieb nehmen Bewahren Sie dieses Handbuch zur künftigen Verwendung sicher auf Dieses Gerät ist nur für den privaten Gebrauch bestimmt DiesesGerätdientzumEmpfangundzurAnzeigevonTV Programmen DieverschiedenenAnschlussmöglichkeiten ermöglichen eine Erweiterung der Empfangs und Anzeigequellen Receiver DVD Player DVD Recorder V...

Страница 4: ...beachten Sie die örtlichen Vorschriften bei der Entsorgung Sicherheitsvorkehrungen Lesen Sie bitte zu Ihrer eigenen Sicherheit die folgenden Sicherheitshinweise sorgfältig durch Stromquelle Das Gerät darf nur an einer Netzsteckdose mit 220 240 V Wechselspannung und einer Frequenz von 50 Hz betrieben werden Stellen Sie sicher dass Sie die richtige Spannung auswählen Netzkabel Stellen Sie keine Gege...

Страница 5: ...Frequenzbereich sicherstellt galvanischer Isolator siehe EN 60728 11 Mit dem Standby Ein Schalter kann das Gerät nicht vollständig vom Netz getrennt werden Außerdem verbraucht das Gerät auch im Standby Betrieb Strom Um das Gerät vollständig vom Netz zu trennen muss der Netzstecker aus der Steckdose gezogen werden Aus diesem Grund muss das Gerät so aufgestellt werden dass der ungehinderte Zugang zu...

Страница 6: ... links Subseiten im TXT modus 16 OK Auswahl Analog TV Modus Halten im 17 TXT Modus Kanalliste DTV Modus Cursor abwärts TXT untere seite 18 Menü Ein Aus 19 Cursor nach links 20 Vorhergehendes Programm 21 Auswahl Bildmodus 22 Programm zurück Programm weiter im DTV 23 Modus Stummschaltung 24 Lautstärke 25 Favoritenmodus im DTV Modus 26 Mono Stereo Dual I II Actuelle Sprache im 27 DTV Modus Bildgrösse...

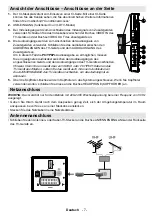
Страница 7: ...ngang verwenden um die YPbPr Signalverbindung zu einem Gerät mit Component Ausgabe herzustellen Schließen Sie das YPbPr PC Kabel zwischen dem PC EINGANG am TV Gerät PC INPUT und den Component Videoausgängen des Geräts an Über den 3 koaxialen Ausgang S PDIF wird das digitale Audiosignal der gerade aktiven Quelle ausgegeben Dolby D Audio wird nur im Medienbrowsermodus überbrückt An den RF Eingang wi...

Страница 8: ...es Audiokabel zwischen den Audioausgängen des angeschlossenen Geräts und den Audioeingängen des TV Geräts anschließen Hinweis Wenn Sie ein Gerät über ein VIDEO oder PC YPbPr Kabel an das TV Gerät anschließen sollten Sie das Gerät auch mit einem Audiokabel an die AUDIOEINGÄNGE des TV Geräts anschließen um das Audiosignal zu aktivieren Über die Kopfhörer Buchse wird ein Kopfhörer an das System anges...

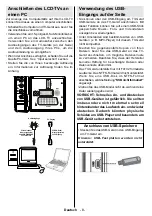
Страница 9: ...it dieser Funktion können Sie auf einem USB Stick gespeicherte Musik Foto und Videodateien anzeigen bzw wiedergeben Unter Umständen sind bestimmte Arten von USB Geräten z B MP3 Player mit diesem TV Gerät nicht kompatibel Machen Sie gegebenenfalls Kopien von Ihren Dateien bevor Sie das USB Gerät an das TV Gerät anschließen um mögliche Datenverluste zu vermeiden Beachten Sie dass der Hersteller kein...

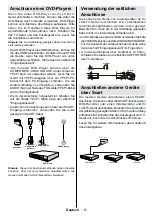
Страница 10: ...rnehmen Verwenden Sie wie unten gezeigt ein SCART Kabel YPbPr PC Adapterkabel optional Scart Anschluss Component Audioeingänge HDMI Eingang DVD Player Hinweis Diese drei Anschlussmethoden haben dieselbe Funktion aber auf verschiedenen Qualitätsstufen Sie müssen nicht alle drei Anschlussarten verwenden Verwendung der seitlichen Anschlüsse Sie können eine Reihe von Zusatzgeräten an Ihr LCD TV Gerät ...

Страница 11: ...haltet wird kann die LED blinken um anzuzeigen dass bestimmte Funktionen wie die Standby Suche Download über Antenne oder ein Timer aktiv sind Eingangsauswahl Wenn Sie externe Geräte an Ihr TV angeschlossen haben können Sie dieses auf unterschiedliche Eingabequellen schalten Drücken Sie die Taste SOURCE auf der Fernbedienung um die Quelle direkt zu ändern oder Wählen Sie die Option Quelle aus dem ...

Страница 12: ...wählen Sie Ihre Sprache aus die nacheinander in allen Sprachen im OSD Menü eingeblendet wird Markieren Sie mit den Tasten oder die gewünschte Sprache und drücken Sie die Taste OK Danach wird das OSD Menü Erstinstallation auf dem Bildschirm angezeigt Wählen Sie durch Drücken der Tasten oder die gewünschte Länderoption und drücken Sie die Taste OK für EU Länder Hinweis Das OSD Menü für die Länderaus...

Страница 13: ...gramme des vorhergehenden Tags an BLAUE Taste Nächster Tag zeigt die Programme des nächsten Tags an INFO Details Zeigt Details zu den Programmen an Zifferntasten Springen zur direkten Auswahl des bevorzugten Kanals über die Zifferntasten OK Suche nach der aktuellen Sendung Erinnerungen für bevorstehende Programme springt zur aktuellen Sendung Drücken Sie die Taste 0 auf der Fernbedienung um das Me...

Страница 14: ...ird nicht unterstützt In diesem Fall wird der TV Ton stummgeschaltet Enthält die Sendung einen AC3 Stream wird die folgende Warnmeldung auf dem Bildschirm angezeigt Ist kein Audiosignal verfügbar wird die folgende Warnmeldung auf dem Bildschirm angezeigt IDTV Menüsystem Drücken Sie die Taste M Das Hauptmenü wird angezeigt Kanalliste Markieren Sie mit den Tasten oder auf der Fernbedienung die erste...

Страница 15: ... Eingabepunkt zum nächsten vorigen Zeichen verschieben Über die Tasten oder können Sie das aktuelle Zeichen ändern So wird zum Beispiel das Zeichen b durch Drücken von zu einem a und durch Drücken von zu einem c Durch Drücken der Zifferntasten 0 9 können Sie das markierte Zeichen durch das Zeichen das über der Taste aufgedruckt ist austauschen Drücken Sie die Taste M um die Bearbeitung abzubrechen...

Страница 16: ... Die Beginnzeit wird über die Tasten Links Rechts und die Zifferntasten eingegeben Ende Die Endzeit wird über die Tasten Links Rechts und die Zifferntasten eingegeben Dauer Dauer zwischen Beginn und Endzeit Wiederholen Sie können die Wiederholung für den Timer auf Einmal Täglich oder Wöchentlich einstellen Ändern Löschen Damit können alle Änderungen für andere Benutzer erlaubt oder gesperrt werden...

Страница 17: ...der zu deaktivieren Drücken Sie die Taste um diese Funktion auf Ein oder Aus zu stellen Kanalliste Verwenden Sie die Tasten oder um zur Option Kanalliste Channel list zu gehen Verwenden Sie die Tasten oder um den Kanallisten Modus umzuschalten Wenn Sie hier über die Tasten oder die Option Nur TV wählen können Sie nur durch TV Kanäle navigieren Wenn Sie hier über die Tasten oder die Option Nur Radi...

Страница 18: ...it kann der Benutzer weder Kanäle hinzufügen löschen umbenennen verschieben noch Timereinstellungen vornehmen MENÜ INSTALLATION Damit wird das Menü Installation gesperrt damit der Benutzer keine Kanäle hinzufügen kann Die Änderungen werden übernommen nachdem das Menü Einstellungen verlassen wurde PIN einstellen Verwenden Sie die Tasten oder um zur Option PIN einstellen zu gehen Drücken Sie die Tas...

Страница 19: ...asten oder die EPG Sprache Aktuell Audio Wird die Audiosprache unterstützt können Sie diese durch Drücken der Tasten oder ändern Untertitel Wird die Untertitelsprache unterstützt können Sie diese durch Drücken der Tasten oder ändern Die gewählte Sprache wird für die Untertitel verwendet Hinweis Wenn die Option Land auf Dänemark Schweden Norwegen oder Finnland eingestellt ist funktioniert das Menü ...

Страница 20: ...hannel Search Bei der manuellen Suche wird die Nummer des Multiplexers manuell eingegeben und es wird nur dieser Multiplexer nach Kanälen durchsucht Für jede gültige Kanalnummer wird am unteren Rand des Bildschirms der Signalpegel und die Signalqualität eingeblendet Bei beiden Suchmöglichkeiten wird jeder bestehende Kanal in der Datenbank nicht noch einmal gespeichert damit es keine Duplikate gibt...

Страница 21: ... folgende Meldung eingeblendet wenn Sie ein USB Gerät anstecken Wählen Sie durch Drücken der Taste oder JA und drücken Sie die Taste OK Der Medienbrowser wird angezeigt Sie können die Musik Bild und Video Dateien von einem USB Speicherstick wiedergeben Hinweis Wenn Sie den USB Stick einstecken während sich das TV Gerät im analogen Modus befindet schaltet es automatisch in den Digital TV Modus um H...

Страница 22: ...l wird hervorgehoben Info Aktiviert die Funktionsleiste Videowiedergabe W i e d e r g a b e Ta s t e R o t S t a r t e t d i e Videowiedergabe Stop Taste Blau Stoppt die Videowiedergabe Pause Taste OK Pausiert die Videowiedergabe Rücklauf Cursor nach links Startet den Rücklauf Vorlauf Cursor nach rechts Startet den Vorlauf Menü Taste M Stellt Untertitel Audio ein Sie können die Untertitel mit der ...

Страница 23: ...ie die Option Bildzoom durch Drücken der Taste oder aus Verwenden Sie die Tasten oder um den Bildzoom auf zu Auto 16 9 oder 4 3 stellen Zurücksetzen Wählen Sie die Option Zurücksetzen mit den Tasten oder aus Drücken Sie die Taste um die Bildmodi auf die Werkseinstellungen zurückzusetzen Auf dem Bildschirm erscheint die Meldung WIRD ZURÜCKGESETZT Menü Ton Lautstärke WählenSiedieOptionLautstärkemitd...

Страница 24: ... Modus Kindersicherung Drücken Sie die Taste oder um die Option Kindersicherung auszuwählen Drücken Sie die Taste oder um die Kindersicherung auf Ein oder Aus zu stellen Wenn Ein On gewählt wird kann das TV Gerät nur über die Fernbedienung gesteuert werden In diesem Fall sind die Tasten am Bedienfeld des TV Gerätes mit Ausnahme der Standby Ein Taste außer Funktion gesetzt Ist die Kindersicherung a...

Страница 25: ...aste oder eine Quelle und wechseln Sie in diesen Modus indem Sie die Taste OK drücken Optionen für Quelle sind TV DTV USB EXT FAV HDMI YPbPr oder PC VGA Mit den Tasten oder können Sie auf Ein oder Aus schalten Wird Aus gewählt erscheint die Quelle nicht im OSD wenn Sie die Taste AV Source auf der Fernbedienung drücken Hinweis Wenn Sie optionale Geräte an Ihr TV Gerät angeschlossen haben müssen Sie...

Страница 26: ...der um die anderen Buchstaben auszuwählen Speichern Sie den Namen indem Sie die Taste ROT drücken Verschieben Sortieren Wählen Sie das Programm das Sie verschieben wollen über die Navigationstasten aus Drücken Sie die Taste GRÜN Verschieben Sie das ausgewählte Programm mit Hilfe der Navigationstasten zum gewünschten Programmplatz und drücken Sie erneut die Taste GRÜN Löschen Delete Drücken Sie die...

Страница 27: ...Bild auf dem Bildschirm kommen In diesem Fall können Sie mit dieser Option durch mehrmalige Versuche ein klareres Bild erhalten Wählen Sie die Option Phase mit den Tasten oder aus Verwenden Sie die Taste oder um den Wert einzustellen Pixelfrequenz Die Einstellung Pixelfrequenz korrigiert Störungen die als vertikale Streifen bei pixelintensiven Darstellungen wie Tabellen oder Absätzen in kleinen Sc...

Страница 28: ... Signals nicht richtig funktioniert oder wenn Sie den ZOOM Modus selbst ändern wollen können Sie manuell zu einem anderen ZOOM Modus wechseln manually 16 9 Hier kann man die linke und die rechte Seite eines normalen Bildes Bildseitenformat 4 3 gleichmäßig ausdehnen um die Breite des TV Bildschirms auszufüllen Für Bilder mit einem Bildseitenverhältnis von 16 9 die zu einem normalen Bild Bildseitenv...

Страница 29: ... hohe Gebäude können dazu führen dass Bilder doppelt dargestellt werden oder Geisterbilder entstehen Manchmal können Sie die Bildqualität verbessern indem Sie dieAntenne anders ausrichten Kann das Bild bzw der Text kaum erkannt werden Überprüfen Sie ob Sie die richtige Frequenz eingegeben haben Bitte stellen Sie die Kanäle neu ein Die Bildqualität kann sich verschlechtern wenn zwei Zusatzgeräte gl...

Страница 30: ...andard Hor Ver Ver Hz Hor KHz 1 640 480 60 31 5 VESA 2 640 480 72 37 9 VESA 3 640 480 75 37 5 VESA 4 800 600 56 35 2 VESA 5 800 600 60 37 9 VESA 6 800 600 70 43 8 7 800 600 72 48 1 VESA 8 800 600 75 46 9 VESA 9 832 624 75 49 7 MAC 10 1024 768 60 48 4 VESA 11 1024 768 70 56 5 VESA 12 1024 768 72 57 7 13 1024 768 75 60 0 14 1152 864 75 67 5 VESA 15 1152 870 75 68 9 MAC 16 1280 768 60 47 7 VESA 17 13...

Страница 31: ...DMI 1 480I 60Hz O 480P 60Hz O 576I 50Hz O 576P 50Hz O 720P 50Hz O 720P 60Hz O 1080I 50Hz O 1080I 60Hz O 1080P 24Hz X 1080P 25Hz X 1080P 30HZ X 1080P 50HZ O 1080P 60HZ O X Nicht möglich O Möglich Hinweis In einigen Fällen kann unter Umständen ein Signal nicht richtig auf dem LCD Schirm angezeigt werden Das Problem kann durch eine Inkompatibilität in den Standards des Quellgeräts verursacht werden D...

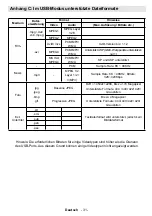
Страница 32: ...sik PCM Sample Rate 8K 48KHz mp3 MPEG 1 2 Layer 1 2 3 MP3 Sample Rate 8K 48KHz Bitrate 32K 320Kbps Foto jpg jpeg bmp gif Baseline JPEG BxH 14592x12288 Bis zu 179 Megapixel Unterstützte Formate 444 440 422 420 Graustufen Progressive JPEG Bis zu 4 Megapixel Unterstützte Formate 444 440 422 420 Graustufen Ext Untertitel srt Textdateiformat wird unterstützt jedoch kein Bilddateiformat smi sub psb ass ...

Страница 33: ...DVB T MPEG2 Demodulation COFDM mit 2K 8K FFT Modus FEC alle DVB Modi Video MP ML PAL 4 3 16 9 Audio MPEG Layer I II 32 44 148kHz ANZAHL DER VOREINGESTELLTEN KANÄLE 200 KANALANZEIGE Bildschirmanzeige RF ANTENNENEINGANG 75 Ohm nicht geregelt BETRIEBSSPANNUNG 220 240V AC 50 Hz AUDIO Deutsch Nicam Stereo AUDIO AUSGANGSLEISTUNG WRMS 10 THD 2 x 2 5 LEISTUNGSAUFNAHME W 60 W max 1 W Standby PANEL 22 Breit...

Страница 34: ...USB 63 Spécifications 64 Contenu du carton 34 Caractéristiques 34 Introduction 34 Préparation 34 Précautions de sécurité 35 Source d alimentation 35 Cordon d alimentation 35 Humidité et eau 35 Nettoyage 35 Ventilation 35 Chaleur et flammes 35 Foudre 35 Pièces de rechange 35 Maintenance 35 Mise au rebut 35 Informations applicables aux utilisateurs concernant la mise au rebut de l ancien appareil et...

Страница 35: ...iée de votre téléviseur Lisez le minutieusement avant de procéder à l utilisation de votre appareil Veuillez le conserver dans un endroit sûr car vous pourrez à nouveau en avoir besoin Le présent appareil est réservé uniquement à une utilisation privée Le présent appareil a été conçu pour recevoir et afficher les programmes de télévision Les différentes options de connexion offrent une possibilité...

Страница 36: ...Précautions de sécurité Lisez les consignes de sécurité recommandées ci après pour votre sécurité Source d alimentation Ce téléviseur ne doit fonctionner qu à partir d une prise de courant 220 240 V AC 50 Hz Assurez vous de sélectionner la tension appropriée pour votre convenance Cordon d alimentation Ne placez pas l appareil ni une pièce de mobilier etc sur le cordon d alimentation alimentation s...

Страница 37: ... galvanique voir EN 60728 11 Le bouton Veille Marche ne sépare pas complètement cet appareil du secteur De plus l appareil continue de consommer de l électricité en mode veille Pour couper complètement l alimentation de l appareil du secteur débranchez sa fiche de la prise secteur Pour cette raison l appareil doit être installé de manière à garantir un libre accès à la prise secteur de sorte la fi...

Страница 38: ...XT 16 OK Sélectionner Mode TV analogique 17 Retenir en mode TXT Liste des chaînes mode DTV Curseur vers le bas TXT vers le bas de la 18 page Menu Marche Arrêt 19 Touche directionnelle gauche 20 Programme Précédent 21 Sélection du mode Image 22 Programme suivant Page précédente en 23 mode DTV Muet 24 Baisser le volume 25 Mode favori en mode DTV 26 Mono stéréo Dual I II Langue courante en 27 mode DT...

Страница 39: ...cter une vidéo en composantes Vous pouvez utiliser une entrée PC pour connecter YPbPr à un appareil doté d une sortie du composant Connectez le câble YPbPr sur celui du PC entre l ENTREE PC du téléviseur et les sorties vidéo composite de votre appareil La 3 Sortie coaxiale S PDIF envoie les signaux audio numériques de la source en cours Le Dolby D Audio est en mode Bypass pendant le mode Navigateu...

Страница 40: ...Pr en pareille situation utilisez un câble audio approprié entre les sorties audio de l appareil et les entrées audio du téléviseur Remarque Si vous branchez un périphérique au téléviseur via l ENTRÉE VIDÉO ou le câble PC YPbPr vous devez également brancher votre périphérique à l aide d un câble audio aux ENTRÉES AUDIO AUDIO INPUTS du téléviseur pour activer le son La prise jack du casque s utilis...

Страница 41: ...e la possibilité d afficher de lire les fichiers musicaux photographiques ou vidéos enregistrés sur un support USB Il est possible que certains types de périphériques USB à l exemple des lecteurs MP3 soient incompatibles avec ce téléviseur Vous pouvez sauvegarder vos fichiers avant d effectuer tout branchement au téléviseur afin d éviter de probables pertes de données Veuillez remarquer que la res...

Страница 42: ...comme présenté dans l illustration Prise scart YPbPr vers le câble du PC Facultatif Entrées audio du composant Entrée HDMI HDMI input Lecteur DVD Remarque Ces procédés de branchement réalisent la même fonction mais à des niveaux de qualité différents Il n est pas nécessaire d effectuer la connexion en recourant à toutes les trois méthodes Utilisation des connecteurs AV latéraux Vous pouvez branche...

Страница 43: ... mode veille téléchargement automatique ou Minuterie sont actives Sélection d entrée Une fois les équipements externes connectés à votre téléviseur vous pouvez commuter entre différentes sources d entrée Appuyez sur la touche SOURCE de la télécommande pour changer les sources en direct ou Sélectionnez l option Source à partir du menu principal en utilisant le bouton ou Puis utilisez les touches ou...

Страница 44: ...ues sur le menu de l écran Sélectionnez la langue de votre choix avec les touches ou puis appuyez sur la touche OK Ensuite le menu Première installation s affiche à l écran En appuyant sur les boutons ou sélectionnez le pays que vous voulez et appuyez sur le bouton OK Pour les pays de l UE Remarque L OSD Sélection du pays Country selection ne sera pas disponible pour le RU Pressez le bouton OK sur...

Страница 45: ...our suivant affiche les programmes du jour suivant INFO Détails affiche les programmes dans les moindres détails Boutons numériques Sauter aller directement à la chaîne préférée via des boutons numériques OK Affichage de diffusions en cours rappel de programmes à venir saute sur la diffusion en cours Appuyez sur la touche 0 de la télécommande pour afficher le menu Recherche du guide Vous pouvez à ...

Страница 46: ...as le son en provenance du téléviseur sera coupé Si la diffusion intègre le flux AC3 le message d avertissement ci après s affichera à l écran Si la diffusion intègre le flux AC3 le message d avertissement ci après s affichera à l écran Système de menu IDTV Appuyez sur le bouton M Le menu principal s affichera Liste des chaînes Àl aidelatouche ou delatélécommande veillez à ce que le premier élémen...

Страница 47: ...qu illustré ci dessous Pressez le bouton OK pour activer la fonction de changement de nom Presser maintenant le bouton ou déplace vers le caractère précédent ou suivant En appuyant sur les touches ou vous changez le caractère en surbrillance par exemple le b devient un a ou un c En appuyant sur les touches numériques de 0 à 9 vous remplacez le caractère en surbrillance par les caractères marqués a...

Страница 48: ...ez l élément à partir du menu principal Pour ajouter une minuterie appuyez sur le bouton JAUNE de la télécommande La fenêtre Ajouter un minuteur s affiche alors Mode Sélectionne le mode Liste des chaînes Chaîne Lestouches ou permettrontàl utilisateur de parcourir la liste des programmes TV ou radio Date Ladatededébutestsaisievialesboutonsgauche droite et via les boutons numériques Démarrage L heur...

Страница 49: ...ètres de votre téléviseur Sélectionnez Configuration à partir du menu Configuration et pressez OK pour afficher ce menu Pressez le bouton RETURN sur la télécommande pour sortir Faible son pour les pays de l UE uniquement en option Utilisez le bouton ou pour sélectionner l option Malentendant et appuyez ensuite sur le bouton ou pour activer ou désactiver ce paramètre Si le diffuseur active un quelc...

Страница 50: ... le verrouillage du menu vous pouvez paramétrer le verrouillage de tous les menus ou du menu d installation pour restreindre l accès à ces menus Si le verrouillage du menu est désactivé l accès au système de menu sera libre Utilisez le bouton ou pour aller sur l option Verrouillage du menu Utilisez le bouton ou pour choisir le mode de verrouillage du menu DÉSACTIVÉ Tous les menus sont déverrouillé...

Страница 51: ...res utilisez ce paramètre pour sélectionner une langue de sous titrage de film En appuyant sur le bouton ou sélectionnez l option de langue désirée Guide Pressez le bouton ou pour changer la langue du guide En cours Audio si la langue audio est prise en charge changez la en pressant le bouton ou Sous titrage si le sous titrage est supporté changez la langue des sous titres avec le bouton ou La lan...

Страница 52: ...t à l écran Dans le tableau des programmes vous verrez les numéros et les noms assignés à ces programmes Recherche de chaînes En balayage de chaîne manuel le numéro de multiplexage est saisi manuellement et seul ce multiplexage de programmes est utilisé pour la recherche de chaîne Pour chaque numéro de chaîne valide le niveau du signal et la qualité du signal sont affichés à l écran Tant en mode m...

Страница 53: ...ur la touche OK pour continuer Le contenu du menu Navigateur média selon le contenu de votre lecteur USB s affiche De même lorsque vous branchez un périphérique USB l écran ci après s affiche Sélectionnez OUI YES en appuyant sur la touche ou et sur OK Le navigateur média s affiche Vous pouvez lire des fichiers de musique d image et vidéo à partir d une carte mémoire USB Remarque Si vous branchez u...

Страница 54: ...ntinue en arrêt et l icône devient soulignée Info active la barre des opérations Lecture Vidéo Lecture Bouton Rouge Démarre la lecture vidéo Stop Bouton Bleu Arrête la lecture vidéo Pause Bouton OK Pause la lecture vidéo Rembobiner Touche directionnelle gauche Revient en arrière Réglage vers l avant Touche directionnelle droit Avance Menu Touche M Règle le sous titre Audio Vous pouvez régler les s...

Страница 55: ... se trouve sur la télécommande n aura aucune fonction tant que le mode Jeu est activé Zoom image Sélectionnez Zoom image en pressant le bouton ou Utilisez les boutons ou pour changer le zoom d image sur Auto 16 9 et 4 3 Réinitialisation Pressez le bouton ou pour sélectionner Réinitialisation Appuyez sur la touche pour réinitialiser les modes Image aux valeurs par défaut réglées en usine L indicati...

Страница 56: ...ton ou pour sélectionner l activation ou la désactivation du verrouillage parental Lorsque Marche On est sélectionné le téléviseur ne peut être contrôlé que par télécommande Dans ce cas les boutons du panneau de contrôle ne fonctionneront pas en dehors du bouton Veille Marche Lorsque le verrouillage enfants est activé vous pouvez faire passer le téléviseur en mode Veille en appuyant sur le bouton ...

Страница 57: ...lorsque vous appuyez sur la touche AV Source de la télécommande Remarque Une fois que vous avez branché des systèmes en option à votre télé vous devez sélectionner l entrée requise pour visualiser les images à partir de cette source Remarque Vous pouvez recourir au mode YPbPr uniquement lorsque vous raccordez un appareil doté d une sortie YPbPr à travers l entrée PC avec le câble YPbPr pour PC Le ...

Страница 58: ...ton JAUNE En appuyant de nouveau sur le bouton JAUNE YELLOW vous supprimez le programme sélectionné de la liste de programmes et les programmes montent d une place APS Système d auto programmation Quand vous pressez la touche BLEUE pour démarrer le réglage automatique le Menu du Système d auto programmation APS apparaît à l écran Appuyez sur le bouton pour sélectionner votre pays Si vous voulez qu...

Страница 59: ...pour sélectionner la deuxième icône Le menu image PC apparaît à l écran Les réglages du contraste de la luminosité de la température de couleur et du Mode jeu dans ce menu sont les mêmes que les réglages dans le menu image TV du Système de Menu TV analogique Remarque Si vous réglez la température de couleur sur Utilisateur vous pouvez définir les paramètres R V B manuellement Les options Son Fonct...

Страница 60: ...git ici de sa taille originale Télétexte Le système Télétexte est disponible si votre diffuseur le prend en charge Le télétexte transmet des informations portant sur l actualité le sport et la météo sur votre téléviseur Remarquez que le signal diminue par exemple dans des climats modestes certaines erreurs de texte peuvent apparaître ou le mode de télétexte peut être annulé Les boutons de fonction...

Страница 61: ...nt la direction de l antenne Est ce que l image ou le télétexte sont méconnaissables Vérifiez si vous avez introduit la fréquence appropriée Veuillez régler à nouveau les chaînes La qualité d image peut se dégrader lorsque deux périphériques sont connectés au téléviseur en même temps Dans un tel cas déconnectez l un des périphériques Aucune image Est ce que l antenne est correctement branchée Est ...

Страница 62: ...Résolution Fréquence Norme Hor Ver Ver Hz Hor KHz 1 640 480 60 31 5 VESA 2 640 480 72 37 9 VESA 3 640 480 75 37 5 VESA 4 800 600 56 35 2 VESA 5 800 600 60 37 9 VESA 6 800 600 70 43 8 7 800 600 72 48 1 VESA 8 800 600 75 46 9 VESA 9 832 624 75 49 7 MAC 10 1024 768 60 48 4 VESA 11 1024 768 70 56 5 VESA 12 1024 768 72 57 7 13 1024 768 75 60 0 14 1152 864 75 67 5 VESA 15 1152 870 75 68 9 MAC 16 1280 76...

Страница 63: ...080P 60Hz O HDMI 1 480I 60Hz O 480P 60Hz O 576I 50Hz O 576P 50Hz O 720P 50Hz O 720P 60Hz O 1080I 50Hz O 1080I 60Hz O 1080P 24Hz X 1080P 25Hz X 1080P 30HZ X 1080P 50HZ O 1080P 60HZ O X Non disponible O Disponible Remarque Dans certains cas un signal sur l écran du téléviseur LCD peut ne pas s afficher correctement Le problème peut être une incompatibilité avec les normes de l équipement source DVD ...

Страница 64: ...équence de test 8K 48KHz mp3 MPEG 1 2 Layer 1 2 3 MP3 Fréquence de test 8K 48KHz Débit binaire 32K 320Kbps Photo jpg jpeg bmp gif JPEG de base WxH 14592x12288 jusqu à 179 Mega pixel Format du support 444 440 422 420 Echelle de gris JPEG Progressif Jusqu à 4 méga pixels Format du support 444 440 422 420 Echelle de gris Sous titres externes srt Prend en charge le format du fichier Texte mais ne pren...

Страница 65: ...ransmission DVB T MPEG 2 Démodulation COFDM avec mode 2K 8K FFT FEC tous les modes DVB Vidéo MP ML PAL 4 3 16 9 Audio MPEG Layer I II 32 44 148kHz NOMBRE DE CANAUX PRÉRÉGLÉS 200 INDICATEUR DE CHAÎNE Affichage à l écran ENTRÉE D ANTENNE RF 75 Ohms Non équilibré TENSION DE FONCTIONNEMENT 220 240V AC 50 Hz AUDIO Allemand Nicam Stéréo PUISSANCE DE SORTIE AUDIO WRMS 10 THD 2 x 2 5 CONSOMMATION ÉLECTRIQ...

Страница 66: ...67 Servicing 67 Waste Disposal 67 Information for Users on Disposal of old Equipment and Batteries 67 Disconnecting the Device 68 Headphone Volume 68 Installation 68 LCD Screen 68 Warning 68 Connection to a Television Distribution System Cable TV etc from Tuner 68 Safety Instructions for the Operation of the Appliance 68 Overview of the Remote Control 69 LCD TV and Operating Buttons 70 Viewing the...

Страница 67: ...t This manual will guide you for the proper operation of your TV Before operating the TV please read this manual thoroughly Please do keep this manual in a safe place for future references This set is intended for private use only This device is intended to receive and display TV programs The different connection options make an additional expansion of the reception and display sources possible re...

Страница 68: ...lowing recommended safety precautions carefully for your safety Power Source The TV set should be operated only from a 220 240 V AC 50 Hz outlet Ensure that you select the correct voltage setting for your convenience Power Cord Do not place the set a piece of furniture etc on the power cord mains lead or pinch the cord Handle the power cord by the plug Do not unplug the appliance by pulling from t...

Страница 69: ...from mains the mains plug has to be pulled from the mains socket Because of that the device should be set up in a way that an unobstructed access to mains socket is guaranteed so that in case of emergency the mains plug can be pulled immediately To exclude the danger of fi re the power cord should principally be separated from the mains socket prior to a longer period of non usage i e during vacat...

Страница 70: ...wn in DTV mode 11 AV Source selection 12 Info Reveal in TXT mode 13 Return Exit in DTV mode Index page in 14 TXT mode Cursor up TXT up page 15 Cursor right Subpage in TXT mode 16 OK Select analogue TV mode Hold in TXT 17 mode Channel List DTV mode Cursor down TXT down page 18 Menu on off 19 Cursor left 20 Previous Programme 21 Picture mode selection 22 Programme down Page up in DTV mode 23 Mute 24...

Страница 71: ... YPbPr signal connection with a device that has component output Connect the YPbPr to PC cable between the PC INPUT on the TV and the component video outputs of your device S PDIF Coaxial Out 3 outputs digital audio signals of the currently watched source Dolby D Audio is bypassed while in media browser mode only RF Input connects to an antenna or a cable system 4 Note that if you use a media reco...

Страница 72: ...PbPr sound connection in such a case use an appropriate audio cable between the connected device s audio outputs and the TV s audio inputs Note If you connect a device to the TV via the VIDEO or PC YPbPr cable you should also connect your device with an audio cable to the AUDIO INPUTS of the TV to enable audio Headphone jack is used for connecting an external headphone to the system 5 Connect to t...

Страница 73: ...y using the USB input of the TV This feature allows you to display play music photo or video files stored in a USB stick It is possible that certain types of USB devices e g MP3 Players may not be compatible with this TV You may back up your files before making any connections to the TV set in order to avoid any possible data loss Note that manufacturer will not be responsible for any file damage ...

Страница 74: ...socket Use a SCART cable as shown below HDMI input Scart socket YPbPr to PC cable optional Component audio inputs DVD Player Note These methods of connection perform the same function but in different levels of quality It is not necessary to connect by all three methods Using Side AV Connectors You can connect a range of optional equipment to your LCD TV Possible connections are shown below Note t...

Страница 75: ... indicate that features such as Standby Search Over Air Download or Timer is active Input Selection Once you have connected external systems to your TV you can switch to different input sources Press SOURCE button on your remote control for directly changing sources or Select Source option from the main menu by using or button Use then or button to highlight an input and press button to select Not...

Страница 76: ... on the remote control to continue and the following message will be displayed on the screen To select the Yes or No option highlight the item by using or buttons and press the OK button The IDTV will automatically tune to the UHF or VHF for EU countries transmission channels searching for digital terrestrial TV broadcasts and displaying the names of channels found This process will take about a f...

Страница 77: ... Subtitle item in Language settings menu and use or button to set Subtitle to the desired language Note You can enable subtitles by pressing the SUBTITLE button of the remote control Press SUBTITLE button again to disable subtitle function If Subtitle is on and a language option is set pressing the button causes the following warning message display on the screen for UK only Digital Teletext for U...

Страница 78: ...s highlighted by using or button Then the name and number of the selected channel will be displayed in the top left and top right of the channel display at the top right of the screen respectively Moving the channels in the channel list Press or buttons to select the channel that will be moved Press or buttons to select the Move item on Channel List menu Following OSD will be displayed next to OK ...

Страница 79: ...Enter the password by using the numeric buttons on the remote control The lock icon will now be displayed next to the selected channel Repeat the same operation to cancel the lock Setting Favourites To set a favourite you should highlight the Favourites item at the bottom of the Channel List menu Then press OK button and Edit Favourite List menu appears on the screen How to Add a Channel to a Favo...

Страница 80: ...serted Connect the TV to the mains supply switch on and then wait for few moments until the card is activated SomeCAMsmayrequirethefollowingsetup Pleaseset theCAMbyenteringtheIDTVmenu ConditionalAccess then pressing the OK button CAM set up menu is not displayed when it is not required Toseetheviewingcontractinformation enterIDTV press the M button then highlight Conditional Access and press the O...

Страница 81: ...splayed The key is set to 0000 initially Enter PIN If it is incorrect Wrong Pin OSD will be displayed If it is correct the Parental Control menu will be displayed Maturity Lock optional If you set Country option as UK in the first time installation Maturity Lock option will not be visible This setting is available only for EU countries When set this option gets the maturity information from the br...

Страница 82: ...ilable Otherwise the current settings will be used Audio by pressing or keys change the audio language Subtitle alter the subtitle language with or keys The chosen language will be seen in subtitles Movie Subtitle optional In order to display subtitles properly use this setting to select a movie subtitle language By pressing or button select the desired language option Guide By pressing or buttons...

Страница 83: ... the programme numbers and names assigned to the programmes Channel Search In manual channel scan the number of the multiplex is entered manually and only that multiplex is searched for the channels For each valid channel number signal level and signal quality are shown on the screen In both manual and auto search any existing channel in the database is not re stored to avoid redundant duplicates ...

Страница 84: ...ES by pressing or button and press OK button Media browser will be displayed You can play music picture and video files from a USB memory stick Note If you plug USB stick while in analogue mode the TV will automatically switch to digital TV mode Note Some USB compliant devices may not be supported Note If the USB stick is not recognized after power off on or First Time Installation first plug the ...

Страница 85: ...you should set a Movie Subtitle language See the section Movie Subtitle in Language Settings for selecting Movie Subtitle language Press STOP button to switch back to previous menu Analogue TV Menu System Picture Menu Mode For your viewing requirements you can set the related mode option Press or button to select Mode Press or button to choose from one of these options Natural Cinema User and Dyna...

Страница 86: ...ancelevel can be adjusted between 50 and 50 Headphone Mute Press or buttontoselectHeadphoneMute Press or button to set Headphone Mute as On or Off If you want to mute Headphone sound please change to Headphone Mute function to On Also when the TV is in mute you can use this feature to activate or deactivate headphone sound Sound Mode Press or buttontoselectSoundMode Using or button youcanselectMon...

Страница 87: ...sec or 60 sec TXT Teletext Language Press or button to select TXT Language Use or button to change TXT Language to West East Cyrillic Turk Gre Arabic or Persian Ext Out Press or button to select Ext Out Use or button to set the Ext Out as On or Off Note For copying from a DVD or VCR device you should choose desired source from source menu and turn On to EXT Out from feature menu Ext Out should be ...

Страница 88: ... see all the programmes in TV mode except for the AV modes By cursor action programme selection is done automatically Name To change the name of a programme select the programme and press the RED button The first letter of the selected name will be highlighted Press or button to change that letter and or button to select the other letters By pressing the RED button you can store the name Move Sele...

Страница 89: ...by using or buttons Use or button to adjust the value PC VGA Picture Menu For adjusting PC picture items do the following Press or button to select the second icon PC Picture menu appears on the screen Contrast Brightness Colour Temperature and Game Mode settings in this menu are identical to settings defined in TV picture menu under Analogue TV Menu System Note If you set Colour Temp as User you ...

Страница 90: ...e that if the signal degrades for example in poor adverse weather conditions some text errors may occur or the teletext mode may be aborted Teletext function buttons are listed below Teletext Mix Activates teletext mode when pressed once Press again to place the teletext screen over the programme mix Pressing again will quit the teletext mode RETURN Index Selects the teletext index page Subcode Pa...

Страница 91: ...ay degrade when two peripherals are connected to the TV at the same time In such a case disconnect one of the peripherals No Picture Is the aerial connected properly Are the plugs connected tightly to the aerial socket Is the aerial cable damaged Are suitable plugs used to connect the aerial If you are in doubt consult your dealer No Picture means that your TV is not receiving a transmission Have ...

Страница 92: ... Ver Ver Hz Hor KHz 1 640 480 60 31 5 VESA 2 640 480 72 37 9 VESA 3 640 480 75 37 5 VESA 4 800 600 56 35 2 VESA 5 800 600 60 37 9 VESA 6 800 600 70 43 8 7 800 600 72 48 1 VESA 8 800 600 75 46 9 VESA 9 832 624 75 49 7 MAC 10 1024 768 60 48 4 VESA 11 1024 768 70 56 5 VESA 12 1024 768 72 57 7 13 1024 768 75 60 0 14 1152 864 75 67 5 VESA 15 1152 870 75 68 9 MAC 16 1280 768 60 47 7 VESA 17 1366 768 60 ...

Страница 93: ...50Hz O 1080P 60Hz O HDMI 1 480I 60Hz O 480P 60Hz O 576I 50Hz O 576P 50Hz O 720P 50Hz O 720P 60Hz O 1080I 50Hz O 1080I 60Hz O 1080P 24Hz X 1080P 25Hz X 1080P 30HZ X 1080P 50HZ O 1080P 60HZ O X Not Available O Available Note In some cases a signal on the LCD TV may not be displayed properly The problem may be an inconsistency with standards from the source equipment DVD Set top box etc If you do exp...

Страница 94: ...upport SP and ASP Music PCM Sample Rate 8K 48KHz mp3 MPEG 1 2 Layer 1 2 3 MP3 Sample Rate 8K 48KHz Bit Rate 32K 320Kbps Photo jpg jpeg bmp gif Baseline JPEG WxH 14592x12288 Up to 179 Mega pixel Support format 444 440 422 420 Grayscale Progressive JPEG Up to 4 Mega pixel Support format 444 440 422 420 Grayscale External Subtitles srt Support Text File Format but do not support Picture File Format s...

Страница 95: ... Transmission standard DVB T MPEG 2 Demodulation COFDM with 2K 8K FFT mode FEC all DVB modes Video MP ML PAL 4 3 16 9 Audio MPEG Layer I II 32 44 148kHz NUMBER OF PRESET CHANNELS 200 CHANNEL INDICATOR On Screen Display RF AERIAL INPUT 75 Ohm unbalanced OPERATING VOLTAGE 220 240V AC 50 Hz AUDIO German Nicam Stereo AUDIO OUTPUT POWER WRMS 10 THD 2 x 2 5 POWER CONSUMPTION W 60 W max 1 W Standby PANEL...

Страница 96: ... Ihres Gerätes oder den Austausch gegen ein gleichwertiges Gerät die bei uns anfallenden Arbeitslöhne Materialkosten und die Transportkosten des Gerätes innerhalb der Schweiz 5 Zur Geltendmachung Ihrer Beanstandung setzen Sie sich bitte mit folgender Servicenummer in Verbindung Es wird empfohlen die Originalverpackung aufzubewahren um im Garantiefalle einen sicheren Transport des Gerätes zu gewähr...

Страница 97: ...ischen Defekt aufweist bei Pixelfehlern die innerhalb der in der ISO Norm 13406 2 festgelegten Pixelfehlerklasse II Toleranzen liegen 10 Die Garantie umfasst keine weitergehende Haftung unsererseits ins besondere keine Haftung für Schäden die nicht am Gerät selbst ent standen sind oder die durch den Ausfall des Gerätes bis zur Instandsetzung entstehen z B Wegekosten Handlingskosten etc Hierdurch w...

Страница 98: ...galement les coûts de travail ainsi que les frais de matériaux et de transport de l appareil sur le territoire de la Suisse 5 En cas de réclamation veuillez contacter notre service après vente au numéro suivant Nous vous recommandons de conserver l emballage d origine afin de pro téger l appareil pendant le transport Nous vous conseillons de joindre une brève description de votre réclamation afin ...

Страница 99: ...uts de pixels tolérés par la norme ISO 13406 2 classe II de défauts de pixels 9 La garantie exclut toute autre responsabilité de notre part en particulier pour les dommages qui ne concernent pas directement l appareil ou qui sont survenus entre la panne de l appareil et sa réparation par exemple coûts d in frastructure de manutention etc Cependant ceci ne limite ou n exclut pas notre responsabilit...

Страница 100: ...ugual valore le nostre tariffe lavorative i costi del materiale e le spese di trasporto dell apparecchio all interno della Svizzera 5 Per far valere il proprio reclamo mettersi in contatto con il seguente numero del servizio di assistenza Si consiglia di conservare l imballaggio originale al fine di poter trasportare in modo sicuro l apparecchio nell evenienza che venga presentato un reclamo legit...

Страница 101: ... compresi nelle tolleranze stabilite dalla norma ISO 13406 2 Classe II 10 La garanzia non prevede alcuna responsabilità da parte nostra che vada oltre allo specificato In particolare la garanzia non prevede alcuna responsabilità per danni che non si sono verificati direttamente sull ap parecchio o che a causa del guasto dell apparecchio si verificano fino al momento della riparazione ad es costi d...

Страница 102: ...50170364 ...
Отзывы: