background image

- 25 -

3) Group 2/3 (forward-facing)

(For children weighing 15–36 kg)

1.  Follow the installation steps 1 to 4 in Point 2 (Group 1, forward-facing).
2. Now  thread  the  diagonal  belt  through  the  car’s  3-point  belt  guide  on  the


head support of the child car seat.

3. 

When placing your child in the child car seat, turn the car seat towards the car door for con

-

venience.

4. Put your child in the child car seat.
5. Adjust  the  height  of  the  head  support  so  that  the  child’s  head  is  completely  posi

-

tioned in the 

head support and the diagonal belt exits the belt guide at the 

child’s shoulder height.

6. 

 Turn the seat into the forward-facing position. Check whether the child car seat is locked in 

this position.

7.  Close the belt buckle of the car’s 3-point belt again until you hear a click.
8. Pull the diagonal strap in order to tighten it. Please ensure that the straps are not twisted.

9. 

The child car seat may only be used in seat position 1 for this age group.

INFORMATION:

FIRST, 

REMOVE 

THE 

BELT 

SYSTEM 

AS 

PREVIOUSLY 

DESCRIBED.


THE SUPPORT LEG MUST BE RETRACTED AND MUST NOT TOUCH THE CAR FOOTWELL. THE 
SUPPORT LEG INDICATOR MUST THEREFORE SHOW RED.

EN

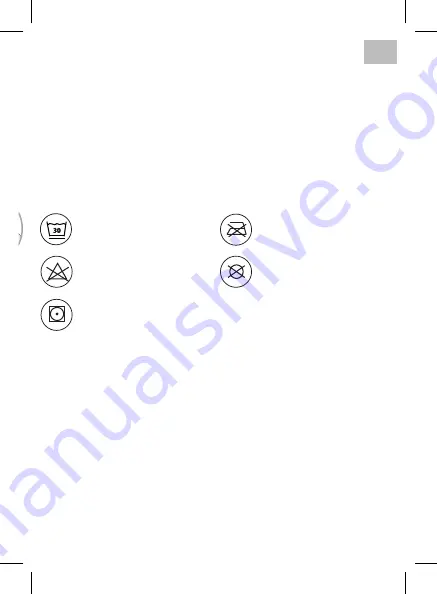
CLEANING

This product has been developed taking into account safety, comfort and functionality. Please 
take  the  time  to  read  these  instructions  carefully  before  using  the  product  and  retain  these 

instructions for future reference.

To ensure that your child car seat remains in a good condition for a long time, please refrain 
from using solvents or abrasive or aggressive cleaning products to clean it. After washing, al

-

ways check that the fabric and stitching is not damaged. Please only ever wash the cover in 
accordance with the instructions on the label (see below).

CARE

Please check the product for any possible damage regularly. Do not use a damaged product 

and keep it out of the reach of children. 

If you require assistance with this product, please contact our 

customer service department 

(see details on reverse).

Do NOT bleach

Tumble dry at a low 

temperature

Wash at 30 °C
on a delicate cycle

Do NOT iron

Do NOT dry clean

30

30

30

30

30

Содержание OXALIS

Страница 1: ......

Страница 2: ...connecteurs Isofix L enfant est attach par la ceinture 3 points de la voiture La jambe de force doit tre r tract e et ne doit plus toucher le plancher de la voiture Le t moin de la jambe de force doit...

Страница 3: ...it avec la r glementation 44 04 dans sa version en vigueur pour un usage courant dans les v hicules quip s de syst mes d ancrage Isofix Il est adapt pour les v hicules dans des positions qui sont auto...

Страница 4: ...s blessures Le si ge pour enfant doit tre remplac lorsqu il a t soumis des efforts violents lors d un accident Pour des raisons de s curit le si ge auto pour enfant doit galement tre fix dans le v hi...

Страница 5: ...R glage de l appui t te Sangle d paule Bouton des connec teurs Isofix pour le r glage en longueur et le d ver rouillage Rembourrage boucle de ceinture Jambe de force T moin de la jambe de force Bouton...

Страница 6: ...du si ge d une main et faites pivoter la coque du si ge de l autre main Le levier peut tre rel ch en tournant la coque du si ge Le si ge offre quatre positions de verrouillage 90 180 270 et 0 de 360 d...

Страница 7: ...de mani re ce qu elles reposent sur les paules de l enfant R glage de l appui t te Lib rez la ceinture et tirez le levier l arri re de l appui t te jusqu ce que l appui t te soit la hauteur souhait e...

Страница 8: ...sur les boutons des connecteurs Isofix des deux c t s pour les allonger Enfoncez les connecteurs Isofix dans les aides l insertion et poussez les jusqu ce qu ils s en clenchent de mani re audible Les...

Страница 9: ...auto pour enfant sur la face avant Fig 2 Retirez le rembourrage aux paules les languettes de verrouillage et la boucle de ceinture Pour retirer la boucle de ceinture vous devez placer le clip m talliq...

Страница 10: ...i ge auto enfant en position d inclinaison maximale et faites le pivoter de ma ni re ce qu il pointe vers la position 4 bleue du si ge vers l arri re 8 Pourasseoirconfortablementvotreenfant tournezles...

Страница 11: ...oin de la jambe de force soit vert 7 Le si ge auto enfant dispose de trois positions r glables dans le sens de circulation 8 Pourasseoirconfortablementvotreenfant tournezlesi geautopourenfantverslapor...

Страница 12: ...univeaudes paulesde l enfant 6 Tournez le si ge en position face la route V rifiez que le si ge auto pour enfant soit bien verrouill dans cette position 7 Fermez maintenant la boucle de la ceinture 3...

Страница 13: ...ou des nettoyants agressifs V rifiez toujours que le tissu et les coutures ne sont pas endommag s apr s le lavage Veuillez toujours laver la housse exactement comme indiqu sur l tiquette voir ci desso...

Страница 14: ...child is strapped in with the car s 3 point seat belt The support leg must be retracted and must not touch the car footwell The support leg indicator must therefore show red We recommend installing th...

Страница 15: ...ith Regulation No 44 04 In its respective valid version for general use in vehicles that feature ISOFIX anchoring sys tems It fits in vehicles in positions that are approved as ISOFIX positions as des...

Страница 16: ...eplaced if it is exposed to heavy impact during an accident For safety reasons the child car seat must be secured in the vehicle even when your child is not sitting in the child car seat Always make s...

Страница 17: ...ngle adjustment lever Head section ad justment Shoulder belt Isofix connector buttons for adjusting the length and releasing Belt lock pad Support leg Support leg indicator Button for adjusting the he...

Страница 18: ...to pull the lever at the front of the seat and use your other hand to turn the seat bucket The lever can be released when turning the seat bucket The seat offers four locking positions at 90 180 270...

Страница 19: ...the belts are adjusted in such a way that they rest on the child s shoulders Adjusting the head support Loosen the belt and pull the lever at the back of the headrest until the headrest is at the des...

Страница 20: ...ly installed insertion aids Press the buttons on the Isofix connectors on both sides to extend these Slide the Isofix connectors into the insertion aids and press them in until you hear these lock in...

Страница 21: ...gh the child car seat to the front side Fig 2 Remove the shoulder pads the belt tongues and the belt lock pad To remove the seat belt buckle you must turn the metal clip of the seat belt buckle crossw...

Страница 22: ...pport leg is showing green 7 Set the child car seat to the maximum reclining position and turn it until it points to the blue seat position 4 when facing backwards 8 When placingyourchild in the child...

Страница 23: ...Please ensure that the indicator on the support leg is showing green 7 When facing in the direction of travel the child car seat offers three adjustable seat positions 8 When placingyourchild in the...

Страница 24: ...diagonal belt exits the belt guide at the child s shoulder height 6 Turn the seat into the forward facing position Check whether the child car seat is locked in this position 7 Close the belt buckle...

Страница 25: ...ts or abrasive or aggressive cleaning products to clean it After washing al ways check that the fabric and stitching is not damaged Please only ever wash the cover in accordance with the instructions...

Страница 26: ...n de auto bevestigd Het kind wordt vastgezet met de 3 puntsgordel van de auto De steunpoot moet ingebracht worden en mag de voetruimte van uw auto niet meer raken De aanduiding op de steunpoot moet du...

Страница 27: ...n overeenstemming met de verordening 44 04 in de geldende versie voor algemeen gebruik in voertuigen die zijn uitgerust met een Isofix verankeringssysteem Het past in voertuigen met posities die zijn...

Страница 28: ...n vervangen als het bij een ongeval is blootgesteld aan sterke belastingen Om veiligheidsredenen moet het autostoeltje ook in de auto zijn bevestigd als uw kind niet op het autostoeltje zit Zorg er al...

Страница 29: ...el Hendel voor hoekver stelling Hoofdsteunverstelling Schoudergordel Isofix connector knoppen voor lengteverstelling en losmaken Kussen gordelslot Steunpoot Steunpoot indicator Knop om de hoogte van d...

Страница 30: ...de voorkant van de stoel en draai de zitschaal met de ande re hand De hendel kan worden losgelaten bij het draaien van de zitschaal Het stoeltje beschikt over vier vergrendelposities op 90 180 270 en...

Страница 31: ...or dat de riemen zo zijn afgesteld dat ze op de schouders van het kind rusten Hoofdsteun instellen Maak de gordel los en trek aan de hendel achter de hoofdsteun totdat deze op de gewenste hoog te is L...

Страница 32: ...eerde inbrenghulpen heeft Druk op de knoppen van de Isofix verbindings stukken aan beide zijden om ze te verlengen Steek de Isofix verbindingsstukken in de inbreng hulpen en druk ze verder tot deze ho...

Страница 33: ...et autostoeltje naar voren Afb 2 Verwijder de schouderkussens de gesptongen en het kussen voor het gordelslot Om het gordelslot te verwijderen moeten de metalen klemmen van het gordelslot dwars worden...

Страница 34: ...Stel het autostoeltje in de maximale ligpositie in en draai het zo dat het achterwaarts gericht staat in de blauwe zitpositie 4 8 Omuwkindcomfortabelinhetzitjeteplaatsen draaituhetautostoeltjeinderic...

Страница 35: ...6 Controleer of de indicator op de steunpoot groen is 7 Het autostoeltje heeft drie instelbare zitposities in de rijrichting 8 Omuwkindcomfortabelinhetzitjeteplaatsen draaituhetautostoeltjeinderichtin...

Страница 36: ...delgeleidingterhoogtevandeschoudersvanhet kind naar buiten komt 6 Draai het autostoeltje naar de voorwaarts gerichte positie Controleer of het autostoeltje in deze positie is vastgeklikt 7 Sluit nu de...

Страница 37: ...huurmiddelen of agressieve schoonmaakmiddelen Controleer de stof en de naden na het wassen altijd op beschadigingen Was de bekleding altijd precies zoals is aangegeven op het etiket zie hieronder ONDE...

Страница 38: ...deve essere legato per mezzo della cintura a 3 punti dell auto Retrarre la base di sostegno che non deve pi essere a contatto con il pavimento del veicolo La spia della base di sostegno deve essere r...

Страница 39: ...enerale nei veicoli dotati di sistemi di fissaggio Isofix in conformit al pi recente aggiornamento del re golamento UN ECE n 44 04 adatto a veicoli con posizioni omologate come Isofix come descritto n...

Страница 40: ...a carichi pesanti a causa di un incidente Per motivi di sicurezza il seggiolino auto per bambini deve essere fissato nel veicolo anche quando il bambino non seduto nel seggiolino auto per bambini Acc...

Страница 41: ...ne del poggiatesta Cintura di ritenuta spalle Pulsanti dei connettori Isofix per regolare la lunghez za e per allentare Imbottitura della fibbia Base di sostegno Spia della base di sostegno Pulsante p...

Страница 42: ...na mano la leva nella parte anteriore del seggiolino e con l altra mano ruotare il guscio del seggiolino Rilasciare la leva quando si ruota il guscio del seggiolino Il seggiolino offre quattro possibi...

Страница 43: ...di regolare le cinture in modo che appoggino sulle spalle del bambino Regolazione del poggiatesta Slacciare la cintura e tirare la leva dietro al poggia testa finch non si raggiunge l altezza desider...

Страница 44: ...elementi di connessione Isofix su entrambi i lati per allungarli Far scorrere gli elementi di connessione Isofix negli ausili di inserimento e premere finch non si inne stano con uno scatto sonoro Le...

Страница 45: ...il seggiolino sul lato anteriore Fig 2 Rimuovere le spalline le linguette della fibbia e l imbottitura della fibbia Per rimuovere la fibbia occorre posizionare di traverso il fermaglio di metallo del...

Страница 46: ...Posizionare il seggiolino nella posizione reclinata massima e ruotarlo in modo che orientato all indietro si trovi nella posizione blu 4 8 Per posizionare il bambino in maniera pi agevole ruotare il s...

Страница 47: ...e installato nella direzione di marcia il seggiolino auto per bambini dispone di tre posizioni di seduta regolabili 8 Per posizionare il bambino in maniera pi agevole ruotare il seggiolino auto per ba...

Страница 48: ...ca dalla guida della cintura all altezza delle spalle del bambino 6 Ruotare il seggiolino nella posizione orientata in avanti Controllare che il seggiolino auto per bambini sia bloccato in questa posi...

Страница 49: ...e o detergenti aggressivi Controllare sempre l integrit del tessuto e delle cuci ture dopo il lavaggio Lavare sempre la fodera esattamente come indicato sull etichetta vedi sotto CURA Controllare rego...

Страница 50: ...l ni o con el cintur n de 3 puntos del autom vil abrochado La base se tiene que recoger y no debe tocar el espacio para los pies del coche El indicador de la base deber iluminarse de color rojo Se rec...

Страница 51: ...do homologado para uso general en ve h culos equipados con sistemas de anclaje Isofix de acuerdo con el Reglamento 44 04 en su versi n vigente Se adapta a veh culos con posiciones homologadas como Iso...

Страница 52: ...nes de seguridad el asiento infantil debe fijarse al veh culo incluso si su hijo no est sentado en el asiento Aseg rese siempre de que todas las correas que sujetan el retenedor del asiento al veh cul...

Страница 53: ...ur n Palanca giratoria Estribo de las almoha dillas de los hombros Conector Isofix Carcasa del asiento Almohadilla para hombro Cintur n del hombro Palanca de ajuste del ngulo Ajuste del reposa cabezas...

Страница 54: ...la palanca situada en la parte delantera del asiento con una mano y gire la carcasa del asiento con la otra La palanca se puede liberar al girar la carcasa del asiento El asiento ofrece cuatro posici...

Страница 55: ...sten de manera que descansen sobre los hom bros del ni o Ajustar el reposacabezas Afloje el cintur n y tire de la palanca situada en la parte trasera del reposacabezas hasta que el repo sacabezas est...

Страница 56: ...los conectores Isofix en ambos lados para extenderlos Inserte los conectores Isofix en los dispositivos de inserci n y emp jelos hasta que encajen de forma audible Los indicadores de ambos lados solo...

Страница 57: ...av s del asiento infantil Fig 2 Quite la almohadilla para hombro las leng etas de cierre y la almohadilla de cierre del cin tur n Para quitar el cierre del cintur n debe colocar la abrazadera met lica...

Страница 58: ...nfantil en la posici n de reclinaci n m xima y g relo de modo que apunte a la posici n 4 de asiento azul en sentido contrario a la marcha 8 Para sentar c modamente a su hijo gire el asiento infantil h...

Страница 59: ...de apoyo est en verde 7 El asiento infantil tiene tres posiciones de asiento ajustables en el sentido de la marcha 8 Para sentar c modamente a su hijo gire el asiento infantil hacia la puerta del auto...

Страница 60: ...u a del cintur n a la altura de los hombros del ni o 6 Gire el asiento a la posici n orientada hacia delante Compruebe que el asiento infantil est bloqueado en esta posici n 7 Cierre la hebilla del ci...

Страница 61: ...os o limpiadores agresivos Compruebe siempre la tela y las costuras para ver si est n da adas despu s de lavarlas Lave siempre la cubierta exactamente como se indica en la etiqueta v ase abajo CUIDADO...

Страница 62: ...62...

Страница 63: ...63...

Страница 64: ...FCOXALIS R1 01 20 Rue du Claret 38230 Charvieu France Tel 33 0 4 72 46 98 98 www groupeteamtex com...

Отзывы: