background image

11.8 Discharging Square Bales


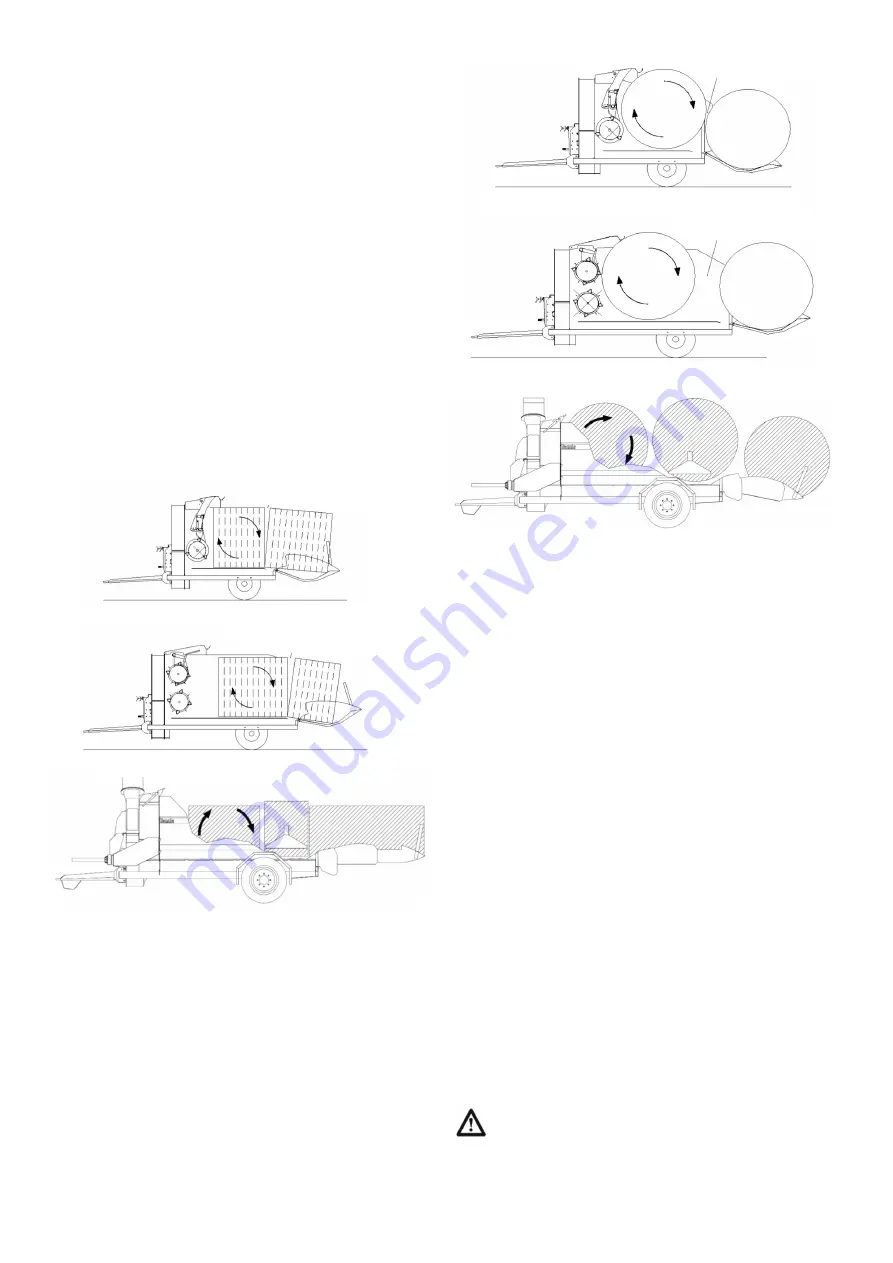
Gradually  increase  bed  chain  speed  by  means  of  the 
speed  control  until  shredding  commences.  It  is  then 
advisable to increase bed chain speed to a point at which 
the  slices  of  the  bale  being  shredded  are  forced  up  and 
over  the material coming forward.   This rotational motion 
is represented in Figure 6.


Where  a  bale  lift  is  fitted  to  a  Tomahawk  1010,  release 
the portion of the bale retained by the bale lift only when 
the  first  portion  has  been  discharged  which  is  usually 
indicated by a large fall in discharge rate.


Once  the  material  in  the  bale  chamber  has  been 
discharged  the  tailgate  can  be  lifted  to  allow  a  portion  of 
rear  half  of  the  bale  to  be  loaded  into  the  chamber  thus 
allowing  room  for  the  material  in  the  bale  chamber  to 
rotate.


With a Tomahawk  1010  it  will  be found  advantageous to 
only allow half of the second bale to enter the chamber at 
a time thus allowing room for each half to rotate.


Typically  the  rate  of  discharge  may  be  controlled  by  bed 
chain  speed  but  only  once  rotation  of  the  material  within 
the body of the machine has been achieved.


Figure 6. Rotation of square bales


11.8 Discharging Round Bales


Gradually  increase  bed  chain  speed  by  means  of  the 
speed  control  until  discharge  commences.  Good 
performance  will  only  be  achieved  by  getting  the  bale  to 
rotate within the chamber as shown in Figure 7.


Increasing  the  speed  of  the  bed  chain  will  increase  the 
rate of discharge until a maximum rate is achieved. If the 
bed chain speed is too great, material will unroll from the 
bale at a rate greater than can be discharged. This will be 
indicated by a build up of material above the crossbeater 
bale restraint.


Figure 7. Rotation of round bales


11.9 Discharging Clamp Silage


Increase bed chain speed until the desired discharge rate 
is  achieved.  Once  the  forward  portion  of  the  load  has 
been  discharged,  the  tailgate  can  be  lifted  to  ensure  a 
continuous feed rate.


11.10 General Discharging Instructions


If  a  large  amount  of  loose  material  builds  up  above  the 
bale  restraint    it  may  be  necessary  to  reverse  the  bed 
chain  until  the  loose  material  falls  down  behind  the 
crossbeater(s) before recommencing discharge.


When it is necessary to stop shredding part way through a 
bale,  always  stop  the  bed  chain  rotation  and  put  it  in 
reverse  for  a  few  seconds  before  stopping  the  rotor  and 
crossbeater(s).    This  allows  the  material  in  the  area 
around  the  crossbeater(s)  and  rotor  to  be  blown  clear  of 
the machine.  Failure to  do this may result  in  a blockage 
when the machine is re

-

started.


The  length  of  chop,  evenness  of  feed  and  power 
consumption  will  vary  with  the  condition  of  the  bale.  In 
general, baled silage and damp or caked straw materials 
will require a higher power input than dry brittle materials.


Should  the  rotor  or  crossbeater(s)  become  blocked, 
indicated by either slipping of the PTO clutch or failure of 
the crossbeater(s) shear bolt, it may be necessary to turn 
the  rotor  backwards.    This  may  be  achieved  by  levering 
the  rotor  paddles  with  a  post  through  the  outlet  chute.  
Further access may be gained by removing the blockage 
panels  from  the  front  of  the  upper  and  lower  rotor 
housing.


CAUTION. 

DUAL  CHOP:  Always  fully  raise  the 

blade  carrier  and  lock  it  in  position  with  pins  before 

attempting  to  remove  blocked  material  from  the 
crossbeater.


20


1010 models


7100, 7150, 8100, 8150, 8500 & 8555 models


9500 models


Gap between bales


Gap between bales


7100, 7150, 8100, 8150, 8500 & 8555 models


9500 models


Gap between front and rear


1010 models


Gap between front and rear


Содержание Tomahawk 7100

Страница 1: ...30417 10100 11 19 30970 10345 31725 11338 10056 3694 TMKBXOP1119A...

Страница 2: ...nd Safety requirements of EEC Directive 2006 42 EC 2004 108 EC To effect correct application of the essential Health and Safety requirements stated in the EEC Directives the following harmonised stand...

Страница 3: ...and machines This handbook forms part of that instruction and it must be read and understood before fitting the machine onto the tractor or attempting to use it Your supplier is responsible for carryi...

Страница 4: ...hine protective devices 21 13 Maintenance 21 13 1 Safety 21 13 2 Blades 21 13 3 Bed chain 22 13 4 Bale restraint beam adjustment and removal 22 13 5 Dual chop sieve removal 23 13 6 Crossbeater shear b...

Страница 5: ...r bearings behind crossbeater drive sprocket on LHS 9 Grease nipple bed chain front roller bearing 10 Layshaft bearing Ref Description 11 PTO guards monthly 12 Grease nipple layshaft U J monthly For m...

Страница 6: ...sprocket on LHS 9 Grease nipple bed chain front roller bearing 10 Layshaft bearing Ref Description 11 PTO guards monthly 12 Grease nipple layshaft U J monthly 13 Wheel bearings annually 14 Hitch coupl...

Страница 7: ...ing Ref Description 10 PTO guards monthly 11 Grease nipple layshaft U J monthly 12 Wheel bearings annually 13 Hitch coupling as required 14 Fill chain oiler as required 16 Brake levers as re quired 15...

Страница 8: ...ngs annually 13 Hitch coupling as required For more detailed information see maintenance section 5 Lubrication Schedule Tomahawk 9500 Twice Weekly Weekly Fortnightly Other Notes 1 Frequencies based on...

Страница 9: ...sprocket on LHS 9 Grease nipple bed chain front roller bearing 10 Layshaft bearing Ref Description 11 PTO guards monthly 12 Grease nipple layshaft U J monthly 14 Wheel bearings annually 15 Hitch coup...

Страница 10: ...mum hydraulic oil pressure 220 bar 3190 psi Maximum hydraulic oil flow 60 litres minute 13 2 gal min Minimum hydraulic oil flow 35 litres minute 7 7 gal min Time averaged sound power 92dBA 92dBA 92dBA...

Страница 11: ...length tailgate up 4 19 m 4 19 m 4 19 m Overall length tailgate down 5 42 m 5 42 m 5 42 m Maximum round bale diameter 1 83 m 1 83 m 1 83 m Maximum rectangular bale size 1 3m x 1 2m x 2 5m Tyre size s...

Страница 12: ...2 m 5 42 m 5 42 m Max Round bale diameter 2 00 m 2 00 m 2 00 m Maximum rectangular bale size 1 3m x 1 2m x 2 5m 1 3m x 1 2m x 2 5m 1 3m x 1 2m x 2 5m Tyre size standard tyres 12 5 80 15 3 12 5 80 15 3...

Страница 13: ...2 00 m 2 00 m Maximum rectangular bale size 1 5m x 1 2m x 2 5m 1 5m x 1 2m x 2 5m 1 3m x 1 2m x 2 5m 1 3m x 1 2m x 2 5m Tyre size standard tyres 305 55 R22 5 305 55 R22 5 385 55 R22 5 385 55 R22 5 Whe...

Страница 14: ...High rotor speed Low rotor speed 2 1 EXPLANATION OF PICTOGRAMS Bed chain speed Raise giraffe chute deflector Rotate giraffe clockwise Rotate giraffe anti clockwise Lower giraffe chute deflector Bed ch...

Страница 15: ...ressure Tractor Cable Control Panel 2 2 Safety Decals Maintenance The safety signs fitted to the machine warn of hazards and form an important part of keeping the operator and by standers safe It is i...

Страница 16: ...nd speed of PTO input shaft 8 Jacking point Information Label 9 Tighten wheel nuts to setting in operators handbook 10 Beware crushing hazard keep clear 1 Unblocking procedure 2 Beware thrown objects...

Страница 17: ...relevant Standard and be approved by the Safety Inspectorate Disposable filtering face piece respirators to EN149 or half mask respirators to EN140 fitted with filters to EN 143 are likely to be adequ...

Страница 18: ...upon a The size and weight of the bale to be spread b The availability of front counter weights c Whether the machine is to be used to transport bales along the road The machine is designed to use th...

Страница 19: ...ar basis it is recommended that a PTO shaft with a wide angle constant velocity joint be fitted 9 3 Mounted Machines Attach the Tomahawk to the 3 point tractor linkage Make sure the lower link stabili...

Страница 20: ...operation of the chute tailgate functions This can be programmed when setting the maximum speed of the machine by slowing down the maximum bed speed a small amount before switching off However if ful...

Страница 21: ...e hooks are positioned on the underside of the tailgate to tie partially removed twine and netwrap to Raise the tailgate the bale will roll into the machine leaving the twine or netwrap tied to the ta...

Страница 22: ...am raised screen removed and replaced with a screen blanking frame which prevents a build up of material in the screen support frame The sliding blade carrier is controlled through the hydraulic spool...

Страница 23: ...restraint Figure 7 Rotation of round bales 11 9 Discharging Clamp Silage Increase bed chain speed until the desired discharge rate is achieved Once the forward portion of the load has been discharged...

Страница 24: ...a blockage the shear bolt may have failed and require replacement See paragraph 13 6 in the maintenance section Shear bolt grades Silage straw machine 10 9 M8 x 50 mm Dual Chop machine 8 8 M8 x 50 mm...

Страница 25: ...chain becomes tight in use check that the grooves in the front and or rear sprockets have not become tightly packed with straw or silage If they have they will need clearing and the scrapers may have...

Страница 26: ...ection Refill the reservoir with 2 0L of HVI 22 Anti Fling Oil 13 8 2 Bed Chain Drive 7100 to 8555 models To tension the bed chain drive remove the chain guard on the right hand side of the machine re...

Страница 27: ...sture repelling agent such as WD40 When the machine is not being used it is recommended that the control desk is stored safely away from the machine in a dry location or under the cover provided on th...

Страница 28: ...use The recommended wheel nut torque is listed in table 7 Always cross tighten the wheel nuts NOTE Once the nuts are allowed to work loose it may be impossible to keep them tight and new nuts and stud...

Страница 29: ...castle nut Tap the hub gently using a mallet to shake down the assembly Check that the hub rotates more freely Always err on the side of too free rather than too tight When the hub has been adjusted f...

Страница 30: ...r pin as appropriate 11 For hubs without grease retaining plates fill the hubcap with grease 12 Refit the hubcap 13 20 Handbrake where fitted The central spindle of the handbrake lever will need greas...

Страница 31: ...entre the brake shoes before locking the nut of the pin When the hub brake assembly has been reassembled slacken the fulcrum nut slightly operate the brake lever in the correct direction direction of...

Страница 32: ...le pressure is controlled by the tractor and is determined by the force on the brake pedal or whether the tractor s parking brake is applied It is commonplace for this line to be fully pressurised whe...

Страница 33: ...ing members If the machine is shredding whilst turning on a regular basis it is recommended that a PTO shaft with a wide angle constant velocity joint be fitted 15 2 Drawbar Jack Where the machine is...

Страница 34: ...the locking bolts from the lower link latch plates see Figure 14 Lower the tailgate fully and drop the machine onto it s front stand The machine can now be unhitched from the tractor 15 3 5 Lubricatio...

Страница 35: ...ractor hydraulics If motor is seized reverse flow to release Consult your dealer if this fails Sprockets seized Replace bearings Dirt or contamination in the proportional flow slice or relief valve co...

Страница 36: ...t clutch assembly Also increase engine speed Hydraulic valve fails to operate No oil flow from tractor Check that oil is flowing and that hoses are correctly connected to the tractor spool valve Hydra...

Страница 37: ...ittings or the tractor spool valve Clamping bolts loose Check bolts through valve tightened to correct torque specified in the valve manual Separation of slices in valve block as a result of reverse o...

Страница 38: ...NOTES 35...

Страница 39: ...36 NOTES...

Страница 40: ......

Отзывы: