background image

26

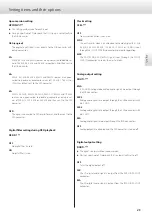
Automatic display darkening setting
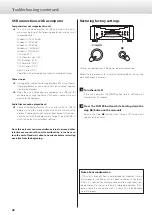
DPaOFF>***

ON

If playback is stopped and no operation is conducted for 10 minutes, 
the OEL display automatically turns off .

OFF

The display will not turn off, but it will dim to DIMMER 1 bright-
ness to protect it from excessive wear .


o

If the OEL display is left on with the same indication for a long time, 
brightness irregularities can occur . For this reason, we recommend 
that you set the automatic display darkening function to ON .

Automatic power saving setting
APS>***


o

By default, the setting is 30m .

When the input source is CD/SACD, the unit will turn off automati-
cally if the set amount of time passes without a disc being loaded or 
with the disc remaining stopped .
When the input source is COAX in, OPT in or USB in, the unit will turn 
off automatically if the set amount of time passes without being able 
to lock an input signal from the selected input source .


o

The input sources that are not selected have no effect on auto-
matic power saving .

30m

30 minutes

60m

60 minutes

90m

90 minutes

120m

120 minutes

OFF

The automatic power saving function is disabled .

Setting items and their options (contd.)

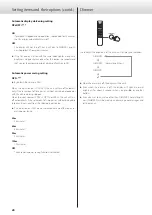
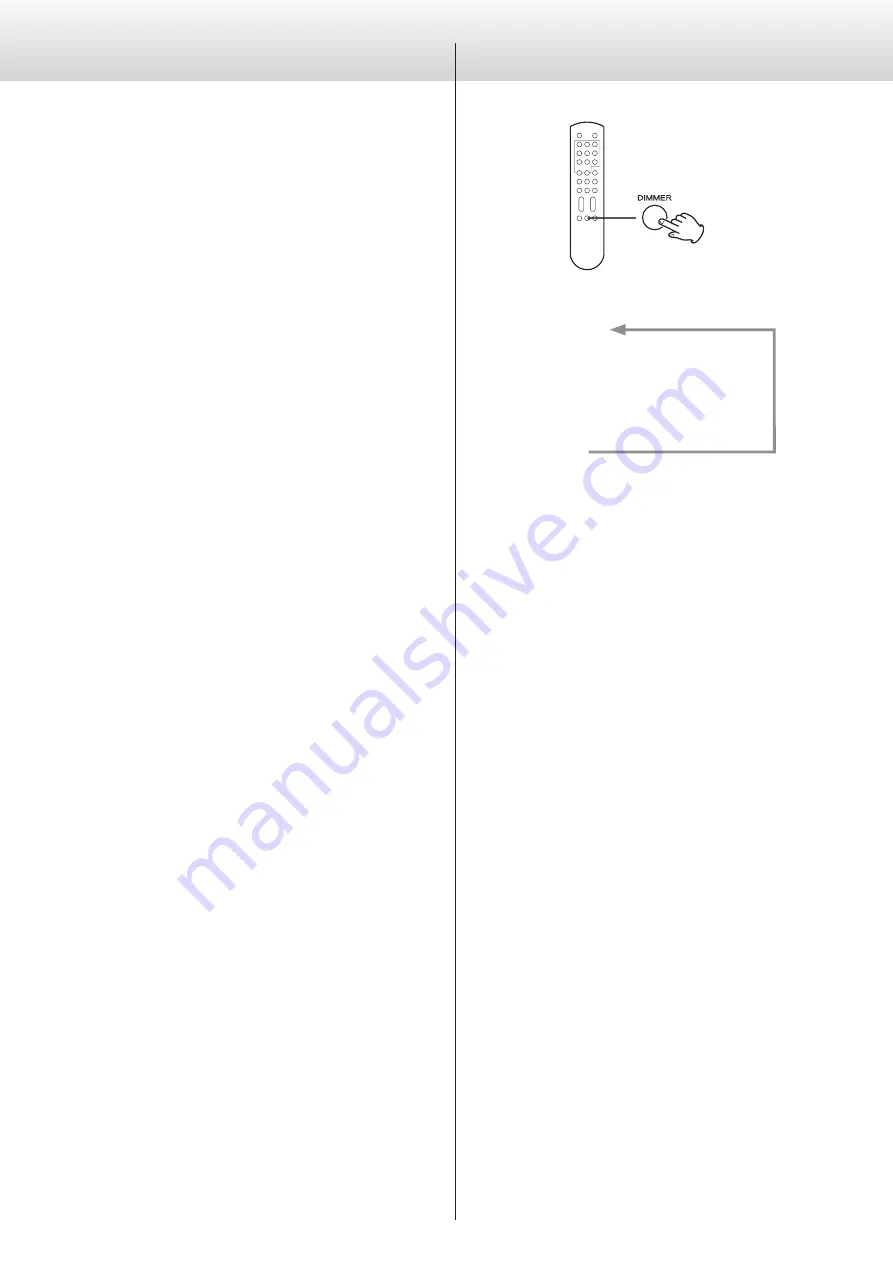
Dimmer

Use to adjust the brightness of the main unit’s display and indicators .

DIMMER 3

c

DIMMER 2

c

DIMMER 1

c

off

(normal brightness)


o

When the dimmer is off, the display will be unlit .


o

Even when the dimmer is off, the display will light at normal 
brightness for about 3  seconds when you press 

7

 or another 

button .


o

Even when set to any value other than DIMMER 2, normal bright-
ness (DIMMER 2) will be used when displaying error messages and 
setting menus .

Содержание ESOTERIC Grandioso K1

Страница 1: ...D01302121B OWNER S MANUAL 3 MODE D EMPLOI 31 MANUAL DEL USUARIO 59...

Страница 2: ......

Страница 3: ...his equipment generates uses and can radiate radio frequency energy and if not installed and used in accordance with the instructions may cause harmful interference to radio communications However the...

Страница 4: ...e wider than the other A grounding type plug has two blades and a third grounding prong The wide blade or the third prong are pro vided for your safety If the provided plug does not fit into your outl...

Страница 5: ...o If the remote control is not used for a long time more than a month remove the batteries to prevent them from leaking o o If the batteries leak wipe away the leakage inside the battery compartment a...

Страница 6: ...unit if any of these accessories are missing or have been damaged during transportation Power cord 1 Remote control RC 1315 1 Batteries for remote control AAA 2 Felt pads 4 Owner s manual this documen...

Страница 7: ...or move the unit during playback because the disc rotates at high speed Doing so could damage the disc o o Always remove any loaded disc before moving this unit or pack ing it for installation in a di...

Страница 8: ...Do not use a disc that has sticky residue left on its surface after removing tape or a sticker for example If such a disc is loaded it might become stuck in the unit or damage the unit o o Never use c...

Страница 9: ...ow to handle a CD R or CD RW disc contact the manufacturer of the disc directly Making connections Connecting with a Grandioso F1 using ES LINK Analog ESL A Grandioso F1 XLR audio cables ES LINK Analo...

Страница 10: ...set so that either 2 or 3 is HOT page 25 RCA audio cables XLR cables USB cable Connect using a set of only one type RCA coaxial digital cable Optical digital cable Included power cord RCA coaxial digi...

Страница 11: ...erter AV amplifier or recorder Use commercially available cables for connections XLR XLR digital cable RCA RCA coaxial digital cable o o These connectors cannot output Super Audio CD digital audio o o...

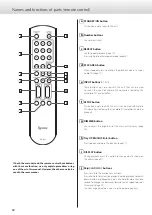
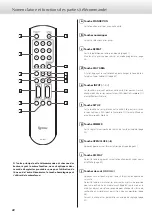
Страница 12: ...on Use to adjust the brightness of the main unit s display page 26 h Tray OPEN CLOSE button Press to open and close the disc tray page 17 i DISPLAY button During playback press this button to change w...

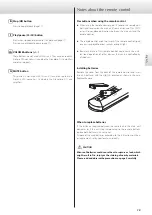
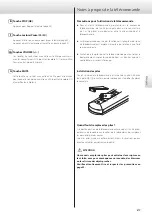
Страница 13: ...the remote control o o The remote control might not work if the remote control signal receiver is exposed to direct sunlight or bright light o o Beware that use of this remote control could cause the...

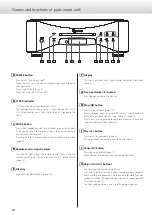
Страница 14: ...eiver panel page 13 E Disc tray Load a disc for playback here page 16 F Display This shows playback time track number and other information page 21 G Tray open close button Press to open and close the...

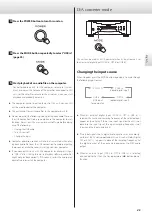
Страница 15: ...ersion UPCONV 4Fs The upconverter circuit will upconvert the signal to 128 176 4 or 192 kHz before digital to analog conversion UPCONV 8Fs The upconverter circuit will upconvert the signal to 256 352...

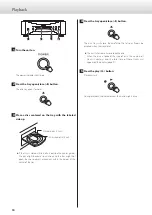
Страница 16: ...uck inside and the tray might not open Be sure to always place discs within the guides at the center of the tray 4 Press the tray open close button The disc tray will close Be careful not to let your...

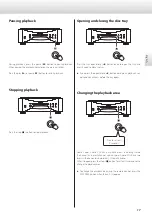
Страница 17: ...t again to close the tray o o If you press the open close button during disc playback sev eral seconds will pass before the tray opens Changing the playback area Press for at least 2 seconds Some Supe...

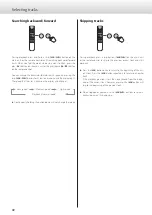
Страница 18: ...stopped or paused use the buttons to select a track and pause at its beginning Searching backward forward During playback press and hold a skip button on the main unit or the remote control until sear...

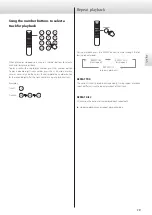
Страница 19: ...s the corresponding number button for the second digit After the track number is input playback starts Examples Track 7 Track 23 During playback press the REPEAT button to cycle through the fol lowing...

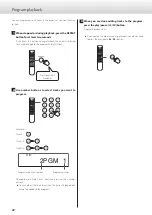
Страница 20: ...number buttons to select tracks you want to program Examples Track 3 Track 12 Track 20 Programmed track number Program number CD 2PGM 1 To program multiple tracks continue pressing the number buttons...

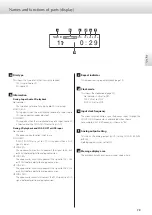
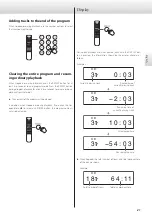
Страница 21: ...addition when stopped or during playback if you press the tray open close or main unit POWER button the program contents will also be cleared Display During disc playback and when paused each time the...

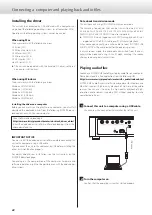
Страница 22: ...llation see the instructions on the ESOTERIC download page Depending on the composition of the computer hardware and software operation might not be possible even with the above oper ating systems Not...

Страница 23: ...r mode 3 Press the POWER button to turn this unit on 4 Press the MODE button repeatedly to select USB in page 23 5 Start playback of an audio file on the computer For better audio quality set the comp...

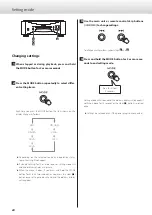
Страница 24: ...etting mode will end and ordinary display will resume o o When the menu is open if you press and hold the MODE button for at least two seconds or you press the stop 8 button once setting mode will end...

Страница 25: ...No digital filter is used ON A digital filter is used Clock setting CLK OFF Clock synchronization is not used SYNC This unit s master clock is synchronized to the clock signal 44 1 kHz 48 kHz 88 2 kHz...

Страница 26: ...opped When the input source is COAX in OPT in or USB in the unit will turn off automatically if the set amount of time passes without being able to lock an input signal from the selected input source...

Страница 27: ...leave it for 1 2 hours page 28 The unit does not respond when buttons are pressed e e Multiple button presses without pause can cause the unit to stop responding After pressing a button wait momentari...

Страница 28: ...not play back correctly if you con nect this unit with the computer or change its input to USB in after starting the music playback software Since this unit uses a microcontroller external noise and o...

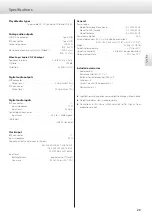
Страница 29: ...that can be input 10 ppm 44 1 kHz 48 kHz 88 2 kHz 96 kHz 176 4 kHz 192 kHz 10 MHz 22 5792 MHz 24 576 MHz Input level Rectangle wave equivalent to TTL levels Sine wave 0 5 to 1 0 Vrms 50 75 General Po...

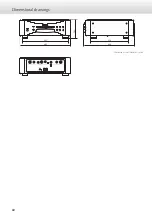
Страница 30: ...30 Dimensional drawings 445 403 448 334 162 Dimensions in millimeters mm...

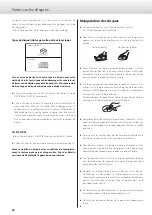
Страница 31: ...MES AVEC CE PRODUIT CONTACTEZ LE MAGASIN O VOUS AVEZ ACHET L UNIT N UTILISEZ PAS LE PRODUIT TANT QU IL N A PAS T R PAR o o L UTILISATION DE COMMANDES DE R GLAGES OU LE SUIVI DE PROC DURES AUTRES QUE...

Страница 32: ...re prises en cas d utilisation d couteurs ou d un casque avec le produit car une pression sonore excessive volume trop fort dans les couteurs ou dans le casque peut cau ser une perte auditive AVERTISS...

Страница 33: ...te d sign s par le gouvernement ou les autorit s locales b En vous d barrassant correctement des quipements lec triques lectroniques et piles accumulateurs hors d usage vous contribuerez la sauvegarde...

Страница 34: ...avez achet cette unit si l un de ces accessoires manque ou a t endom mag durant le transport Cordon d alimentation 1 T l commande RC 1315 1 Piles pour t l commande AAA 2 Patins en feutre 4 Mode d emp...

Страница 35: ...unit durant la lecture car le disque tourne vitesse lev e Cela pourrait endommager le disque o o Retirez toujours tout disque charg avant de d placer cette unit ou de l emballer pour par exemple l ins...

Страница 36: ...ou d autres mat riaux sur les disques N utilisez pas de disque dont la surface conserve des r sidus collants apr s par exemple le retrait d un autocollant ou d une ti quette Si un tel disque est charg...

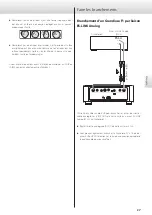
Страница 37: ...ons quant la fa on de manipuler un CD R ou CD RW contactez directement son fabricant Faire les branchements Branchement d un Grandioso F1 par liaison ES LINK Analog ESL A Grandioso F1 C bles audio XLR...

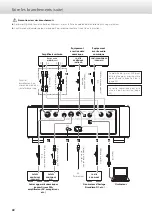
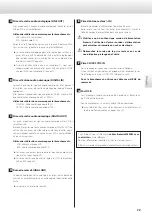
Страница 38: ...che 2 ou 3 page 53 C bles audio RCA C bles XLR C ble USB Faites les branchements au moyen d un jeu d un seul et m me type C ble num rique coaxial RCA C ble num rique optique Cordon d alimentation sect...

Страница 39: ...r AV ou un enregistreur Utilisez des c bles du commerce pour les branchements XLR c ble num rique XLR RCA c ble num rique coaxial RCA o o Ces prises ne peuvent pas produire les donn es audio num rique...

Страница 40: ...e l cran de l unit principale page 54 h Touche OPEN CLOSE Appuyez pour ouvrir et fermer le tiroir de disque page 45 i Touche DISPLAY Durant la lecture appuyez sur cette touche pour changer ce qui est...

Страница 41: ...la t l commande o o La t l commande peut ne pas fonctionner si le capteur de signal de t l commande est expos la lumi re du soleil ou une forte source lumineuse o o Sachez que l emploi de cette t l co...

Страница 42: ...u de r ception page 41 E Tiroir de disque Chargez ici le disque lire page 44 F cran Affiche la dur e de lecture le num ro de piste et d autres infor mations page 49 G Touche d ouverture fermeture de t...

Страница 43: ...4Fs Le circuit convertira le signal en 128 176 4 ou 192 kHz avant conversion num rique vers analogique UPCONV 8Fs Le circuit convertira le signal en 256 352 8 ou 384 kHz avant conversion num rique ve...

Страница 44: ...nc l int rieur et le tiroir risque de ne plus s ouvrir Veillez toujours placer les disques dans les guides au centre du tiroir 4 Appuyez sur la touche d ouverture fermeture de tiroir Le tiroir de disq...

Страница 45: ...essus pour le fermer o o Si vous appuyez sur la touche d ouverture fermeture du tiroir durant la lecture d un disque plusieurs secondes s couleront avant que le tiroir ne s ouvre Changement de la zone...

Страница 46: ...ches pour s lec tionner une piste et vous mettre en pause son d but Recherche arri re avant Durant la lecture pressez et maintenez une touche de saut sur l unit principale ou la t l commande jusqu ce...

Страница 47: ...des dizaines puis appuyez sur la touche num rique correspondant au deuxi me chiffre Une fois le num ro de piste saisi la lecture d marre Exemples Piste 7 Piste 23 Durant la lecture appuyez sur la touc...

Страница 48: ...pistes que vous souhaitez programmer Exemples Piste 3 Piste 12 Piste 20 Num ro de piste programm Position dans le programme CD 2PGM 1 Pour programmer d autres pistes continuez d appuyer sur les touche...

Страница 49: ...tre l arr t ou en lecture si vous appuyez sur la touche d ouver ture fermeture du tiroir ou sur la touche d alimentation POWER de l unit principale le contenu du programme est galement effac cran Dura...

Страница 50: ...sur la page de t l chargement d Esoteric Selon la composition de l ordinateur et le logiciel un bon fonc tionnement peut ne pas tre possible m me avec les syst mes d exploitation ci dessus Note propo...

Страница 51: ...r la touche POWER pour allumer cette unit 4 Appuyez plusieurs fois sur la touche MODE afin de s lectionner USB in page 51 5 Lancez la lecture d un fichier audio sur l ordinateur Pour une meilleure qua...

Страница 52: ...affichage normal revient o o Quand le menu est ouvert si vous maintenez press e la touche MODE durant au moins 2 secondes ou si vous appuyez une fois sur la touche Stop 8 le mode de r glage est abando...

Страница 53: ...Aucun filtre num rique n est utilis ON Un filtre num rique est utilis R glage d horloge Clock CLK OFF La synchronisation d horloge n est pas employ e SYNC L horloge ma tre de cette unit est synchroni...

Страница 54: ...in ou USB in l unit s teint automatiquement apr s que se soit coul le temps d fini sans avoir pu verrouiller un signal venant de la source d entr e s lectionn e o o Les sources d entr e non s lectionn...

Страница 55: ...L unit ne r pond pas quand on appuie sur les touches e e L encha nement rapide de plusieurs pressions de touche peut entra ner l arr t de la r ponse de l unit Apr s avoir appuy sur une touche attende...

Страница 56: ...sur USB in apr s avoir lanc le logi ciel de lecture musicale les fichiers audio peuvent ne pas tre lus correctement Comme cette unit utilise un microcontr leur du bruit ou d autres interf rences exte...

Страница 57: ...uences recevables 10 ppm 44 1 kHz 48 kHz 88 2 kHz 96 kHz 176 4 kHz 192 kHz 10 MHz 22 5792 MHz 24 576 MHz Niveau d entr e Onde rectangulaire quivalent aux niveaux TTL Onde sinuso dale 0 5 1 0 Vrms 50 7...

Страница 58: ...58 Sch mas avec cotes 445 403 448 334 162 Les dimensions sont en millim tres mm...

Страница 59: ...s para proporcionar una protecci n razonable contra interferencias perjudiciales en instalaciones residenciales Este equipo genera utiliza y puede irradiar energ a de radiofrecuencia y si no se instal...

Страница 60: ...enchufe que venga con la unidad no encaja en su salida de corriente haga que un electricista cambie su salida anticuada 10 Evite que el cable de corriente quede de forma que pueda ser pisado o quedar...

Страница 61: ...que se sulfaten y ten gan fugas o o Si las pilas presentan fugas limpie el l quido que haya ca do en el compartimento y sustituya las pilas por otras nuevas o o No utilice pilas que no sean del tipo e...

Страница 62: ...ducto si falta cualquiera de estos accesorios o si alguno ha sufrido desperfectos durante el transporte Cable de corriente 1 Mando a distancia RC 1315 1 Pilas para el mando a distancia AAA 2 Almohadil...

Страница 63: ...o gira a alta velocidad y puede da arse o o Antes de mover la unidad o por ejemplo de embalarla para insta larla en un sitio diferente quite cualquier disco que est cargado Si mueve la unidad con un d...

Страница 64: ...r Si introduce en la uni dad un disco en estas condiciones puede quedarse pegado en el interior de la unidad o da arla o o Nunca utilice estabilizadores de CD de los disponibles en esta blecimientos c...

Страница 65: ...R o CD RW p ngase en contacto con el fabricante del disco directamente Realizar las conexiones Conexi n con un Grandioso F1 mediante ES LINK Analog ESL A Grandioso F1 Cables de audio XLR Terminales ES...

Страница 66: ...o POSITIVO la punta 2 o la 3 p gina 81 Cables de audio RCA Cables XLR Cable USB Haga la conexi n con un juego de un solo tipo Cable digital coaxial RCA Cable digital ptico Cable de corriente incluido...

Страница 67: ...amplifica dor AV o grabadora Para la conexi n utilice cables de los disponibles en esta blecimientos comerciales XLR cable digital XLR RCA cable digital coaxial RCA o o Por estos terminales no puede s...

Страница 68: ...intensidad del brillo de la pantalla de la unidad principal p gina 82 h Bot n de bandeja OPEN CLOSE P lselo para abrir y cerrar la bandeja de disco p gina 73 i Bot n DISPLAY Durante la reproducci n p...

Страница 69: ...podr a no funcionar si el receptor de se ales de control remoto est expuesto directamente a la luz del sol u otra luz intensa o o Tenga en cuenta que la utilizaci n de este mando a distancia podr a c...

Страница 70: ...eproducci n el n mero de pista y otras informaciones p gina 77 G Bot n de apertura cierre de la bandeja P lselo para abrir y cerrar la bandeja de disco H Bot n de parada 8 P lselo para parar la reprod...

Страница 71: ...n sobreconvertir la se al a 128 176 4 o 192 kHz antes de la conversi n digital a anal gico UPCONV 8Fs El circuito de sobreconversi n sobreconvertir la se al a 256 352 8 o 384 kHz antes de la conversi...

Страница 72: ...en el interior y la bandeja podr a no volver a abrirse Aseg rese de colocar siempre los discos dentro de las gu as centrales de la bandeja 4 Pulse el bot n de apertura cierre de la bandeja La bandeja...

Страница 73: ...a pulsarlo otra vez para cerrarla o o Si pulsa el bot n de apertura cierre durante la reproducci n del disco pasar n varios segundos antes de que la bandeja se abra Cambiar el rea de reproducci n Pul...

Страница 74: ...la reproducci n en pausa al principio de la misma Buscar hacia atr s hacia delante Durante la reproducci n pulse y mantenga pulsado uno de los botones de salto de la unidad principal o del mando a dis...

Страница 75: ...e el bot n num rico correspondiente al segundo d gito Una vez introducido el n mero de pista se iniciar la reproducci n Ejemplos Pista 7 Pista 23 Durante la reproducci n pulse el bot n REPEAT para rec...

Страница 76: ...eleccionar las pistas que desee programar Ejemplos Pista 3 Pista 12 Pista 20 N mero de pista programada N mero de programa CD 2PGM 1 Para programar varias pistas siga pulsando las teclas num ricas o o...

Страница 77: ...a si pulsa el bot n de apertura cierre de la bandeja o el bot n de encendido POWER de la unidad principal tambi n se borrar el con tenido del programa Pantalla Durante la reproducci n del disco o cuan...

Страница 78: ...ulte las instrucciones en la p gina de descarga de ESOTERIC Dependiendo de la composici n del hardware y del software del ordenador podr a darse el caso de que incluso con los sistemas operativos menc...

Страница 79: ...Pulse el bot n MODE repetidamente para seleccio nar USB in p gina 79 5 Comience la reproducci n de un archivo de audio en el ordenador La mejor calidad de sonido se consigue ajustando el volumen en e...

Страница 80: ...n se cancelar y se reanudar la pan talla normal o o Cuando el men est abierto si pulsa y mantiene pulsado el bot n MODE durante al menos dos segundos o si pulsa el bot n de parada 8 una vez el modo d...

Страница 81: ...za un filtro digital Ajuste de reloj CLK OFF No se utiliza sincronizaci n de reloj SYNC El reloj maestro de esta unidad se sincroniza con la se al de reloj 44 1 kHz 48 kHz 88 2 kHz 96 kHz 176 4 kHz 19...

Страница 82: ...B in se apaga autom ticamente si transcurre la cantidad de tiempo establecida sin poder sincronizar una se al de entrada procedente de la fuente de entrada seleccionada o o Las fuentes de entrada no s...

Страница 83: ...durante una o dos horas p gina 84 La unidad no responde cuando se pulsan los botones e e M ltiples pulsaciones de botones sin parar pueden hacer que la unidad deje de responder Despu s de pulsar un bo...

Страница 84: ...dad al ordenador o si se cambia la entrada a USB in despu s de haber iniciado el software de reproducci n de m sica Dado que esta unidad utiliza un microcontrolador ruidos externos y otras interferenc...

Страница 85: ...pueden introducirse 10 ppm 44 1 kHz 48 kHz 88 2 kHz 96 kHz 176 4 kHz 192 kHz 10 MHz 22 5792 MHz 24 576 MHz Nivel de entrada Onda rectangular equivalente a niveles TTL Onda senoidal de 0 5 a 1 Vrms 50...

Страница 86: ...86 Dibujos con las dimensiones 445 403 448 334 162 Dimensiones en mil metros mm...

Страница 87: ......

Страница 88: ...42 356 9156 TEAC AUDIO EUROPE Gutenbergstr 3 82178 Puchheim Germany Phone 49 8142 4208 141 0317 MA 2323B This appliance has a serial number located on the rear panel Please record the serial number a...

Отзывы: