background image

Uninstalling Programs

24

TEAC CD-RW Drive User’s Manual

TEAC8x8x32.book  Page 24  Thursday, October 19, 2000  9:56 PM

Содержание CD-W58E

Страница 1: ......

Страница 2: ......

Страница 3: ......

Страница 4: ......

Страница 5: ......

Страница 6: ......

Страница 7: ......

Страница 8: ... User s Manual CD W58E 8x8x32 CD RW ...

Страница 9: ...sted and found to comply with the limits for a Class B digital device pursuant to Subpart J of Part 15 of the FCC Rules These limits are designed to provide reasonable protection against harmful interference in a residential installation However there is no guarantee that interference will not occur in a particular installation To ensure compliance with FCC rules the cable that connects the unit t...

Страница 10: ...uces the CD RW Drive and describes shipping package contents and recommended system requirements Chapter 2 Configuring and Installing the CD RW Drive This chapter explains how to configure the CD RW drive s CSEL Slave Master setting by positioning a jumper pin It also explains how to install the CD RW Drive in your computer and make the appropriate hardware connections Chapter 3 Installing the Rec...

Страница 11: ...g the CD RW Drive 7 Configuring the CD RW Drive 7 Installing the CD RW Drive 8 Connecting to Audio Equipment 12 Chapter 3 Installing Software 13 Installing Easy CD Creator and DirectCD Software 14 About the Reference Guides ReadMe Files and Help Files 19 About Online Registration 20 About Web Checkup 20 Starting Easy CD Creator 21 Using Easy CD Creator 21 Starting DirectCD 22 Using DirectCD 22 Uni...

Страница 12: ...ogram Window 14 Figure 10 TEAC Adaptec CD RW Software Suite CD ROM 14 Figure 11 Adaptec Easy CD Creator DirectCD Main Installation Panel 15 Figure 12 InstallShield Setup Panel 15 Figure 13 Welcome Panel 16 Figure 14 DirectCD Installation Support Warning 16 Figure 15 Software License Agreement Panel 17 Figure 16 Choose Destination Location Panel 17 Figure 17 Setup Complete Panel 18 Figure 18 Main I...

Страница 13: ...er to Appendix B Specifications on page 27 for detailed information Recommended System Requirements IBM PC compatible computer Pentium II 300MHz or higher CD ROM drive with DAE support for disc to disc audio recording One available 5 25 inch drive bay 64MB of RAM A hard drive that meets or exceeds the following minimum specifications 1GB hard disk space or more 1 2MB second data transfer rate or fa...

Страница 14: ...CD drag drop software Version 3 01d or higher One blank CD R disc One blank CD RW disc Interface cable ribbon cable Audio cable to connect internally to your PC Mounting screws not shown TEAC CD Rewritable CD RW Drive User s Manual this booklet Figure 1 CD RW Drive Kit Package Contents Note If any of these items is missing from the package please contact the vendor immediately to have the kit repl...

Страница 15: ... Use a 3 5mm stereo mini plug For external speakers connect a stereo adapter to split the output into separate cables for the left and right channels Such adapters convert a male stereo mini jack to two female phono jacks volume control Use the volume control to adjust the volume Turn the control right to increase the volume left to decrease Lower the volume before you start a CD ROM audio program...

Страница 16: ...ject button Press this button to open or close the disc tray Some CD ROM titles disable the manual eject button and rely on software commands to eject the disc Refer to the documentation for these titles for more information Operation Right LED Left LED At tray loading green LED flashes off At tray eject green LED flashes off During write erase off green LED flashes During audio play green LED fla...

Страница 17: ...he CD RW Drive on page 7 interface connector Use the included IDE interface ribbon cable to connect the CD RW drive to an IDE interface in your computer For more information see Chapter 2 Configuring and Installing the CD RW Drive on page 7 power connector Connect the power connector to the 5VDC and 12VDC power sources The 5VDC terminal is on the left as you face the rear panel the 12VDC terminal ...

Страница 18: ...Rear Panel 6 TEAC CD RW User s Manual ...

Страница 19: ...acing the jumper on the appropriate pair of pins you can set the drive to Master Slave or CSEL mode Figure 4 Jumper Pins on Rear Panel The Master Slave CSEL jumper configuration of your TEAC CD RW drive will depend on whether or not you have an IDE CD ROM DVD drive installed in your system The following section will guide you through most typical system configurations Figure 5 CSEL Slave and Maste...

Страница 20: ...e jumper on the rear panel of the CD RW drive is configured to its default setting of Master 4b Slide the CD RW drive into the empty 5 25 drive bay Install the CD RW drive in your personal computer in a horizontal orientation within 10 of horizontal The eject button should be located on the right side of the unit Secure the drive using the included 3x5mm mounting screws Figure 6 Installing the CD ...

Страница 21: ... cable to the interface connector on the rear panel of the CD RW drive Figure 7 Cable Connections 4e Connect one end of the included analog audio cable to the analog audio connector on the rear panel of the CD RW drive and connect the opposite end to your sound card Go to Step 6 5 If you have an IDE CD ROM DVD drive installed on your system do the following Typically your IDE CD ROM DVD drive is c...

Страница 22: ...uter s sound card Therefore there is no need to connect the audio cable that came with your CD RW drive This audio cable is not necessary for recording audio CDs Go to Step 6 6 Connect the power cable to the power connector on the rear panel of the CD RW drive Insert the power cable plug in the correct orientation into the power connector The plug is shaped so that it can be easily inserted in onl...

Страница 23: ...DE CD ROM DRIVE ATAPI version 1 2 driver is installed If not open the Control Panel double click SCSI Adapters click the Drivers tab then click the Add button At the Select a SCSI Adapter Option window select IDE CD ROM DRIVE ATAPI Ver 1 2 Click Install and follow the instructions on screen The drive is recognized by the operating system as a typical CD ROM drive Once you confirm that you can read ...

Страница 24: ...nvert a male stereo mini jack to two female phono jacks Alternatively if you are using a sound card in your PC you can connect external powered speakers to the audio connectors on the rear panel of the PC Figure 8 Connecting Analog Audio Speakers or Headphones Note If you connect external powered speakers to the sound card on the rear panel of the PC monitoring sound via headphones connected to th...

Страница 25: ...s and data CDs Adaptec DirectCD Version 3 01d or higher DirectCD is a drag drop software application that allows you to read and write to your CD RW as if it were a standard floppy or removable hard drive It also provides the tools necessary to format the media An installation procedure for these applications is provided in Installing Easy CD Creator and DirectCD Software on page 14 Note The Adapt...

Страница 26: ...into the TEAC CD RW drive Figure 10 TEAC Adaptec CD RW Software Suite CD ROM Note Before you install any portion of the Adaptec software package it is strongly recommended that you disable any applications that may be running in the background including anti virus software screen savers schedulers etc This will ensure the proper installation of the Adaptec software Press CTL ALT DEL on your keyboa...

Страница 27: ...l 2 If you would like to select a language other than English for the installa tion procedure click the Language English button You can select one of the following languages Dutch English French German Italian Spanish or Svenska Click the OK button to return to the installation process 3 On the main installation panel Figure 11 click the left mouse button on the name of the application program you...

Страница 28: ...Figure 14 DirectCD Installation Support Warning Note When installing DirectCD the system will display a message about CD R CD RW support see Figure 14 The TEAC CD RW supports packet writing Therefore click the Yes button to install DirectCD The Welcome panel is specific to the application you are installing ...

Страница 29: ...t Figure 15 Figure 15 Software License Agreement Panel 5 Please read the License Agreement and click Yes if you agree to its terms The system displays the Choose Destination Location panel Figure 16 which lets you specify a directory in which to install the application by first clicking the Browse button Or you can accept the default directory Figure 16 Choose Destination Location Panel ...

Страница 30: ...gure 17 Setup Complete Panel 7 Click the Finish button to conclude the setup The system again displays the main installation panel Figure 18 Figure 18 Main Installation Panel 8 Do one of the following If you wish to continue and install another program e g Easy CD Creator or DirectCD return to Step 3 on page 15 If you have installed all programs or if you wish to use the program you just installed...

Страница 31: ...er 4 0 is also included on the CD ROM and loads automatically Also be certain to review the ReadMe files for Easy CD Creator and the Help files for DirectCD These PDF files comprise the user documentation for the applications The files are entitled as follows Adaptec Easy CD Creator Quick Reference Guide 16 pages You can open this guide by selecting Start Programs Adaptec Easy CD Creator 4 Quick R...

Страница 32: ...software Refer to Appendix C Technical Support on page 28 if you wish to contact TEAC About Web Checkup Web Checkup is primarily a feature of the Easy CD Creator Deluxe Version software The Adaptec software bundled with the TEAC CD RW kit is a standard version Therefore the Web Checkup feature will not work unless you eventually upgrade to the Deluxe version For now you may disable this feature ...

Страница 33: ...atively you can double click the Create CD shortcut on the desktop Figure 20 Easy CD Creator Welcome Panel Using Easy CD Creator The Welcome panel for Easy CD Creator enables you to Create audio discs Create data discs Use CD Copier to copy discs additional CD ROM or DVD ROM drive required Use Jewel Case Creator to help you design and print jewel case cover art Upgrade to a deluxe version of Easy ...

Страница 34: ...tem displays an introductory screen for DirectCD Wizard Figure 21 which will guide you through Checking the status of a disc in the CD RW drive Preparing a CD R or CD RW disc for reading or writing Managing the final data when ejecting a DirectCD disc Figure 21 DirectCD Wizard Using DirectCD For information on using DirectCD refer to the user documentation in PDF format on the CD ROM or to the Help...

Страница 35: ...CD Creator 4 Uninstall To uninstall Easy CD Creator select Start Programs Adaptec DirectCD Uninstall DirectCD The system displays the Control Panels window Use the Add Remove Programs utility For additional information refer to your Windows documentation You can uninstall both programs from the Add Remove Programs object in the Control Panel ...

Страница 36: ...Uninstalling Programs 24 TEAC CD RW Drive User s Manual ...

Страница 37: ...wipe the surface of the disc from the surface to the outside edge Do not use benzene alcohol thinner or other solvents Figure 22 How to Handle Compact Discs CD R and CD RW Recommended Media One blank TEAC CD R disc and one blank CD RW rewritable disc are included in the package with your CD RW For optimum performance use 74 or 80 minute 8X speed rated blank CD R and CD RW media from TEAC or the fo...

Страница 38: ... the Eject button on the front of the drive to extend the disc tray refer to Figure 23 Remove the disc from the disc tray and place it in its protective case Then press the Eject button again to retract the disc tray back into the drive Figure 23 Ejecting the Disc Tray Disc Format Data Capacity CD DA 74 or 80 minutes CD ROM Mode 1 650MB or 700MB CD ROM XA Mode 2 Form 1 650MB or 700MB CD ROM XA Mod...

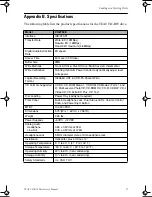
Страница 39: ...rite CD Formats Supported CD DA CD ROM Mode 1 CD ROM XA Mode 2 Form 1 and 2 Multi session PhotoCD CD ROM XA CD R CD RW CD I Video CD CD Extra CD Plus CD Text Disc Loading Power Tray caddy not required Front Panel Built in Headphone Jack Dual Status LEDs Volume Control Knob and Power Eject Button MTBF 100 000 POH Dimensions 5 75 W x 1 63 H x 7 56 D Weight 2 65 lbs Power Supplies 5VDC 12VDC Analog A...

Страница 40: ...rt ja teac de TEAC UK Ltd 5 Marlin House Croxley Business Park Watford Hertfordshire WD1 8YA Telephone 0923 225235 Fax 0923 236290 TEAC France S A 17 rue Alexis de Tocqueville CE 005 92182 ANTONY CEDEX Telephone 1 42 37 01 02 Fax 1 42 37 65 45 Japan Asia Middle East TEAC Corporation 3 7 3 Nakacho Musashino shi Tokyo 180 0006 Japan Field Service and Technical Support Section Data Storage Products S...

Отзывы: