


Test and Alignment Specification for RT2841 Series (v0.01).docx
Page 19 of 27
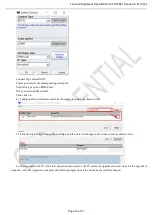
After burning, the HDCP key will movie to the folder HDCP_BACKUP.
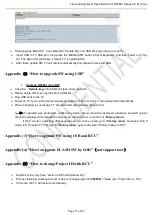
Appendix
⑽
“How to upgrade MAC Address using USB”
Create the folder named “MAC”, change the MAC key to “MAC_xxx.bin”(xxx is the number), put MAC key into
the folder.
Enable Factory Key
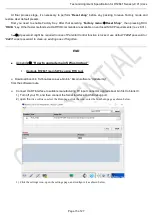
Plus the USB into the TV.
Go to “
Main menu
Service menu
USB Update
MAC Upgrade
“, click the right button.
If the toast show MAC Update OK, it means burn the key success.
After burning, the MAC key will movie to the folder MAC_BACKUP.
Note
⑨:
There is no this function which is only displaying.
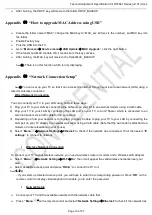
Appendix
⑾
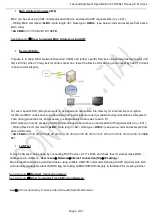
“Network Connection Setup”
Note
⑩
:You can set up your TV so that it can access the Internet through your local area network (LAN) using a
wired or wireless connection.
Wired Network Connection
You can connect your TV to your LAN using cable in three ways:
1) Plug your TV to your LAN by connecting the LAN port on your TV to an external modem using a Cat5 cable.
2) Plug your TV to your LAN by connecting the LAN port on your TV to an IP Sharer which is connected to an
external modem. Use Cat5 cable for the connection
3) Depending on how your network is configured, you may be able to plug your TV to your LAN by connecting the
LAN port on your TV directly to a network wall outlet using a Cat5 cable (Note that the wall outlet is attached to a
modem or router elsewhere in your house)
4) Select “
Menu
Network Settings
Ethernet
” to check if the network has connected. If not then select “
IP
settings
” to connect to network.
Wireless Network Connection
To connect your TV to your wireless network, you need a wireless router or modem and a Wireless LAN Adapter.
Select “
Menu
Network Settings
Wi-Fi
On
”, then it will appear the valid wireless networks near your
area.
Select available access point and press “
OK/
►” to connect the TV to it.
Note
(
11
):
- If you select a protected access point, you will have to enter the corresponding password. Press “
OK
”
on the
remote control to display virtual keyboard to enable you to enter the password.
Network Setup
Connect your TV and the available network with the network cable first.
Press
“
Menu
”
on the remote control and select “
Network Settings
Ethernet
” to check if the network has
Содержание RT41VS-EU
Страница 32: ...Test and Alignment Specification for RT2841 Series v0 01 docx Page 27 of 27...
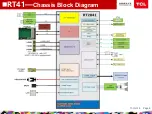
Страница 33: ...11 Oct 18 Page 8 nRT41 Chassis Block Diagram...
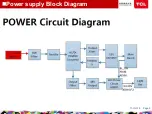
Страница 34: ...11 Oct 18 Page 9 nPower supply Block Diagram...
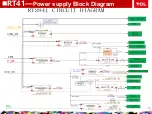
Страница 35: ...11 Oct 18 Page 10 nRT41 Power supply Block Diagram...
Страница 46: ...11 Oct 18 Page 23 nTrouble Shooting...
Страница 47: ...nTrouble Shooting 11 Oct 18 Page 24...
Страница 48: ...nTrouble Shooting 11 Oct 18 Page 25...
Страница 49: ...11 Oct 18 Page 11 nKey Test Point Main Power Supply 12V 12V Test point...
Страница 51: ...11 Oct 18 Page 13 nKey Test Point LDC1 1V5_DDR UDC1 3V3_STB to 1V5_DDR 3V3_STB STR Enable...
Страница 52: ...11 Oct 18 Page 14 LDB1 CORE 1V0 nKey Test Point 12V UDDB 12V TO 1V0...
Страница 53: ...11 Oct 18 Page 15 LDA1 5V nKey Test Point UDA1 12V TO 5V...
Страница 57: ...11 Oct 18 Page 19 nKey Test Point PANEL_VCC 12V Q900 PANEL_VCC...
Страница 58: ...11 Oct 18 Page 20 Main Chip 1 SOC Config 2 24MHz CRYSTAL nKey Test Point Test Point...
Страница 59: ...11 Oct 18 Page 21 nKey Voltage Key Voltage for RTD2841 TCL New Standard RTD2841 POWER 0V Test Point...


