background image

14

Schedule list

This function is used to perform scheduled recording.

1. Press 

Option

 on the remote control and select 

Quick 

    access > Schedule list

.

2. Press the 

OK

 or right direction button to display the 

    schedule list. 

3. To add a schedule into your schedule list, press the 
    red button first to display 

Schedule list

. Then,  

    - 

Channel number

: use the left or right direction 

      button to select the channel number.  
    - 

Start date

: use the digit buttons to set the recording 

      date.  
    - 

Start time

: set the starting time of recording. 

    - 

Stop time

: set the stopping time of recording. 

    - 

Schedule type

:

      . set 

Reminder

 to inform you that you can switch to 

        the scheduled programme when the time you set 
        comes. When the time is out and you don't execute 
        any operation, the dialog box will disappear and no 
        Further operation will be executed. 
      . set 

Record

 to check if you really want to start your 

        scheduled recording when the time you set comes. 
        When time is out and you don't execute any 
        operations, scheduled recording will start 
        automatically.  
    - 

Repeat type

: set different repeat mode of 

      recording. 

4. Press the left/right/up/down buttons to select 

Add

    then press

 OK

 to add the schedule you set into your 

    schedule list. 

5. Press the red button to repeat above procedures to 
    add another schedule. 

6. If you wish to edit or delete a schedule, select it and 
    press 

OK

 to enter. 

7. Press 

Exit

 to close the menu.

Advanced Functions

USB Functions

Your TV is fitted with a USB connector that enables you to 
view photos, listen to music or watch videos stored on a 
USB storage device. 

Supported file formats:

Picture:       JPEG
Music:         MP3
Video:         AVI, MP4, MPG, MPEG, TS


Note: some USB keys and USB products like digital     

    cameras or mobile phones are not fully compatible with     
    USB 2.0 standard so it may not work with the TV    
    multimedia player. Not  all USB keys or devices are 
    compatible for the USB function.

When a USB device is detected, it enters the 

Media


center 

menu directly.

Photo

To display photos if available.
1.  Select 

Media center > Photo

, then press 

OK

 to enter     

     the main file content browser.

2. In the main file content browser, use the left/right/up
    /down direction buttons to select a photo or an inner file 
    folder. 

3. Select an inner file folder, press 

OK

 to enter a sub file     

    content browser. 

4. Use the left/right/up/down direction buttons to select a 
    photo in either main or sub file content browser, press   

    Menu

 to display the photo menu in the folder mode. 

    -  

Sort:

 sort folders and photos by modification Date or  

        Name. 
    -  

Edit:

 copy, paste or delete a selected photo.

    -  

Parser: 

you can select 

Recursive

 to display photos  

       from all sub file folders.

5. Select a photo, press 

OK

 to watch, and a slide show 

begins from the selected photo. Press 

OK

 to pause the 

photo if you want to rotate or zoom the paused photo. 
Press 

Menu

 to display the photo menu in the browser 

mode. You can play, pause or rotate the photo, select 
different play mode, zoom mode and displaying effect, 
etc..

6. Press the related buttons on the remote control to 

perform the available functions shown on the function 
bar at the bottom of the TV screen.

To enter the 

Media center

 manually, press


Menu


on the remote control and select 

Media

.

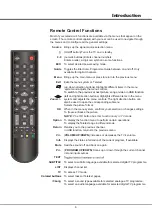
Содержание L32F1520

Страница 1: ...i ii iii iv SCALE SIZE COLOUR 1 1 72 MT31LA EAUAH HZ2013 08 262R0 2013 8 28 16 180X130mm B5 L32F1520 L39F1520 TCL L32F1520 L39F1520 AU 80G DN cn ou Huizhou dc com 2013 08 28 10 38 45 08 00...

Страница 2: ...User s Guide are provided for reference only and may differ from actual product appearance Product design and specifications may be changed without notice OPERATION MANUAL LED TV For use with models L...

Страница 3: ...se Environment Cleaning Hanging the TV Set on the Wall Sockets Remote Control Functions Important Information Buttons on the TV Switching on Switching off Using Menu System Automatic Channel Set up Au...

Страница 4: ...and the signal cable to moisture Do not place the set on an unstable cart stand or table Use Environment Place the set on a place that allows good ventilation Do not use the set near damp and cold ar...

Страница 5: ...output The SPDIF socket can be used to connect a compatible digital audio receiver or Increases the volume or scans up through the program Note In all signal sources press it to increase the volume w...

Страница 6: ...R Headphone socket output This socket can be used to connect headphones or stereo earphones Warning excessive sound pressure from earphones and headphones can cause hearing loss HEADPHONE or USB socke...

Страница 7: ...l list and input sources V VOLUME UP DOWN Increases or decreases the TV s volume Returns you to the previous channel In USB function returns to the previous menu LIST Displays channel list left and ri...

Страница 8: ...the TV set The aerial socket 75 OHM VHF UHF cable can be used for connecting an external aerial or other equipment fitted 4 When powered on the TV will be turned on directly or be in standby mode If...

Страница 9: ...ton Or press Exit to exit or interrupt the search halfway 3 Once the automatic search ends the set enters the next step automatically You can press the up or down direction button to select your locat...

Страница 10: ...name finally press OK to confirm This allows you to update all available channels without altering the sorting of existing channels 1 Display the Channel install menu press the up or down direction bu...

Страница 11: ...reduction this setting reduces picture static or any type of interference This feature is especially useful for providing a clearer picture in weak analog signal conditions Press the left or right dir...

Страница 12: ...ption allows you to lock a certain external source you want to lock Press the OK or right direction button to display Input lock menu then press the up or down direction button to select a certain ext...

Страница 13: ...he OK or right direction button to display its submenus Subtitle press the left or right direction button to turn On or off the subtitles Subtitle type press the left or right direction button to sele...

Страница 14: ......

Страница 15: ...tos listen to music or watch videos stored on a USB storage device Supported file formats Picture JPEG Music MP3 Video AVI MP4 MPG MPEG TS Note some USB keys and USB products like digital cameras or m...

Страница 16: ...rform the available functions shown on the function bar at the bottom of the TV screen Video To watch video if available 1 Select Media Center Video then press OK to enter the main file content browse...

Страница 17: ...orientation of the indoor outdoor antenna 2 Check the connection of antenna 3 Fine tune the channel 4 Try another channel Broadcasting failure may happen Ignition Black spots or horizontal streaks ap...

Отзывы: