background image

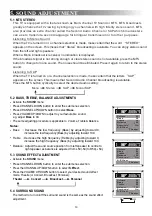
6.1  AUTO SEARCH

You can set your TV to receive local TV channels (from an antenna) or CATV channels (when you have Cable TV 
service ). Then, use AUTO SEARCH to set up the channels that are available for you. This makes it easy for you
to select only the available TV stations when press the CHANNEL UP or DOWN button. Before you start AUTO
SEARCH, connect the Antenna or CATV signal as detailed.

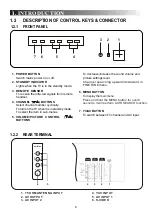
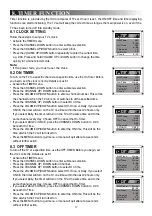
Press the CHANNEL UP/DOWN button to select 

Auto search

.

Press the VOLUME UP button to start the auto searching, and then all available  

 channels will be stored from No.1(in CATV mode) or No. 2(in TV mode) and 
 upward in order. Auto-searching will stop after all the frequency bands are 
 searched, and the last programme which you select before auto search action 
 will reappear on the screen. Press the VOLUME DOWN button if you need to
stop AUTO SEARCH during the process.

Activate the 

PRESET

 menu.

Press the CHANNEL DOWN button to enter submenu selection. 
Press the CHANNEL UP/DOWN button to select 

TV/CATV

.

Press the VOLUME UP/DOWN button to select 

TV

 or 

CATV

 to be the signal 

source. 

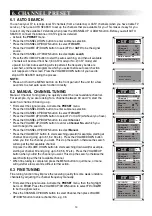
6.2  MANUAL CHANNEL TUNING

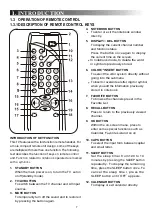
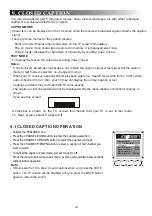
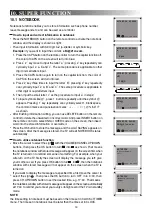
Press the VOLUME UP button to start searching upward(for example, starting at
channel 60 and going up to 61, 62, 63,etc.). Press the VOLUME DOWN button
when you find the channel you want. This stop the search, otherwise the search
will stop at the first available channel.
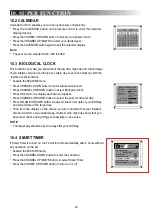
Or press the VOLUME DOWN button to start searching downward(for example, 
starting at channel 60 and going up to 59, 58, 57,etc.). Press the VOLUME UP
button when you find the channel you want. This stop the search, otherwise the
search will stop at the first available channel. 

When fine tuning is completed, press the MENU button to quit menu, or menu
will quit after a few seconds without further action.

Press the CHANNEL UP/DOWN button to select 

Manual

.

First select the signal source. Activate the 

PRESET

 menu.

Press the CHANNEL DOWN button to enter submenu selection. 
Press the CHANNEL UP/DOWN button to select 

TV/CATV

.

Press the VOLUME UP/DOWN button to select TV or CATV(whichever you have).
Press the CHANNEL UP/DOWN button to select 

Channel

.

Press the VOLUME UP/DOWN button to enter a 

Channel No. 

at which you

want to begin the search.
 

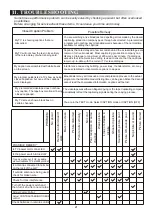
 6. CHANNEL PRESET

NOTE:

Press and hold the MENU button on the front panel of the unit for a few
seconds to start auto search action directly.

Add/Erase

Fine

0

F a v o u r i t e  l i s t

Add

2

Channel

Manual

Up

TV

TV/CATV

Auto search

Programming

P l e a s e  W a i t

                  TV       3

Add/Erase

Fine

0

F a v o u r i t e  l i s t

Add

CATV

TV/CATV

Auto search

Manual

Up

Manual  Channel Tuning lets you quickly select the next available channel.
For example, if you are looking for a channel between 60 and 70, start the
search at channel 60 and go up.

Add/Erase

Fine

0

F a v o u r i t e  l i s t

Add

61

Channel

TV/CATV

Auto search

Manual

Up

60

Channel

CATV

Add/Erase

Fine

0

F a v o u r i t e  l i s t

Add

59

Channel

TV/CATV

Auto search

Manual

Down

CATV

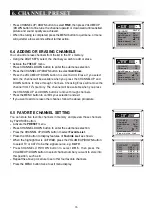
6.3  FINE TUNING

Fine tuning function may improve the receiving quality for some weak /unstable
channels by adjusting the channel frequency manually.

First select the signal source. Activate the 

PRESET

 menu, then the highlight 

bar is on 

TV/AV

. Press the VOLUME UP/DOWN button to select 

TV

 or 

CATV


to be the signal source. 
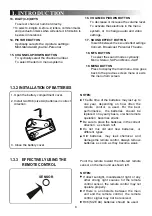
Press the CHANNEL UP/DOWN button to select Channel, then press VOLUME
UP/DOWN button to entera channel No., e.g. 08. 

Add/Erase

Fine

0

F a v o u r i t e  l i s t

Add

59

Channel

TV/CATV

Auto search

Manual

Down

CATV

14

Содержание 34189S6

Страница 1: ...Alignment Procedure 68 5 Block Diagram 72 6 Schematic Diagram 73 7 PCB Layout 74 8 Explode View Diagram 76 This manual is the latest at the time of printing and does not include the modification which...

Страница 2: ...Printing Spray Printing Spraying Paint TO PMC PMC PE QA IQC i ii iii iv SCALE SIZE COLOUR A R F NO ODF ODF DATE 1 72 A189S6 X499A 1 1 48 PREPARED BY REVIEWED BY ENG CHECKED BY OPERATION MANUAL A5 PLS...

Страница 3: ...1 MANUAL DEL USUARIO 34189...

Страница 4: ...er la combinaci n carro aparato para evitar lesiones al tropezarse 13 Desenchufe este aparato durante tormentas el ctricas o cuando no se va a usar por largos per odos de tiempo 14 Refiera todos los s...

Страница 5: ...protegerlo del calentamiento excesivo Nunca cubra las ranuras o aberturas con un pa o u otro material Nunca bloquee las ranuras de ventilaci n de la parte inferior colocando el equipo sobre una cama s...

Страница 6: ...le una sistema de antena externo se debe poner extremo cuidado de no tocar las l neas de energ a o circuitos ya que el contacto con estos podr a ser fatal 3 Para protecci n adicional de este televisor...

Страница 7: ...las operaciones normales siguiendo el procedimiento detallado en sus instrucciones de operaci n no intentar ning n otro ajuste Desenchufar el televisor y llamar a su distribuidor o t cnico de servici...

Страница 8: ...avoritos 7 AJUSTE DE IMAGEN 7 1 Configuraci n manual de imagen 7 2 Configuraci n autom tica de imagen 8 FUNCI N DE TEMPORIZADOR 8 1 Configuraci n de Reloj 8 2 Temporizador Encendido ON 8 3 Temporizado...

Страница 9: ...3 ENTRADA AV 2 4 YUV ENTRADA 4 BOTONES DE CANALES Selecciona el n mero de programa en forma c clica Para encender el televisor cuando esta en modo de detenci n standby Para seleccionar el tem en los...

Страница 10: ...amente le bot n 5 BOTON CUADERNO NOTEBOOK Para ingresar o salir de la ventana cuaderno notebook directamente 6 BOTON SUBTITULO CAPS Para seleccionar la forma de entrada entre letras may sculas y min s...

Страница 11: ...EFECTIVO DEL CONTROL REMOTO ABRA LA CUBIERTA DE COMPARTIMIENTO DE BATER A INSTALE DOS BATER AS R06 TAMA O AA EN LA DIRECCI N CORRECTA CIERRE LA CUBIERTA DE BATER A SENSOR OBSERVACIONES La vida til de...

Страница 12: ...anales consulte a su compa a de cable local Caja CATV o caja sat lite no suministrada Desde un sistema de cable o antena satelital 75 OHM cable coaxial Desde sistema de cable VHF UHF Combinaci n anten...

Страница 13: ...ones CANAL ARRIBA ABAJO CHANNEL UP DOWN del televisor o control remoto para desplazarse por los tems en el men Use los botones VOLUMEN ARRIBA ABAJO VOLUME UP DOWN del televisor o el control remoto par...

Страница 14: ...vance en la barra del men principal SONIDO SOUND CARACTERISTICA FEATURE TEMPORIZADOR TIMER O CONFIGURAR PRESET Para salir del men principal presionar el bot n men nuevamente 4 5 SELECCION DE SUB MENU...

Страница 15: ...si la recepci n es pobre Presionar el bot n COLOR una vez para visualizar el sistema de color actual Presionar el bot n COLOR en forma repetida para seleccionar sus sistema de color deseado Auto NTSC...

Страница 16: ...AGUDOS Y AJUSTES DE BALANCE BASS TREBLE AND BALANCE ADJUSTMENTS Activar el men SONIDO SOUND Presionar el bot n CANAL ARRIBA ABAJO CHANNEL UP DOWN para seleccionar Bajos Bass Presionar VOLUMEN ARRIBA A...

Страница 17: ...ona antes de que la acci n de b squeda autom tica reaparezca en la pantalla Presionar el bot n VOLUMEN ABAJO VOLUME DOWN si necesita detener la BUSQUEDA AUTOMATICA AUTO SEARCH durante el proceso NOTA...

Страница 18: ...moverse a trav s de los canales Elegir Borrar ERASE eliminar el canal de la memoria del televisor El canal estar disponible cuando presione los botones CANAL ARRIBA CHANNEL UP y DOWN ABAJO para mover...

Страница 19: ...n de ruido Encender ON o apagar OFF esta Noise Red opci n Si decide encenderla ON reducir el ruido y mejorar la calidad de la imagen Temperatura del color seleccionar Normal Normal Tibio Warm o Fr o C...

Страница 20: ...enda o cambia en un momento espec fico Presionar el bot n CANAL ARRIBA ABAJO CANAL UP DOWN para seleccionar En tiempo On Timer Presionar el bot n VOLUMEN ARRIBA ABAJO VOLUME UP DOWN para seleccionar A...

Страница 21: ...ar la pantalla seleccionar C Capt Subt tulos a Apagado Off 9 1 FUNCIONAMIENTO DE SUBTITULOS CLOSED CAPTION OPERATION Activar el men CARATERISTICA FEATURE Presionar el bot n CANAL ABAJO CHANNEL DOWN pa...

Страница 22: ...arezca Presionar la tecla 1 en forma repetida puede seleccionar en forma repetida puede seleccionar en forma c clica 1 espacio en blanco marcas comunes y signos de puntuaci n como se muestra Despu s d...

Страница 23: ...terminado para vivir en armon a con los ritmos del medio ambiente Activar el men CARACTERISTICA FEATURE Presionar el bot n CANAL ABAJO CHANNEL DOWN para ingresar la selecci n del submen Presionar el b...

Страница 24: ...minuto Si un di logo sobrepasa este rango se usa edici n selectiva para asegurar que los subt tulos permanezcan actualizados con el di logo actual de la pantalla del televisor Mi subt tulo esta codif...

Страница 25: ...rrosa POSIBLE SOLUCION Esta conectado el cable Esta encendido el televisor Intentar un nuevo canal si funciona bien es posible que sea un problema del cana Est el televisor en modo de detenci n Est co...

Страница 26: ...s Espa ol Franc s y Portugu s Entrada de Antena VHF UHF CATV 750HM No balanceado Tipo F Tama o CRT 86CM Entrada Salida de Video 75 ohm 1 0p p RCA Entrada de Audio 10k ohm 0 5 Vrms alta impedancia Sali...

Страница 27: ...OPERATION MANUAL 1 34189...

Страница 28: ...13 Unplug this apparatus during lightning storms or when unused for long periods of time 14 Refer all servicing to qualified service personnel Servicing is required when the apparatus has damaged in a...

Страница 29: ...to an antenna discharge unit size of grounding conductors location of antenna discharge unit connection to grounding electrode and requirements for the grounding electrode Note to CATV system install...

Страница 30: ...n by following the detailedprocedurein your operating instructions do not attempt any further adjustment Unplug the set and call your dealer or service technician Whenever the television set is damage...

Страница 31: ...PRESET 6 1 AUTO SEARCH 6 2 MANUAL CHANNEL TUNING 6 4 ADDING OR ERASING CHANNELS 6 3 FINE TUNING 6 5 FAVORITE CHANNEL SETTING 7 PICTURE ADJUSTMENT 7 1 MANUAL PICTURE SETTING 7 2 AUTO PICTURE SETTING 8...

Страница 32: ...TROL BUTTONS 1 2 2 REAR TERMINAL 1 75 OHM ANTENNA INPUT 2 AV OUTPUT 3 AV INPUT 2 4 YUV INPUT 5 AV INPUT 1 6 S VIDEO 2 3 1 2 STANDBY INDICATOR Lights when the TV is in the standby mode 6 MENU BUTTON To...

Страница 33: ...creen 6 COLOR INSERT BUTTON To select the color system directly without going into the submenu 7 FAVORITE BUTTON To browse the channels preset in the Favorite List 8 RECALL BUTTON Press to return to t...

Страница 34: ...emote control may not operate properly If there is an obstacle between the main unit and the remote control the remote control signal may not be received R06 SIZE AA batteries should be used SENSOR NO...

Страница 35: ...lied VHF Antenna Not supplied OR OR OUT IN ANT IN From Cable System or Satellite Antenna 75 ohm Coaxial Cable From Cable System UHF VHF Rod Antenna Supplied CATV Box or Satellite Box Not supplied Note...

Страница 36: ...rol have the same functions as those in the menu They can be used on their own or to compliment the on screen display 3 1 MAP OF THE ON SCREEN MENU 3 MENU OVERVIEW PICTURE FEATURE TIMER PRESET Color 5...

Страница 37: ...he submenu selection Then press the CHANNEL UP or DOWN button to select the desired item in the submenu e g Brightness in the PICTURE menu 4 6 ADJUSTING OPTION Press VOLUME UP DOWN button to adjust th...

Страница 38: ...the submenu selection Add Erase Fine 0 F a v o u r i t e l i s t Add 2 Channel TV TV CATV Auto search Manual Up 4 9 SELECTING COLOR SYSTEM This feature allows you to select your desired Color system...

Страница 39: ...VOLUME UP DOWN to adjust to your favourable sound e g adjust Bass to 30 5 2 BASS TREBLE BALANCE ADJUSTMENTS Bass Decrease the low frequency Bass by adjusting toward 0 increase the low frequency Bass...

Страница 40: ...annel When fine tuning is completed press the MENU button to quit menu or menu will quit after a few seconds without further action Press the CHANNEL UP DOWN button to select Manual First select the s...

Страница 41: ...t Favorite List Press the OK button to display features of Favorite List as shown Press CHANNEL UP DOWN button to select CH 3 then press the VOLUME UP DOWN button to select channel number you want to...

Страница 42: ...t Obtain natural skin tones Blue Back Turn this option ON or OFF If you choose ON a solid blue background screen will appear if the TV is on a weak channel for example if reception is very poor or if...

Страница 43: ...is provided by the microcomputer of TV set Once it is set the ON OFF time and time displaying functions can start functioning The TV set will keep the correct time as long as the main power is on eve...

Страница 44: ...ceives a special effects playback signal i e Search Slow Still from a VCR s video output channel Ch3 or Ch4 your TV may not display the correct caption or text Captions and texts may not match the TV...

Страница 45: ...R mode on the screen then insert word into the stored information or overwrite it Press the OK button to store the message and the word SAVING appears on the screen After the message is stored the TV...

Страница 46: ...year month and day Press VOLUME UP DOWN button to adjust to the correct date of your birthday andcorrect date of the target day Then from the display on the screen you can conclude that your intellect...

Страница 47: ...n Since the decoder cannot read the compressed information captions will be lost The videotape was either an illegal copying or the tape duplicating company accidentally left out the captioning signal...

Страница 48: ...ower Supply DC 3V two batteries size AA PACKINGLIST Product is subjected to change without notice 150W 73 kg 920X562X685 MM 6W 6W 110 240V 50 60Hz PAL M N NTSC M 1 TV set one set 2 Remote Control Hand...

Страница 49: ...72 A189S6 X499A...

Страница 50: ...PAL M PAL N Scanning lines and frequencies 525 625 lines 15 625kHz 15 75kHz 50 60Hz Color sub carrier 3 579MHz 2 3 IF picture 45 75MHz sound 4 5MHz 2 4 Power Supply 110V 240V AC 50 60Hz 2 5 Aerial Inp...

Страница 51: ...merican Stereo Indicator MPX 3 6 Remote Effective Distance 8m 3 7 Construction of Front Side Panel Main Power Switch Remote Sensor Menu Select S VHS Input TV AV Select Standby Indicator Program Volume...

Страница 52: ...0E2 BATT TERMINAL WF 1 67 X31028 0E2 SPRING BATTERY WF 1 67 X31029 0E2 SPRING BATTERY WF 1 74 009022 60C POLYBAG HANDSET 9CMX22CM WF 1 08 HS46F0 PAY ASS Y PACKING OF IR HANDSET 1 76 002091 0AT CARTON...

Страница 53: ...SA817 AAX TRANSISTOR 2SA817AY 1 Q208 11 630MFP 0AX TRANSISTOR IRF630MFP 1 Q414 13 00M24C 08P IC EEPROM 8K M24C08 WRITE 1 IC001 13 STV817 2AS IC STV8172 1 IC301 13 000040 52P IC 4052 1 IC901 18 CB0100...

Страница 54: ...18 CB0562 JNX RES C F 5 6k OHM 1 6W 5 2 R256 R418 18 CB0681 JNX RES C F 680 OHM 1 6W 5 2 R106 R940 18 CB0683 JNX RES C F 68K OHM 1 6W 5 1 R941 18 CB0750 JNX RES C F 75 OHM 1 6W 5 1 R923 18 CB0820 JNX...

Страница 55: ...C230 26 AIC221 KBX CAP CER 220 PF 500V 10 B 2 C433 C441 26 AIC332 KBX CAP CER 3300 PF 500V 10 B 1 C402 26 AIC391 KBX CAP CER 390 PF 500V 10 B 1 C403 26 EBP102 KBX CAP CER 1000 PF 50V 10 B 4 C109 C226...

Страница 56: ...J303 J304 J623 J917 41 WJ0085 B00 WIRE BARE JUMPER 8 5MM 5 D261 J202 J203 J206 J905 41 WJ0085 B00 WIRE BARE JUMPER 8 5MM 4 J907 J924 J936 J945 41 WJ0090 B00 WIRE BARE JUMPER 9MM 1 J309 41 WJ0095 B00...

Страница 57: ...3 FOR C411 1 2 3 66 343730 0B0 HOLLOW RIVET 1 6X3 0XL3 2 10 FOR T402 1 2 4 5 6 7 8 9 10 11 66 343730 0B0 HOLLOW RIVET 1 6X3 0XL3 2 3 FOR C414 1 2 3 66 343730 0B0 HOLLOW RIVET 1 6X3 0XL3 2 2 FOR C419...

Страница 58: ...OHM 1 4W 5 2 R808A R810 18 CE0332 JNX RES C F 3 3k OHM 1 2W 5 1 R843 18 FE0124 JNX RES M O 120K OHM 1 2W 5 1 R840 18 FG0104 JHX RES M O 100K OHM 2W 5 2 R851 R852 18 FG0221 JHX RES M O 220 OHM 2W 5 1 R...

Страница 59: ...832 35 139730 00X FERR BEAD BF60 2 FOR L801 35 237250 00X FERR BEAD HF70 4 5X5 0 2 FOR D831 35 237250 00X FERR BEAD HF70 4 5X5 0 2 FOR D833 36 TRF127 AX2 TRANSFORMER CONV BCK 4922 1 T803 41 WJ0060 B00...

Страница 60: ...F 4 7k OHM 1 6W 5 1 R1232 18 CB0561 JNX RES C F 560 OHM 1 6W 5 3 R1205 R1206 R1207 18 CB0682 JNX RES C F 6 8K OHM 1 6W 5 1 R1203 18 CB0821 JNX RES C F 820 OHM 1 6W 5 3 R1201 R1209 R1213 25 BCB470 M1X...

Страница 61: ...F 50V 20 1 C1010 26 ABC339 CZX CAP CER 3 3 PF 50V 0 25 SL 2 C1001 C1002 26 EBP103 ZFX CAP CER 0 01UF 50V 80 20 F 4 C1031 C1034 C1037 C1038 26 EBP152 KBS CAP CER 1500PF 50V 10 1 C1012 26 EBP220 JCS CAP...

Страница 62: ...9730 00X FERR BEAD BF60 2 FOR C508 L505 L506 40 2980UA CRA P C B CRT BD 1 41 WJ0050 B00 WIRE BARE JUMPER 5MM 2 L502 L504 41 WJ0060 B00 WIRE BARE JUMPER 6mm 3 R504 R507 R512 41 WJ0075 B00 WIRE BARE JUM...

Страница 63: ...1 C714 26 EBP101 JCS CAP CER 100 PF 50V 5 2 C706 C708 26 EBP103 ZFX CAP CER 0 01UF 50V 80 20 F 1 C701 34 A100K0 1IX COIL CHOKE 10UH 10 1 L701A 35 LB1005 0IX FERR BEAD H75 3 5X1X5 3 L702 L703 L704 40 H...

Страница 64: ...1 56 A189PK 0HA9F POWER KNOB SJC 1 62 216780 00D PLATIC TAPE 12 SJC 4 62 269940 0HA POWER SW CONNECTIONABS LG H121 HB SJC 1 62 321780 0HG CRT COIL MTG 25 29 SJC 4 62 321930 1UG CRT MTG SJC 4 62 387950...

Страница 65: ...22 UF 16V 20 2 C210 C304 25 BCB330 M1X CAP ELEC 33 UF 16V 20 1 C235 25 BFB108 M1X CAP ELEC 0 1 UF 50V 20 1 C211 25 BMJ391 M1X CAP ELEC 390 UF 400V 20 1 C806 26 EBP102 KBX CAP CER 1000 PF 50V 10 B 1 C3...

Страница 66: ...MB 3UN MAIN BD BRACKET SJC 1 08 A189S6 PA1 ASS Y PACKING PARTS 1 49 382550 BAT BATTERY R06P AA 1 5V 5 2 71 RADIOV SCR9A LABEL SCREEN 1 72 A189S6 X499A OPERATION MANUAL 1 74 022032 6WEAD PLASTIC BAG 1...

Страница 67: ...H POWER 1 SW801 51 DC0220 0QB01 POWER CORD 1 08 A189S6 SW1 1 62 310430 0HA LED HOLDER COMMON SJC 1 08 B189S6 SIY ASS Y SIDE AV BD 1 40 2513MT SIF P C B SIDE AV BD 1 41 WJ0100 B00 WIRE BARE JUMPER 10MM...

Страница 68: ...lance adjustment Mode Be used for White balance adjustment In Factory Mode press BUS OFF to enter and exit Default Value OK mode Be used for default value setting before TV leaves Factory In Factory M...

Страница 69: ...eat step 2 3 to make X 284 Y 299 Note M134 chassis can adjust white balance automatically In factory mode press I2C BUS to enter in The white balance in the other two colors temperature is Warm 296 29...

Страница 70: ...a HPOS6 12 CNTX 7F BRTC 40 ST3 20 PARA6 16 CNTN 08 COLC 2C SV3 20 TRAP6 2B BRTX 20 COLP 00 SV4 19 HSIZE6 2C BRTN 20 SCOL 07 SVD 19 CNRT6 0B COLX 35 SCNT 0C ASSH 07 CNRB6 0D COLN 00 CNTC 4C SHPN 10 VEH...

Страница 71: ...em Data Item Data Item Data RC C 80 RC W 80 D COL 32 S COL 32 GC C 80 GC W 80 D BRI 32 S BRI 32 BC C 80 BC W 80 D CON 5A S CON 32 GD C 40 GD W 40 D SHP 32 S SHP 32 BD C 40 BD W 40 YUVGC 03 YUVBC 03 FA...

Страница 72: ......

Страница 73: ...34189S6 01 A189S6 AG49...

Страница 74: ......

Страница 75: ......

Страница 76: ......

Отзывы: