


Safety warnings
Read the safety warnings carefully and only use the product as described in these
instructions to avoid accidental injury or damage. Keep these instructions for future
reference. If you pass this product on to another person, remember to give them these
instructions.
Intended use
The trimmer is designed for trimming excess hair off the nose, ears, sideburns, beard,
neck and eyebrows.
It is intended for private use and is not suitable for commercial purposes.
Danger to children
• Do not use the device on children. Keep the device and all accessories out of the reach
of children.
• Keep small parts and packaging materials out of the reach of children.
There is a risk of suffocation and injury!
• Swallowing batteries can be fatal. If a battery is swallowed, it can cause severe internal
chemical burns and even death within 2 hours. Therefore, keep both new and old bat-
teries and the product out of the reach of children. If you think that a battery has been
swallowed or has got into the body in any other way, seek medical advice immediately.
Risk of injury
• Do not insert the attachments deeper than 0.5 cm into your ear or nostril, as you could
injure your eardrum or the mucous membrane in your nose.
• When using the device, make sure the attachment is securely fitted.
• The trimmer must not be used if the device or the attachments show any signs of
damage. Only use the original accessories.
• The battery provided must not be charged, taken apart, thrown into fire or short-
circuited.
• If the battery leaks, avoid contact with skin, eyes and mucous membranes.
If necessary, rinse the affected areas with water and consult a doctor immediately.
Material damage
• When inserting the battery, ensure that the polarity (+/–) is correct.
• When cleaning the device, the battery compartment cover must be securely closed.
• Never immerse the device in water.
• After use, turn the device off and put the protective cap onto the detail attachment.
• Protect the batteries and the product from excessive heat. Remove the battery from
the product when it is flat or you do not intend to use the product for a prolonged
period. This will help prevent damage caused by leakage.
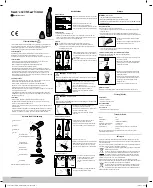
At a glance (contents)
Initial operation
Inserting the battery
1. Twist the battery compartment cover anti-
clockwise as far as it will go and pull it off.
2. Insert the battery provided.
Ensure that the polarity (+/–) is correct.
Put the battery compartment cover back on and
twist it clockwise as far as it will go.
Switching on/off
1. Remove the protective cap if you have not already done so.
2. Slide the On/Off switch forwards (
I
) or backwards (
0
) again to switch the device on
or off again. As soon as the device is switched on, the built-in light at the front of the
cutting attachment will also light up.
Use
• You should always use a mirror when using the device.
• Clean the device after each use as described in the chapter “Cleaning”.
After cleaning, put the cutting attachment followed by the protective cap onto
the device.
Using the cutting attachment
To affix the cutting attachment, place it onto the
handpiece and twist it clockwise as far as it will
go. You should feel and hear it click into place.
To remove the cutting attachment, turn it anti-
clockwise and then pull it off.
Trimming nose hair
CAUTION
– risk of injury
Do not insert the attachments deeper than 0.5 cm into your nostril, as you
could damage the mucous membrane in your nose.
1. Switch the device on and carefully insert the
cutting attachment into the front section of your
nostril.
2. Remove nose hair by carefully moving the trimmer
in a circular motion.
3. After use, switch the device off.
Trimming ear hair
CAUTION
– risk of injury
Do not insert the cutting attachment into your ear canal, as this may
damage the eardrum.
1. Switch the device on and carefully insert it into the
outer parts of your ear.
2. Carefully move the cutting attachment along the
hairy parts of your ear.
3. After use, switch the device off.
Using the detail attachment
Shaping and styling
1. To remove the cutting attachment, turn it anti-
clockwise and then pull it off.
2. Attach the detail attachment to the device and
remove the protective cap.
3. Switch on the device.
4. Move the detail attachment downwards over the
skin at a flat angle without applying pressure.
Do not move the device in an upward or sideways
motion.
Trimming eyebrows
SHO
R
T
LO
NG
2mm
SHOR
T
LO
N
G
4mm
1. Place the comb attachment on top of the
detail attachment. Position it with either
the longer or the shorter prongs facing
forwards, depending on the length you
want to trim at.
SH
O
R
T
LO
NG
S
HO
R
T
LO
NG
2. Carefully move the comb along your eyebrow in
the direction of hair growth.
Cleaning
NOTICE
– material damage
• Never immerse the device in water.
• The battery compartment cover must be closed securely.
• Do not use abrasive or caustic cleaning agents, or hard brushes, etc.,
for cleaning.
After each use
M
Clean the device after every use.
1. Switch off the device, turn the attachment anticlockwise and pull it off.
2. You can rid the attachments of hair by tapping them gently or blowing the hair out.
You can also remove hair from the attachments using the cleaning brush provided.
3. Clean the attachment under warm running water.
4. Dry the clean attachment and, if necessary, the
handpiece with a soft cloth.
5. After drying, put the cutting attachment followed by the protective cap onto the
device. This ensures the best possible protection for the device.
Cleaning the cutting mechanism inside the detail and cutting attachments
M
Clean the cutting mechanism after every third use.
1. Switch off the device.
Drive
spindle
2. To remove the attachment, turn it anti-clockwise
and then pull it off.
3. Brush any remaining hair out of the attachment
and the exposed drive spindle on the device using
the cleaning brush.
4. Rinse the attachment with the cutting mechanism
under running water and leave it to dry completely.
5. Place the cutting attachment back onto the device
and twist it clockwise until tight.
6. If necessary, dry the handpiece with a soft cloth.
7. Place the protective cap on the device.
Cleaning the handpiece
M
Wipe down the handpiece with a soft, slightly damp cloth.
Problems / solutions
Not working
• Is the battery flat?
• Has the battery been inserted correctly?
Motor not running smoothly
• Is the attachment dirty?
Motor stops
• Is the battery compartment cover properly attached?
Technical specifications
Model: 312
Product number:
661 159
Battery:
1x
LR6(AA)/1.5
V
(ZnMn02)
Operating time (with battery):
approx. 90 minutes
Ambient temperature:
+10 to +40 °C
Manufactured by:
Jaxmotech GmbH, Ostring 60, 66740 Saarlouis
Germany
In the course of product improvement, we reserve the right to make technical and
optical modifications to the product.
Disposal
This product, its packaging and the battery provided have been manufactured from
valuable materials that can be recycled. Recycling reduces the amount of refuse and
helps to preserve the environment.
Dispose of the packaging at a recycling point which sorts materials by type. Make use of
the local facilities provided for collecting paper, cardboard and lightweight packaging.
Devices marked with this symbol must not be disposed of along with nor-
mal household waste!
You are legally obliged to dispose of old devices separately from household
waste. Electronic devices contain hazardous substances and, if stored or
disposed of improperly, can cause harm to health and the environment.
Information about collection points where old devices can be disposed of free of charge
is available from your local authorities.
Single-use batteries and rechargeable batteries must not be disposed of
along with household waste!
You are legally obliged to dispose of flat standard batteries and flat re-
chargeable batteries at a local authority collection point or to return them
to a battery retailer.
Nose and Ear Hair Trimmer
131573FV05X06XIII · 2023-03
en
Instructions for use
LONG
SHOR
T
LONG
SHOR
T
On/Off switch
Handpiece
Drive spindle
Detail attachment for trimming
sideburns, beard and neck
Cutting attachment for trimming
nose and ear hair
Comb attachment for trimming
eyebrows
Cleaning brush
Not illustrated: Storage pouch
Protective cap
Light
131573 de en Nasen_Ohrhaatrimmer_661159 v4.indd 2
131573 de en Nasen_Ohrhaatrimmer_661159 v4.indd 2
12.04.23 11:53
12.04.23 11:53


