


Maintenance, Service, and Repair
Batteries
Page 7
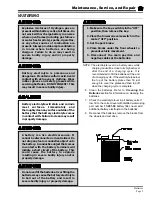
A battery is a live electrical source. It
cannot be disconnected or neutralized. Do
not drop any tool or conductive object onto
the battery. A conductive object that comes
in contact with the battery terminals will
initiate a short circuit of the battery. This
could cause the battery to explode
resulting in severe bodily injury and/or
property damage.
Battery electrolyte is poisonous and
dangerous. It contains sulfuric acid. Avoid
contact with skin eyes or clothing. Wear
rubber gloves and safety glasses while
servicing batteries. DO NOT INGEST! This
may result in severe bodily injury.
15. Install the batteries in reverse order. Refer to the
Illustrated Parts List
for battery cable routing.
16. It is recommended to replace the battery terminal
hardware when replacing the batteries.
17. Torque the terminal hardware to 7-8 ft.-lbs.
18. Tighten the hold downs so that the batteries are
secure but not so tight as to deform the batteries.
19. Remove the blocks from the wheels and test drive.
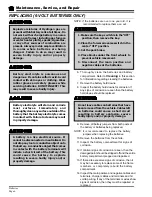
Moist Charge Batteries
Moist charged batteries are shipped without battery
electrolyte. This allows for a much greater shelf life of
the battery. Moist charged batteries must be filled with
electrolyte and charged before putting into service.
Battery electrolyte is a solution of acid and water that is
formulated to be used in wet lead acid batteries and is
available at most automotive parts distributors that carry
batteries.
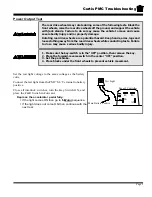
When torquing battery hardware, use a
backup wrench on the battery bolt and
tighten the nut. Failure to use a backup
wrench may damage the battery post.
1. Make sure the key-switch is in the “OFF”
position, then remove the key.
2. Place the forward-reverse switch in the
center “OFF” position.
3. Set the park brake.
4. Place blocks under the front wheels to
prevent vehicle movement.
5. Disconnect the main positive and
negative cables at the batteries.
Do not operate or charge a vehicle
equipped with moist charged batteries until
the batteries have been filled with
electrolyte and charged. Operating or
charging moist charged batteries before
filling and charging will damage the
batteries resulting in premature failure of
the batteries.
Battery electrolyte will stain and corrode
most surfaces. Immediately and
thoroughly clean any surface outside of the
battery that the battery electrolyte comes
in contact with. Failure to clean may result
in property damage.
6. Fill all battery cells with electrolyte to the proper
level.
7. Thoroughly clean any spilled electrolyte from the
batteries or the ground. Refer to
Cleaning the
Batteries
for information on cleaning the
batteries.
8. Reconnect the battery cables, connect the
batteries to the charger and allow the charger to
complete one charging cycle.
9. Remove the blocks from the wheels and test drive.
The batteries are now ready to be put into service.
Содержание B0-012-10
Страница 2: ......
Страница 12: ...B2 48 With Stake Side Dump Bed Option SC1 00 Stock Chaser E4 55 Sit Down Tow Tractor C4 25 Sit Down Tow Tractor...
Страница 26: ...TAYLOR DUNN...
Страница 53: ...Maintenance Service and Repair Steering Page 15 Exploded View of Steering Gear...
Страница 54: ...TAYLOR DUNN...
Страница 69: ...TABLE OF CONTENTS Throttle Linkage Adjustments 2 Magnetic Sensor Module 2 Pot Box module 3 Throttle Linkage...
Страница 72: ...TAYLOR DUNN...
Страница 85: ...Maintenance Service and Repair F2 F3 Transmission Page 13 EXPLODED VIEW...
Страница 86: ...TAYLOR DUNN...
Страница 94: ...TAYLOR DUNN...
Страница 100: ...TAYLOR DUNN...
Страница 106: ...TAYLOR DUNN...
Страница 116: ...TAYLOR DUNN...
Страница 172: ...Illustrated Parts Parts Page 2 Front Axle...
Страница 176: ...Illustrated Parts Parts Page 6 STEERING...
Страница 178: ...Illustrated Parts Parts Page 8 STEERING GEAR...
Страница 180: ...Illustrated Parts Parts Page 10 PARK BRAKE...
Страница 182: ...Illustrated Parts Parts Page 12 DEADMAN SEAT BRAKE optional...
Страница 184: ...Illustrated Parts Parts Page 14 MASTER CYLINDER BRAKE LINKAGE...
Страница 186: ...Illustrated Parts Parts Page 16 HYDRAULIC BRAKE LINES...
Страница 188: ...Illustrated Parts Parts Page 18 FRONT BRAKES optional REAR BRAKES...
Страница 195: ...Illustrated Parts Parts Page 25 This page intentionally left blank...
Страница 196: ...Illustrated Parts Parts Page 26 Motors P1 16 17 6 8 15 Typical GE Motor 9 12 13 9 5 3 4 2 1 14 10 11 7...
Страница 198: ...Illustrated Parts Parts Page 28 16 17 6 8 15 Typical GE Motor 9 12 13 9 5 3 4 2 1 14 10 11 7 Motors P2...
Страница 202: ...Illustrated Parts Parts Page 32 POWER TRACTION DRIVE...
Страница 204: ...Illustrated Parts Parts Page 34 REAR DIFFERENTIAL...
Страница 208: ...Illustrated Parts Parts Page 38 Tires Wheels 10 Ref wheel hub 1 2 5 assembly 4 3 6 7 8 9...
Страница 210: ...Illustrated Parts Parts Page 40 CONTROL PANEL...
Страница 212: ...Illustrated Parts Parts Page 42 CONTROL PANEL EE...
Страница 216: ...Illustrated Parts Parts Page 46 DECALS MISCELLANEOUS STANDARD PARTS...
Страница 218: ...Illustrated Parts Parts Page 48 MISCELLANEOUS STANDARD PARTS Cont d...
Страница 220: ...Illustrated Parts Parts Page 50 Options...
Страница 222: ...Illustrated Parts Parts Page 52...
Страница 224: ...Illustrated Parts Parts Page 54...
Страница 226: ...Illustrated Parts Parts Page 56...
Страница 228: ...Illustrated Parts Parts Page 58...
Страница 230: ...Illustrated Parts Parts Page 60...
Страница 232: ...Illustrated Parts Parts Page 62...
Страница 234: ...Illustrated Parts Parts Page 64...
Страница 238: ...Illustrated Parts Parts Page 68...
Страница 244: ...Illustrated Parts Parts Page 74...
Страница 246: ...TAYLOR DUNN...


