background image

Page 

6

 of 

29


It is your responsibility to make sure that you record in the correct format and frame rate, so ask the 
Post Production Supervisor for the correct settings to use. NEVER GUESS. NEVER ASSUME. Different 
editing houses and labs may prefer different settings according to their software and in-house workflow. 

If you are selecting the pull-down or pull-up rate (48k +/-), you can select the FAKE RATE button  in order 
to stamp a 48k label onto a file in order to fool some recorders into performing a pull-up or pull-down in 
order to sync up with some sprocketed FILM projects.  

Otherwise, use the Actual Rate setting.  

(You select the bit rate, 16 or 24, from the 

REC SETUP

 screen, 

File Format

 tab, as described further 

below). 

Select 

NEXT

 at the bottom of the screen… 


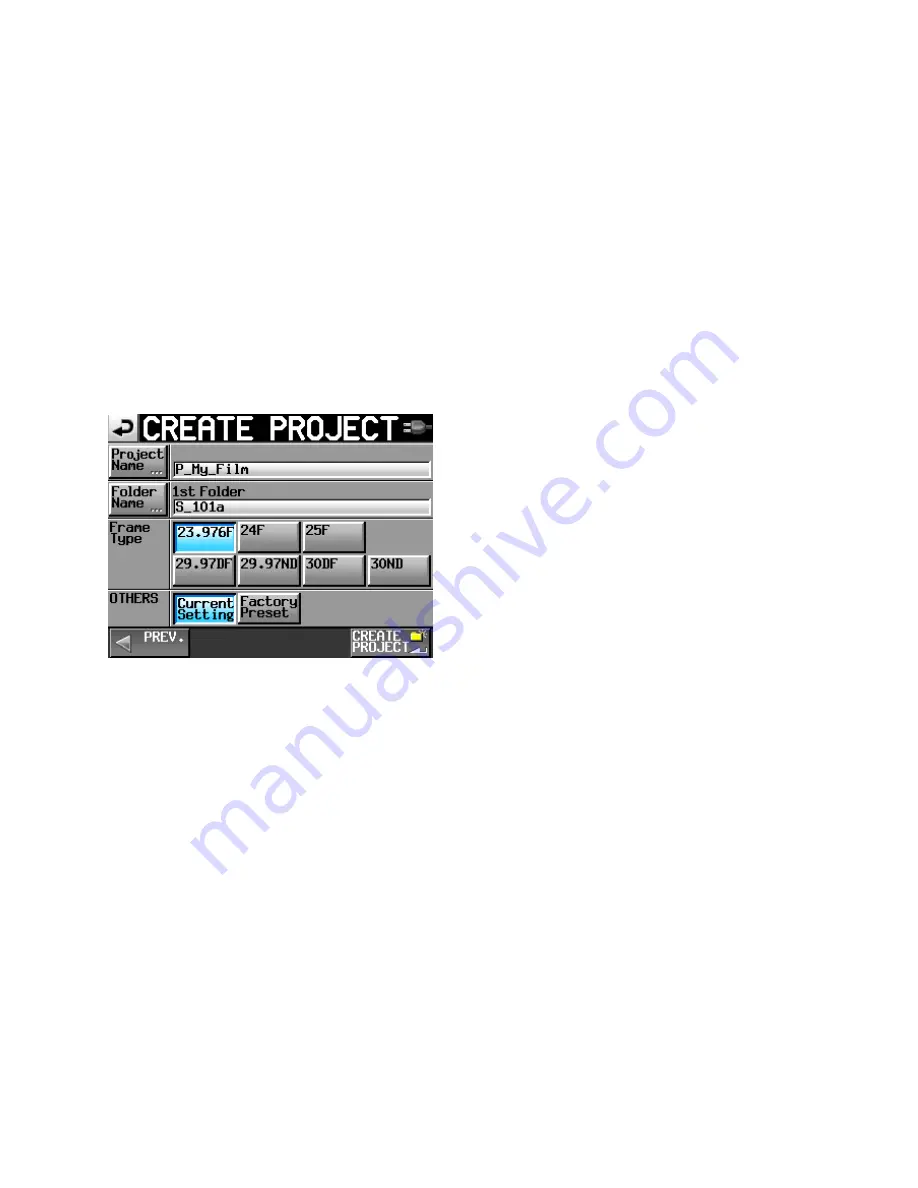
Select the correct 

FRAME RATE

 for your project.  Most so called 24 frame video and HD video is actually 

23.976.  Standard video is 29.97 (drop frame or non-drop frame, make sure you know which is correct). 
Sprocketed or electronic FILM may require 24F or 30ND; be sure to ASK the lab or the Post Production 
Supervisor. 

After entering all of your parameters, you may finalize your choices by confirming the 

CREATE PROJECT 

button at the bottom of the screen. 


Содержание HS-P82

Страница 1: ...er along with explanations and a suggested workflow for professional film video applications It is not meant to replace the comprehensive Owners Manuals provided with the equipment but rather to suppl...

Страница 2: ...adapter or external 12vDC via industry standard XLR 4 pin connector The unit comes with an NP style Battery pack that takes 10 AA alkalines Even if you are planning to use AC or external power it is...

Страница 3: ...ith a fresh one Perform a quick format and then set up your project files so that your recorder is good to go Keep a written notepad with all of your project specs and naming conventions so that all o...

Страница 4: ...tup From the MENU button select the SYSTEM SETUP screen Keyboard type US Solo mode The default setting for SOLO is SINGLE That means only one channel at a time can be solo monitored If you change the...

Страница 5: ...those projects use different formats Press PROJECT button Select Create Project tab at bottom of screen Press the tab on the left to NAME your project DO NOT use the whole word project in your new na...

Страница 6: ...ll up or pull down in order to sync up with some sprocketed FILM projects Otherwise use the Actual Rate setting You select the bit rate 16 or 24 from the REC SETUP screen File Format tab as described...

Страница 7: ...to EDIT or manually enter User Bits This is non changing information that is part of the timecode data such as a date production number or other simple value You can also manually enter a start value...

Страница 8: ...e by most Sound Mixers since it allows the Tascam to continually update to the latest external jam sync code coming in REGEN is what we would commonly refer to as external timecode mode The Tascam rea...

Страница 9: ...uld say UNLOCK It is possible to lock groups of the controls should the need arise Enable the Record Tracks Before you can record to any tracks you must manually arm them that is enable them ready for...

Страница 10: ...for the Tascam is 24 bit which would be correct for music However for film video the 16 bit setting is more prevalent but some productions do use 24 bit Always ASK the Post Production Supervisor what...

Страница 11: ...k controller knob is master over the group For most film video production you would not use this feature The INPUT tab lets you select analog or digital input for each channel If you are bringing in d...

Страница 12: ...utput level knob is another virtual knob marked L R When this virtual knob is depressed it becomes linked to the DATA knob It is the pan control for the output and determines the stereo mix to the mas...

Страница 13: ...eader at your local computer store You will need it for copying dailies on the set anyway With your recorder powered OFF insert the compact flash card into slot 1 Depress the PAUSE and RECORD buttons...

Страница 14: ...urces If your input device is at line level but you feel that the feed is still a bit on the low side according to your meters you can adjust the line level overall sensitivity by going to the SYSTEM...

Страница 15: ...ed for recording will display with red track names You can name each take by pressing the edit button Most soundmixers just use the prefix T for take just as we use the prefix S for scene and P for pr...

Страница 16: ...advantage of using this screen instead of the Channel Setup screen for these functions is that the PAN LEVEL screen shows meters for each channel as well as the master LR mix To return to the root HO...

Страница 17: ...volume to an optimum level on its meter For most film video applications that would be approximately 20dB or 18dB This level allows for plenty of headroom in the event of a loud exclamation or sound e...

Страница 18: ...take into the current location Then just use the PLAY keys When it is time to roll sound for a new take just press RECORD The take number will automatically increment to the correct number regardless...

Страница 19: ...at 23 976 timecode or whatever your timecode rate is The following reference tone will be 30 seconds recorded at negative 20dB or whatever your headtone reference level is Press STOP Go to the System...

Страница 20: ...E number you need to remember that Tascam uses the term FOLDER instead of scene Go to the PROJECT screen either by pressing the scene take box just above the meters on the HOME screen or by pressing t...

Страница 21: ...ant phase cancellation of multiple mics hearing the same sound and mixing them onto the same track Multi track recording allows us to capture the live mix as well as the isolation tracks from all of o...

Страница 22: ...suitable for rebuilding the soundtrack during editing Determine if your mixing board is suitable for accessing the direct outs You may need to step up to a higher caliber board You also need to check...

Страница 23: ...el then go ahead and send each of them respectfully to only L100 or R100 Otherwise use your external mixing board as you normally would Connect your boom operator to an Aux Out or Comm Out connect you...

Страница 24: ...is technically not a mixing panel it is a remote controller for the recorder That being said for all intents and purposes it serves the purpose of a mixing panel for our application The unit allows u...

Страница 25: ...ics on the set But for the overwhelming majority of projects 8 mics is more than sufficient Connecting the RC F82 to the recorder Cables required PS 2 male to PS 2 male jumper cable supplied inch ster...

Страница 26: ...tions recorded with multi track iso s it is customary to only provide a monaural mixdown for dailies and picture edit so this is normally not an issue But if it is then have a technician build you an...

Страница 27: ...st above the module for Channel 8 Another way to address your Boom Operator is to use the slate mic located on the recorder itself Be aware however that any audio from the slate mic goes onto all of t...

Страница 28: ...volume Any changes to that pot will affect the level of the recording Monitor Feed for Director Script It is customary on major sets to provide wireless headphones to the Director Script Supervisor a...

Страница 29: ...ct the button marked TRIM LEVEL Note that the top word represents the encoder knob and the lower word represents the slider For music recording you might want to reverse it and use the slider to contr...

Отзывы: