background image

14 

TASCAM  Model 24

Precauciones de aparatos inalámbricos

Conformidad para la emisión de radio e 

interferencias 

Este producto dispone de la función de emisor de banda amplia 
y usa la banda de 2.4 GHz.
Rango de frecuencias usadas: 2400 – 2480 MHz
Potencia salida máxima: Bluetooth® Class 2 (inferior a 2.5 mW)
Utilice este aparato únicamente en el país o región en el que lo 
haya adquirido. Dependiendo del país, es posible que existan 
determinadas limitaciones al uso de la tecnología inalámbrica 
Bluetooth.

Modelo para EE.UU.

Declaración de conformidad

Respons

able: TEAC AMERICA, INC.

Dirección:   10410  Pioneer  Blvd. 

Suite #1

, Santa Fe 

Springs, California 90670, U.S.A.

Teléfono: 1-323-726-0303

Este dispositivo cumple con lo indicado en la sección 15 de 
las normas FCC y su funcionamiento está sujeto a las dos 
condiciones siguientes: (1) este aparato no debe producir 
interferencias molestas, y (2) este aparato debe aceptar 
cualquier interferencia que reciba, incluso aquellas que 
produzcan un funcionamiento no deseado.

Etiqueta de autorización
FCC ID: XEG-MODEL24

Modelo para la Unión Europea

Por la presente, TEAC Corporation declara 
que el dispositivo de radio de este aparato 
cumple con la Directiva 2014/53/EU., así como 
otras Regulaciones y Directivas de la Comisión 
Europea.

El texto completo de la declaración de conformidad para  la EU 
está disponible en la siguiente página web. En caso de dudas, 
póngase en contacto con nosotros vía email. 

https://www.tascam.eu/en/kontakt.html

Importador para la UE: TEAC Europe GmbH
Bahnstrasse 12, 65205 Wiesbaden-Erbenheim, Germany 

Requisitos de exposición a radiaciones

Este aparato cumple con todas las normativas y regulaciones, 
reconocidas internacionalmente, relacionadas con la exposición 
de los seres humanos a las ondas de radio generadas por el 
transmisor.

Declaración de cumplimiento

Modelo para EE.UU.

Este aparato cumple con los límites de exposición a 
radiaciones expuestos en la FCC/IC en lo relativo a entornos no 
controlados y cumple con las reglas generales de exposición a 
radiofrecuencias.

Modelo para EE. UU./Canadá

Este aparato digital de clase B cumple con la Normativa 
Canadiense ICES-003.
Este aparato cumple con los límites de exposición a 
radiaciones expuestos en la FCC/IC en lo relativo a entornos no 
controlados y cumple con las reglas generales de exposición 
a radiofrecuencias (RF) FCC y con las normas de exposición a 
radiofrecuencias (RF) RSS-102 del IC. Este equipo tiene niveles 
muy bajos de energía de RF que quedan sobradamente por 
debajo de los valores indicados en la evaluación de exposición  
máxima (MPE). Aún así es recomendable que lo instale y utilice 
con el emisor a una distancia mínima de 20 cm con respecto al 
cuerpo de cualquier persona (excluyendo extremidades: manos, 
brazos, pies y piernas).

Modelo para la Unión Europea

Este equipo cumple con la norma EN.62311; Evaluación 
de equipos eléctricos y electrónicos en relación a las 
restricciones en la exposición de las personas a los campos 
electromagnéticos; standard armonizado por la DIRECTIVA 
2014/53/EU.

Содержание 24

Страница 1: ...ENGLISH FRAN AIS ESPA OL OWNER S MANUAL MODE D EMPLOI MANUAL DEL USUARIO 042862302 Model 24 Multitrack Live Recording Console...

Страница 2: ...os in this document are the trademarks or registered trademarks of their respective owners Information is given about products in this manual only for the purpose of example and does not indicate any...

Страница 3: ...h the limits for a Class B digital device pursuant to Part 15 of the FCC Rules These limits are designed to provide reasonable protection against harmful interference in a residential instal lation Th...

Страница 4: ...as been spilled or objects have fallen into the apparatus the apparatus has been exposed to rain or moisture does not operate normally or has been dropped The apparatus draws nominal non operating pow...

Страница 5: ...hazardous substances in the equipment d The Waste Electrical and Electronic Equipment WEEE symbols which show wheeled bins that have been crossed out indicate that electrical electronic equipment and...

Страница 6: ...he other Directives and Commission Regulations The full text of the EU declaration of conformity is available at the following internet address Please contact us by e mail https www tascam eu en konta...

Страница 7: ...d une tension dangereuse non isol e d une grandeur suffisante pour constituer un risque d lectrocution pour les personnes Le point d exclamation dans un triangle quilat ral sert pr venir l utilisateur...

Страница 8: ...uide a t renvers sur l appareil ou si des objets sont tomb s dedans si l appareil a t expos la pluie ou l humidit s il ne fonctionne pas normalement ou s il est tomb L appareil tire un courant nominal...

Страница 9: ...es sur l environnement et la sant humaine en raison de la pr sence de substances dangereuses dans les quipements d Le symbole de d chets d quipements lectriques et lectroniques DEEE qui repr sente une...

Страница 10: ...est disponible l adresse internet suivante veuillez nous contacter par e mail https www tascam eu en kontakt html Importateur pour l UE TEAC EUROPE GmbH Bahnstrasse 12 65205 Wiesbaden Erbenheim Allema...

Страница 11: ...rificado que este aparato cumple con los l mites establecidos para las unidades digitales de clase B de acuerdo a lo indicado en la secci n 15 de las normas FCC Esos l mites han sido dise ados para of...

Страница 12: ...jemplo si el cable de corriente o el enchufe se ha roto si se ha derramado cualquier l quido o se ha introducido un objeto dentro de la unidad si el aparato ha quedado expuesto a la lluvia o la humeda...

Страница 13: ...io ambiente y en la salud a causa de la presencia de sustancias potencialmente peligrosas que pueden contener d El s mbolo del cubo de basura tachado WEEE indica la obligaci n de separar los aparatos...

Страница 14: ...nosotros v a email https www tascam eu en kontakt html Importador para la UE TEAC Europe GmbH Bahnstrasse 12 65205 Wiesbaden Erbenheim Germany Requisitos de exposici n a radiaciones Este aparato cumpl...

Страница 15: ...ngs 32 Viewing the song list 32 Song Operation 32 Creating a New Song 32 Loading Songs 33 Saving the current song 33 Viewing song information 33 Clearing all marks 33 Deleting songs 33 Protecting unpr...

Страница 16: ...L R bus and monitor MONITOR OUT 1 2 0 03 AUX sends MON 1 MON 2 FX 0 0Input channels have 3 band semi parametric EQs with ad justable mid frequencies 0 0Outputs have a 7 band stereo graphic EQs useful...

Страница 17: ...web site to register your TASCAM product online https tascam com us Precautions for placement and use 0 0The operating temperature range of this unit is 5 35 C 0 0 Do not install this unit in the foll...

Страница 18: ...n recording with this unit using an SD card formatted by a computer or other device Bluetooth This unit has a built in Bluetooth audio receiver and can input sound played on a computer or portable aud...

Страница 19: ...AIN MIX L R PFL AFL L R MONITOR OUT 1 2 FX SUB L R c Analog output jack section Use this section to connect the output jacks and adjust the output equalizer d Screen operation section Use this section...

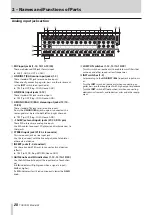
Страница 20: ...onnect CD players and similar devices to these jacks 6 STEREO input jack 21 22 stereo mini This stereo mini jack is a line input jack Use this to connect with the line output jack of a tablet or other...

Страница 21: ...right MAIN MIX L R buses i i When a PAN knob is turned all the way to the left L that channel signal is sent only to the left MAIN MIX L R bus It is not sent to the right bus i i When a PAN knob is t...

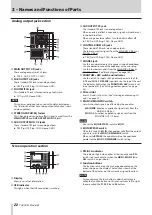
Страница 22: ...PFL AFL L R bus See Block diagram on page 160 c PHANTOM 48V switch and indicator Use this switch to supply 48V phantom power to the 1 2 3 12 and 13 14 19 20 MIC input jacks on the top of the unit The...

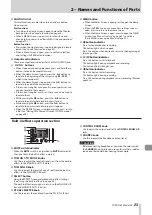
Страница 23: ...n is open press to open the Home Screen i i When the MENU Screen or a menu item settings screen is open press to return to the Home Screen i i When the Home Screen is open press to open the MENU Scree...

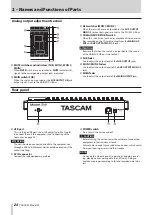
Страница 24: ...to adjust the output level of the SUB OUTPUT jacks P MON 1 MON 2 faders Use to adjust the output levels of the AUX OUTPUT MON 1 2 jacks A MAIN fader Use to adjust the output level of the MAIN OUTPUT j...

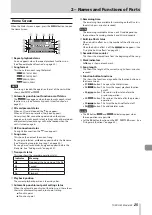
Страница 25: ...ing of the file 9 Paused 0 Recording 7 Playback 8 Playback position The current playback position is shown by a bar 9 Automatic punch in out point setting status When the automatic punch in out functi...

Страница 26: ...Press to show the level meters for channel 9 16 signals on the Meter Screen i i F4 Press to show the level meters for channel 17 22 and MAIN MIX L R bus signals on the Meter Screen Meter Screen detai...

Страница 27: ...ory default settings page 47 MEDIA FORMAT Format the SD card page 47 NOTE The settings for all menu items are retained even when the unit is turned off Basic MENU screen operations After using the MEN...

Страница 28: ...hen using a power strip or similar device be sure to use one that has high current capacity thick cable in order to minimize fluctuations in power voltage 0 0Before connecting audio equipment set the...

Страница 29: ...ise that could harm hearing for example Connecting a computer Use a commercially available Type A Type B USB cable to con nect the unit to a computer USB 2 0 port When the USB connection is working th...

Страница 30: ...noises could damage the speakers or harm your hearing Before turning the power on 1 Make the following settings on the top of the unit o o Other knobs w all the way left o o Faders w all the way down...

Страница 31: ...the display contrast 1 On the SYSTEM Screen select DISPLAY to open the DISPLAY Screen See Menu operation procedures on page 27 2 Select CONTRAST and press the MULTI JOG dial 3 Adjust the display cont...

Страница 32: ...a song operation turn the MULTI JOG dial to select the desired item and press the MULTI JOG dial LOAD SAVE Loads the selected song When the selected song is the current song SAVE will appear and infor...

Страница 33: ...the MULTI JOG dial The first page of the INFORMATION Screen will open The protection status song name sampling frequency bit rate size and date and time last written will be shown 4 Turn the MULTI JOG...

Страница 34: ...essage on the display Editing song names 1 Open the SONG Screen when the recorder is stopped See Menu operation procedures on page 27 2 Select the song with name that you want to change and press the...

Страница 35: ...els before loading Example Loading a song from a Model 16 to a Model 24 Source song Song after loading Tracks 1 14 Tracks 1 14 are loaded Empty tracks are created for tracks 15 22 Track 15 MAIN MIX L...

Страница 36: ...hantom power on off When phantom power is on the PHANTOM 48V indicator lights and phantom power is supplied to the MIC input jacks 1 12 13 14 19 20 VCAUTION Set the following knobs and faders to their...

Страница 37: ...t input signals have been assigned as track recording sources monitoring equipment has been connected and a song has been loaded 1 Press the REC buttons for channel to record Press the REC button to s...

Страница 38: ...ar 2 Press the F4 button to restore the previous operation and return to the state before undoing NOTE To cancel redoing press the F1 button Using the built in effects This unit has built in effects s...

Страница 39: ...e it Options 1 default 100 NOTE Press the F4 button to set the PARAMETER value for the currently selected TYPE to its default 5 Press the F3 button to turn the built in effect on The CURRENT STATUS wi...

Страница 40: ...in out function Punching in and out is a technique used to replace parts of already recorded tracks You can start playback of a recording switch to recording when it reaches the part to be replaced pu...

Страница 41: ...creen Automatic punch in out function Using the automatic punch in out function you can automati cally record between punch in and out points set in advance To use the automatic punch in out functions...

Страница 42: ...k from the pre roll point Both track playback and input source signals can be monitored See Setting a pre roll point on page 42 o o When the punch in point is reached only the input source signal will...

Страница 43: ...n 5 Select a WAV file to import o o Turn the MULTI JOG dial to select a WAV file o o Press the MULTI JOG dial when a folder is selected to show its contents o o Press the F1 button to return to the ME...

Страница 44: ...O MIX EXPORT item For details about menu operation see Menu operation procedures on page 27 3 Press the MULTI JOG dial to open the STEREO MIX EXPORT screen 4 Press the F4 button to start conversion NO...

Страница 45: ...tom of the display Mark icons appear below the playback position bar where marks are set 0 0The xx in the mark name is a number given to all marks that is incremented in order 0 0Marks added during re...

Страница 46: ...space used on the SD card REMAIN SIZE Shows the amount of space unused on the SD card SONG Screen The SONG Screen shows the use status of the MTR folder TOTAL SONG This shows the total number of songs...

Страница 47: ...matting SD cards Formatting erases all music files on the SD card and automati cally creates new MTR MUSIC and UTILITY folders as well as a tascam_m sys file ATTENTION i i Formatting an SD card erases...

Страница 48: ...F1 button to return to the MENU Screen o o Press the F2 button to move up one level NOTE Only WAV files can be played back Unsupported files will not be shown 5 Press the F4 button or 7 9 button to s...

Страница 49: ...to a USB port on the computer The USB cable can be connected either before or after turning this unit on 1 Use a USB cable Type A to Type B to connect the comput er to this unit s USB port ATTENTION T...

Страница 50: ...e unit to the MUSIC folder ATTENTION i i The UTILITY folder is used when updating the unit system for example i i Do not change names delete or otherwise alter individual files inside the MTR folder D...

Страница 51: ...he computer to be used with the unit 2 Uncompress the saved software zip file on the computer desktop or another location 3 Double click the TASCAM_Model_Mixer_Installer_x xx exe file in the folder th...

Страница 52: ...staller starts click the Continue button 4 Next select the desired language and click the Continue button 5 Click the Read License button and check the contents of the Software License Agreement If yo...

Страница 53: ...downloaded from the Internet Are you sure you want to open it might appear as a security warning message In this case click the Open button Changing the Gatekeeper setting The Gatekeeper setting can b...

Страница 54: ...software for exam ple can be shown when the Settings Panel is launched NOTE Put a check in the Do not show the same message again checkbox to prevent the same message from being shown the next time i...

Страница 55: ...while Windows Media Player is running the software will not recognize that the device has been changed In this case restart Windows Media Player i i If you still cannot hear sound after making the set...

Страница 56: ...the current song load another song first Invalid I O point The punch in out point settings on the AUTO PUNCH Screen are not set correctly Automatic punching in out occurred at an invalid position for...

Страница 57: ...s turn the unit off and restart it If these error messages continue to appear frequently please contact the store where you purchased this unit or TASCAM customer support service Device Error File Err...

Страница 58: ...ing frequency 44 1 48 kHz and a bit depth 16 24 bit that are supported by this unit There is noise 0 0Confirm that the connection cables do not have contact issues Sound via Bluetooth breaks up or is...

Страница 59: ...he above methods do not resolve the problem connect the unit to a different USB port on the computer When connected by USB sound breaks up or noise occurs 0 0The processing load on the computer causes...

Страница 60: ...range 20 30 dB Input impedance 22 k INSERT jacks 1 2 Connectors 6 3mm 1 4 standard TRS jacks Tip SEND Ring RETURN Sleeve GND RETURN Ring Nominal input level 0 dBu Maximum input level 18 dBu Input imp...

Страница 61: ...r settings and other operating conditions Mac Supported operating systems macOS Mojave 10 14 or later macOS High Sierra 10 13 or later macOS Sierra 10 12 or later OS X El Capitan 10 11 or later Comput...

Страница 62: ...n the surrounding environment and radio wave conditions Other Power AC100 240V 50 60 Hz Power consumption 52W Dimensions With side panels 576 0 513 0 117 4 mm W x H x D including protru sions Without...

Страница 63: ...sur un morceau 80 Cr ation d un nouveau morceau 80 Chargement de morceaux 81 Sauvegarde du morceau actuel 81 Affichage des informations de morceau 81 Suppression de tous les marqueurs 81 Suppression d...

Страница 64: ...le bus de retour sorties MONITOR 1 2 0 03 d parts auxiliaires MON 1 MON 2 FX 0 0Les canaux d entr e ont des galiseurs semi param triques 3 bandes avec r glage de fr quence des m diums 0 0Les sorties...

Страница 65: ...emploi 0 0La plage de temp rature de fonctionnement de cette unit se situe entre 5 C et 35 C 0 0 Ne placez pas cette unit dans les types d emplacement suivants Cela pourrait d grader la qualit sonore...

Страница 66: ...gistrement avec cette unit au moyen d une carte SD format e par un ordinateur ou un autre appareil Bluetooth Cette unit a un r cepteur audio Bluetooth int gr qui lui permet de recevoir le son lu par u...

Страница 67: ...s MAIN MIX L R PFL AFL L R MONITOR OUT 1 2 FX SUB L R c Section des prises de sortie analogiques Utilisez cette section pour raccorder les prises de sortie et r gler l galiseur de sortie d Section de...

Страница 68: ...lisez des c bles RCA pour connecter des lecteurs de CD et autres appareils similaires ces prises 6 Prise d entr e STEREO 21 22 mini jack st r o Cette prise mini jack st r o est une entr e audio de niv...

Страница 69: ...it du bus MAIN MIX L R i i Quand un bouton PAN est tourn fond gauche L le signal de ce canal n est envoy qu au c t gauche du bus MAIN MIX L R Il n est pas envoy au c t droit i i Quand un bouton PAN es...

Страница 70: ...hon masse x Prise PHONES Utilisez cette prise jack st r o standard pour brancher un casque st r o Utilisez un adaptateur pour brancher un casque fiche mini jack Elle sert contr ler auditivement les si...

Страница 71: ...and l cran des indicateurs de niveau est ouvert pressez cette touche pour ouvrir l cran d accueil i i Quand l cran MENU ou un cran de r glage de param tre de menu est ouvert pressez cette touche pour...

Страница 72: ...UTPUT P Faders MON 1 MON 2 Servent r gler les niveaux de sortie par les prises AUX OUTPUT MON 1 2 A Fader MAIN Sert r gler le niveau de sortie par les prises MAIN OUTPUT Face arri re S Port USB C est...

Страница 73: ...on de lecture La position de lecture actuelle est indiqu e par une barre 9 Position des points de punch in out automatique Lorsque la fonction de punch in out automatique est activ e cela affiche la p...

Страница 74: ...ur lors de l utilisation comme interface audio USB NOTE Les signaux sortant de l ordinateur y compris venant de Win dows Media Player et d iTunes sont envoy s aux canaux 1 2 Structure du menu Quand l...

Страница 75: ...r l cran d accueil depuis un cran MENU Pressez la touche F1 Proc dures d utilisation du menu Cette explication prend pour exemple le r glage d un point de pr d filement pre roll 1 Pressez la touche ME...

Страница 76: ...multiprise ou un dispositif similaire veillez ce qu elle ait une capacit de courant suffisante c ble de forte section pour minimiser les fluctuations de tension d alimentation 0 0Avant de brancher du...

Страница 77: ...d endommager votre audition Branchement d un ordinateur Utilisez un c ble USB type A type B du commerce pour brancher l unit un port USB 2 0 d un ordinateur Quand la connexion USB fonctionne le voyan...

Страница 78: ...t parleurs ou votre audition Avant de mettre sous tension 1 Faites les r glages suivants sur le dessus de l unit o o Autres boutons w fond gauche o o Faders w tout en bas o o Commutateurs w d sactiv s...

Страница 79: ...nnez DISPLAY cran pour ouvrir l cran DISPLAY voir Proc dures d utilisation du menu en page 75 2 S lectionnez CONTRAST contraste et pressez la molette MULTI JOG 3 R glez le contraste de l cran Options...

Страница 80: ...ette MULTI JOG afin de s lectionner l action d sir e et pressez la molette MULTI JOG LOAD SAVE Charge le morceau s lectionn Lorsque le morceau s lectionn est le morceau actuel SAVE appara t et les inf...

Страница 81: ...rceau dont vous souhaitez v rifier les informations et pressez la molette MULTI JOG pour ouvrir la fen tre locale de menu 3 S lectionnez INFORMATION et pressez la molette MULTI JOG La premi re page de...

Страница 82: ...d autres op rations i i Si vous essayez d ex cuter une op ration interdite modification enregistrement suppression sur un morceau prot g Song is protected le morceau est prot g s affiche dans un mess...

Страница 83: ...canaux Exemple chargement d un morceau d un Model 16 dans un Model 24 Morceau source Morceau apr s chargement Pistes 1 14 Les pistes 1 14 sont charg es Des pistes vides sont cr es pour les pistes 15 2...

Страница 84: ...e le voyant PHANTOM 48V est allum et l alimentation fant me est fournie aux prises d entr e MIC 1 12 13 14 19 20 VMISE EN GARDE R glez les boutons et faders suivants au minimum avant de changer le r...

Страница 85: ...es micros guitares et autres sources enregistrer ont t branch s l unit que les signaux d entr e ont t assign s comme sources d enregistrement pour les pistes qu un quipement d coute de contr le a t co...

Страница 86: ...cueil pressez la touche F3 Le message de confirmation suivant appara tra 2 Pressez la touche F4 pour restaurer l op ration pr c demment annul e et revenir l tat d avant l annulation NOTE Pour au contr...

Страница 87: ...e vous le modifiez Options 1 par d faut 100 NOTE Pressez la touche F4 initialiser pour ramener le param tre PARAMETER du TYPE actuellement s lectionn sa valeur par d faut 5 Pressez la touche F3 pour a...

Страница 88: ...ch in out Le r enregistrement partiel ou punch in out est une technique servant remplacer des parties de pistes d j enregistr es Vous pouvez lancer la lecture d un enregistrement basculer en enregistr...

Страница 89: ...ch in out automatique Gr ce la fonction de punch in out automatique vous pouvez automatiquement passer en enregistrement entre des points de punch in et punch out d finis l avance Pour utiliser les fo...

Страница 90: ...int de pr d filement pre roll Les signaux des pistes lues et ceux des sources d entr e peuvent tre entendus voir R glage d un point de pr d filement en page 90 o o Quand le point de punch in est attei...

Страница 91: ...C s afficheront 5 S lectionnez un fichier WAV importer o o Tournez la molette MULTI JOG pour s lectionner un fichier WAV o o Pressez la molette MULTI JOG quand un dossier est s lectionn pour afficher...

Страница 92: ...r le fonctionnement du menu voir Proc dures d utilisation du menu en page 75 3 Pressez la molette MULTI JOG pour ouvrir l cran STEREO MIX EXPORT exporter le mixage st r o 4 Pressez la touche F4 pour l...

Страница 93: ...x endroits o des marqueurs ont t plac s 0 0Le xx dans le nom du marqueur est un nombre incr mentiel donn chaque marqueur selon son ordre d apparition 0 0Les marqueurs ajout s pendant l enregistrement...

Страница 94: ...encore libre sur la carte SD cran SONG L cran SONG affiche l tat du dossier MTR enregistrement multipiste TOTAL SONG Affiche le nombre total de morceaux dans le dossier MTR cran FIRMWARE L cran FIRMWA...

Страница 95: ...i Le r glage de date et d heure n est pas initialis Formatage des cartes SD Le formatage efface tous les fichiers musicaux de la carte SD et cr e automatiquement de nouveaux dossiers MTR MUSIC et UTIL...

Страница 96: ...fficher son contenu o o Pressez la touche F1 pour revenir l cran MENU o o Pressez la touche F2 pour remonter d un niveau dans les dossiers NOTE Seuls des fichiers WAV peuvent tre lus Les fichiers non...

Страница 97: ...onnect e un ordinateur par USB Pour la connexion l ordinateur utilisez un c ble USB 2 0 de type A vers type B pour relier le port USB l arri re de cette unit un port USB de l ordinateur Le c ble USB p...

Страница 98: ...ns l ordinateur pour afficher les dossiers MTR MUSIC et UTILITY 3 Faites glisser sur le dossier MUSIC les fichiers de l ordinateur que vous d sirez transf rer dans l unit ATTENTION i i Le dossier UTIL...

Страница 99: ...rdinateur ou un autre emplacement 3 Double cliquez sur le fichier TASCAM_Model_Mixer_ Installer_x xx exe dans le dossier qui appara t apr s d compression pour lancer le logiciel d installation ATTENTI...

Страница 100: ...langue souhait e et cliquez sur le bouton Continue Continuer 5 Cliquez sur le bouton Read License Lire la licence et prenez connaissance du contrat de licence du logiciel Si vous tes d accord avec le...

Страница 101: ...e depuis internet tes vous s r de vouloir l ouvrir peut appara tre comme message d avertissement de s curit Dans ce cas cliquez sur le bouton Ouvrir Changement du r glage de Gatekeeper Le r glage de...

Страница 102: ...reil peuvent par exemple tre affich es lorsque le panneau de r glages est lanc NOTE Cochez l option Do not show this message again ne plus afficher ce message afin d viter que le m me message ne s aff...

Страница 103: ...r glage pendant que le lecteur Windows Media est en fonction le logiciel ne d tectera pas que le p riph rique a t modifi Dans ce cas relancez le lecteur Windows Media i i Si vous n entendez toujours...

Страница 104: ...actuellement charg chargez d abord un autre morceau Invalid I O point Les r glages de points de punch in out en cran AUTO PUNCH ne sont pas correctement faits Le punch in out automatique est programm...

Страница 105: ...a Si une de ces erreurs survient teignez l unit et rallumez la Si le message d erreur continue de s afficher veuillez contacter le magasin dans lequel vous avez achet cette unit ou un service apr s ve...

Страница 106: ...le bruit La lecture est impossible 0 0Si vous essayez de lire un fichier WAV v rifiez qu il utilise une fr quence d chantillonnage 44 1 48 kHz et une r solution 16 24 bit prises en charge par cette u...

Страница 107: ...robl me connectez l unit un autre port USB de l ordinateur Lors de la connexion par USB le son s interrompt ou du bruit se produit 0 0La charge de traitement de l ordinateur peut entra ner des interru...

Страница 108: ...e de gain 20 30 dB Imp dance d entr e 22 k Prises INSERT 1 2 Connecteurs jacks 6 35 mm 3 points TRS standard pointe d part bague retour manchon masse RETOUR bague Niveau d entr e nominal 0 dBu Niveau...

Страница 109: ...urs param tres et d autres conditions de fonctionnement Mac Syst mes d exploitation pris en charge macOS Mojave 10 14 ou ult rieur macOS High Sierra 10 13 ou ult rieur macOS Sierra 10 12 ou ult rieur...

Страница 110: ...fonction de l environnement et de la pr sence d ondes radio Autres Alimentation CA 100 240 V 50 60 Hz Consommation lectrique 52 W Dimensions Avec les flancs 576 0 x 513 0 x 117 4 mm L x H x P avec pa...

Страница 111: ...n de una nueva canci n 128 Carga de canciones 129 Almacenamiento de la canci n activa 129 Visualizaci n de informaci n de canci n 129 Borrado de todas las marcas 129 Borrado de canciones 129 Protecci...

Страница 112: ...bus SUB L R y monitor MONITOR OUT 1 2 0 03 env os AUX MON 1 MON 2 FX 0 0Los canales de entrada tienen EQ semiparam trico de 3 bandas con frecuencia de medios ajustable 0 0Las salidas tienen EQ gr fic...

Страница 113: ...a la ubicaci n y uso 0 0El rango de temperaturas seguro para el uso de este aparato es entre 5 35 C 0 0 Para evitar degradar la calidad del sonido o que se produzcan aver as no instale la unidad en lo...

Страница 114: ...rjetas SD que vaya a usar en ella Se pueden producir errores al grabar en esta unidad en una tarjeta SD formateada en un ordenador u otro dispositivo Bluetooth Esta unidad dispone de un receptor audio...

Страница 115: ...os a cada bus MAIN MIX L R PFL AFL L R MONITOR OUT 1 2 FX SUB L R c Secci n de tomas de salida anal gicas Use esta secci n para conectar las tomas de salida y ajustar los ecualizadores de salida d Sec...

Страница 116: ...productores de CD y otros dispositivos similares 6 Tomas de entrada STEREO 21 22 stereo mini Esta toma stereo mini es una entrada de l nea Use esta toma para conectar una salida de l nea de una tablet...

Страница 117: ...N completamente a la izquierda L la se al de ese canal ser enviada solo al bus MAIN MIX L R izquierdo No ser enviada se al de ese canal al bus derecho i i De la misma forma cuando gire un mando PAN co...

Страница 118: ...160 c Interruptor e indicador PHANTOM 48V Use este interruptor para pasar alimentaci n fantasma de 48V a las tomas de entrada 1 2 3 12 y 13 14 19 20 MIC del panel superior de la unidad El indicador se...

Страница 119: ...ntalla de medidor activa pulse aqu para acceder a la pantalla inicial i i Con la pantalla MENU o una pantalla de ajustes de elemento de men abierta pulse aqu para volver a la pantalla inicial i i Con...

Страница 120: ...las tomas SUB OUTPUT P Faders MON 1 MON 2 selos para ajustar el nivel de salida de las tomas AUX OUTPUT MON 1 2 A Fader MAIN selo para ajustar el nivel de salida de las tomas MAIN OUTPUT Panel trasero...

Страница 121: ...operativo de la grabadora Indicador Significado 8 Parado al principio del fichero 9 En pausa 0 Grabaci n 7 Reproducci n 8 Posici n de reproducci n La posici n de reproducci n activa es indicada con un...

Страница 122: ...medidores de nivel para los canales 9 16 en la pantalla de medidores i i F4 P lselo para ver los medidores de nivel para los canales 17 22 y el bus MAIN MIX L R en la pantalla de medidores Detalles de...

Страница 123: ...E Restaura los valores por defecto page 143 MEDIA FORMAT Formatea la tarjeta SD page 143 NOTA Los ajustes de todos los elementos de men quedan memorizados cuando apague la unidad Operaciones b sicas d...

Страница 124: ...rica Cuando utilice una regleta o un dispositivo similar aseg rese de que tenga la capacidad de corriente suficiente grosor de cable y especificaciones t cnicas para evitar posibles flucturaciones de...

Страница 125: ...de tipo A a tipo B standard para conectar la unidad al puerto USB 2 0 de un ordenador Cuando la conexi n USB est operativa el piloto USB de la secci n de operaciones de la pantalla se iluminar ATENCI...

Страница 126: ...Se pueden producir ruidos fuertes capaces de da ar los propios auriculares o sus o dos Antes de encender la unidad 1 Realice los ajustes siguientes en el panel superior o o Otros mandos w tope izquie...

Страница 127: ...elija DISPLAY para acceder a la pantalla DISPLAY Vea Operaciones b sicas de pantalla MENU en p g 123 2 Elija CONTRAST y pulse el dial MULTI JOG 3 Ajuste el contraste de la pantalla Opciones 10 40 por...

Страница 128: ...para elegir el elemento que quiera y pulse el dial MULTI JOG LOAD SAVE Carga la canci n elegida Cuando la canci n seleccionada sea la canci n activa aparecer SAVE para que pueda almacenar la informac...

Страница 129: ...l listado desplegable 3 Elija INFORMATION y pulse el dial MULTI JOG Aparecer la primera p gina de la pantalla INFORMATION Aparecer el estado de protecci n nombre de canci n frecuencia de muestreo velo...

Страница 130: ...rotegida aparecer el mensaje Song is protected en un desplegable Edici n de nombres de canciones 1 Acceda a la pantalla SONG con la unidad parada Vea Operaciones b sicas de pantalla MENU en p g 123 2...

Страница 131: ...Ejemplo Carga de una canci n desde un Model 16 en un Model 24 Canci n origen Canci n despu s de la carga Pistas 1 14 Son cargadas las pistas 1 14 Son creadas pistas vac as para las pistas 15 22 Pista...

Страница 132: ...ctiva el piloto PHANTOM 48V se iluminar y ser suministrada alimentaci n fantasma a las tomas MIC 1 12 13 14 19 20 VCUIDADO Ajuste los siguientes mandos y faders a sus valores m nimos antes de cambiar...

Страница 133: ...siguientes asumimos que han sido conectados a la unidad micros guitarras y otros elementos para la grabaci n que las se ales de entrada han sido asignadas como fuentes de grabaci n de las pistas que t...

Страница 134: ...bot n F3 Aparecer el siguiente mensaje de confirmaci n 2 Pulse F4 para restaurar la operaci n anterior y volver al estado previo a deshacer la operaci n NOTA Para cancelar esta recuperaci n pulse el...

Страница 135: ...lo cambia Opciones 1 por defecto 100 NOTA Pulse F4 para ajustar a su valor por defecto el valor del elemento PARAMETER del elemento TYPE seleccionado en ese momento 5 Pulse F3 para activar el efecto...

Страница 136: ...despinchado Esta es una t cnica usada para sustituir partes de pistas ya grabadas Puede iniciar la reproducci n de una grabaci n cambiar a la grabaci n cuando llegue a la parte que quiera sustituir pi...

Страница 137: ...odr grabar de forma autom tica entre los puntos de pinchado y despinchado ajustados previamente Para usar estas funciones ponga en marcha la reproducci n desde un punto de pre rebobinado previo al pun...

Страница 138: ...la reproducci n desde el punto de pre rebobinado Podr monitorizar la reproducci n de la pista y la fuente de entrada Vea Ajuste de un punto de pre rebobinado en p g 138 o o Cuando la unidad llegue al...

Страница 139: ...peta MUSIC 5 Elija un fichero WAV a importar o o Gire el dial MULTI JOG para elegir un fichero WAV o o Pulse el dial MULTI JOG cuando haya elegido una carpeta para ver su contenido o o Pulse F1 para v...

Страница 140: ...cerca de las operaciones de men see Operaciones de men en p g 123 3 Pulse el dial MULTI JOG para acceder a la pantalla STEREO MIX EXPORT 4 Pulse el bot n F4 para iniciar la conversi n NOTA i i Si ya e...

Страница 141: ...puntos en los que haya ajustado las marcas 0 0El xx en el nombre de la marca es un n mero correlativo a adido a todas las marcas 0 0Las marcas a adidas durante la grabaci n ser almacenadas de forma au...

Страница 142: ...muestra la cantidad de espacio disponible en la tarjeta SD Pantalla SONG La pantalla SONG le muestra el estado de uso de la carpeta MTR TOTAL SONG Le muesta el n mero total de canciones en la carpeta...

Страница 143: ...SD El formateo borra todos los ficheros musicales que haya en la tarjeta SD y crea autom ticamente nuevas carpetas MTR MUSIC y UTILITY as como un nuevo fichero tascam_m sys ATENCI N i i El formateo d...

Страница 144: ...visualizar su contenido o o Pulse F1 para volver a la pantalla MENU o o Pulse F2 para subir un nivel NOTA Solo pueden ser reproducidos ficheros WAV Los ficheros en formatos no admitidos no ser n visua...

Страница 145: ...un puerto USB del ordenador Puede conectar el cable USB tanto con la unidad encendida como apagada 1 Use un cable USB tipo A a tipo B para conectar el ordenador con el puerto USB de esta unidad ATENCI...

Страница 146: ...a la carpeta MUSIC ATENCI N i i La carpeta UTILITY se usa para la actualizaci n del sistema de esta unidad por ejemplo i i No modifique los nombres ni elimine ni cambie de forma individual los fichero...

Страница 147: ...comprima el software fichero zip en el escritorio del ordenador o en otra ubicaci n 3 Haga doble clic en el fichero TASCAM_Model_Mixer_ Installer_x xx exe de la carpeta que aparece despu s de la desco...

Страница 148: ...ha haga clic en el bot n Continue 4 Despu s elija el idioma de comunicaci n que quiera y haga clic en el bot n Continue 5 Haga clic en el bot n Read License y compruebe el contenido del Acuerdo de Lic...

Страница 149: ...ation downloaded from the Internet Are you sure you want to open it En ese caso haga clic en el bot n Open Cambio del ajuste Gatekeeper La configuraci n del Gatekeeper puede ser modificada usando el e...

Страница 150: ...onectado a Internet es posible que aparezcan notificaciones cuando ejecute el Settings Panel NOTA Coloque una marca en el recuadro No volver a ver este mensaje para evitar que vuelva a aparecer el mis...

Страница 151: ...s MODE PC NOTA i i Si cambia el ajuste con Windows Media Player en ejecuci n el software no reconocer que el dispositivo ha sido modificado En ese caso reinicie el Windows Media Player i i Si sigue si...

Страница 152: ...oint Los puntos de pinchado despinchado de la pantalla AUTO PUNCH no est n correctamente ajustados El pinchado despinchado autom tico se ha producido en una posici n inv lida para el punto de pinchado...

Страница 153: ...dad y vuelva a encenderla Si el mismo mensaje de error sigue apareciendo con frecuencia p ngase en contacto con el comercio en el que adquiri esta unidad o con el departamento de atenci n al cliente d...

Страница 154: ...spositivos No es posible la reproducci n 0 0Si est tratando de reproducir un fichero WAV compruebe que usa una frecuencia de muestreo 44 1 48 kHz y profundidad de bits 16 24 bits admitidas por esta un...

Страница 155: ...enador 0 0Si los pasos anteriores no solucionan el problema conecte la unidad a otro puerto USB del ordenador Cuando la unidad est conectada v a USB el sonido se corta o se producen ruidos 0 0La carga...

Страница 156: ...ajuste de ganancia 20 30 dB Impedancia de entrada 22 k Tomas INSERT 1 2 Conectores TRS standard de 6 3 mm 1 4 Punta env o Anillo retorno Lateral masa RETURN retorno anillo Nivel de entrada nominal 0 d...

Страница 157: ...justes y condiciones operativas Mac Sistemas operativos admitidos macOS Mojave 10 14 o superior macOS High Sierra 10 13 o superior macOS Sierra 10 12 o superior OS X El Capitan 10 11 o superior Requis...

Страница 158: ...ircundante y de las condiciones de las onda de radio Otras Alimentaci n AC 100 240 V 50 60 Hz Consumo 52 W Dimensiones Con paneles laterales 576 0 513 0 117 4 mm L x A x P incluyendo salientes Sin pan...

Страница 159: ...TASCAM Model 24 159 117 4mm 99 9mm 513 0mm 580 0mm 31 5 mm Dimensional drawings Dessins avec cotes Esquema de dimensiones...

Страница 160: ...160 TASCAM Model 24 Block diagram Sch ma fonctionnel Diagrama de bloques...

Страница 161: ...6 3dBu 0dBu 0dBu MIC Max 10dBu MIC 8dBu MIC Max 10dBu LINE Max 22dBu LINE 4dBu LINE 26dBu MIC 58dBu AFL PFL AFL MASTER Max Max 18dBu 20 CONTROL ROOM PFL 10 0 10 20 MON LEVEL 0 CH LEVEL 10 0 10 FX LEVE...

Страница 162: ......

Страница 163: ...roduct to service However if the necessary repairs are covered by the warranty we will pay return surface shipping charges to any destination within the United States LIMITATION OF IMPLIED WARRANTIES...

Страница 164: ...irecci n del establecimiento WARRANTY Model 24 TEAC CORPORATION https tascam jp jp Phone 81 42 356 9143 1 47 Ochiai Tama shi Tokyo 206 8530 Japan TEAC AMERICA INC https tascam com us Phone 1 323 726 0...

Отзывы: